

Fusion 360 for Robotics Tutorial Series
- Part 1: Create a Robot Base in Fusion 360 — You are Here
- Part 2: Draw the Motor Mount in Fusion 360
- Part 3: Convert Bodies to Components for Assembly
- Part 4: Add Joints in Fusion 360
- Part 5: Generate Drawings, STLs, and G-code using Fusion 360
Overwhelmed by Fusion 360 or CAD modeling in general? Then you’ve come to the right place! In this 5-part tutorial series, we’re going to walk you through the process of designing a robot arm using Fusion 360.
After this tutorial series, you’ll have the ability to create custom components, assemblies, Bill of Materials, and render files for 3D printing.
This lesson will show you how to model the base of a robot arm. We’ll use the base to secure the arm to a surface, such as a table or a floor.
Let’s get started!
Download Fusion 360
This tutorial assumes you have Fusion 360 downloaded and a valid Autodesk Account.
Download a 12-month free subscription to Fusion 360 for Hobbyists, here.
The nice thing about Fusion 360 is that it’s compatible with both Windows and macOS. So, for all the fellow Mac users out there, you don’t have to dual-boot Windows to develop models!
Once you have Fusion 360 downloaded and launched, create a New Design. Go to File > New Design.

Now, we’re ready to begin modeling the robot base. Follow along with the video or feel free to read the project notes, below!
Popular Fusion 360 Hotkeys
In this tutorial, I use a lot of Hotkeys. I find that this is the quickest way to access tools within Fusion 360.
Here’s a list of the Hotkeys that I use in this Fusion 360 tutorial.
S: brings up the search menu
E: Extrude
D: Dimension
F: Fillet
H: Hole command
J: Joint
ESC: exit out of current
Download the Starter Code Files

Fusion 360 Tutorial for Robotics
Over the next few tutorials, we’ll create components for an Industrial Robot arm. In this tutorial, we’ll design the robot base. Here’s what the final part will look like.
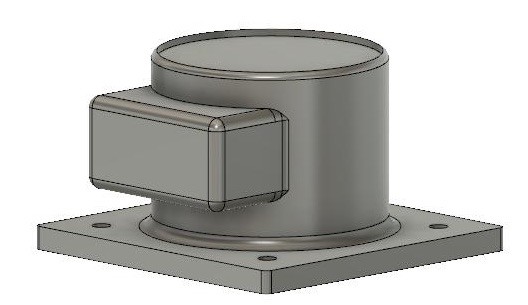
When you’re modeling, it’s important to break the component into smaller sub-components and then model the 2D shape. We’ll start by drawing a 140 mm by 140 mm square base on the top plane. Extrude the square up to 10 mm.
Next, create a circle with a 100 mm diameter on the top face of the extruded square. Extrude the circle up to 100 mm.
Then, create a mounting slot in the top of the cylinder for the first link. Draw a center circle with a 95 mm diameter on the top face of the cylinder. Extrude this inwards at 3 mm (-3 mm).
Finishing Touches for the Robot Base
Furthermore, design a box on the front face of the cylinder to store cables. Draw a 40 mm by 80 mm rectangle onto the front face. Then, apply dimensions so that the bottom left corner is 40 mm away from the origin in both the horizontal and vertical directions. Extrude the rectangle out about 70 mm.
Make sure that the extrusion is set to Join (not Cut) so that it adds to the component instead of subtracting away from the cylinder.

Lastly, we’ll add some mounting holes to the square base. These can be used to secure the robot to a table or surface. Create four points on the top face of the square base. The points are 20 mm from the corner in both the horizontal and vertical directions.
Next, use the Hole command to insert holes from the sketch. We’ll use the four points from before to line up the holes.
Finally, add some Fillets to the edges (as desired), and save your project!
Here’s what the robot base should look like at the end of this Fusion 360 Tutorial.

In the next tutorial, we’ll learn how to create links for our robot arm. If you have any questions be sure to drop a comment below.


