Engineers - Shift your Tech Career into the Robotics Industry in 90 days
Work alongside Robotics Engineers to unlock opportunities getting paid to build robots in Industrial Automation, AI/ML, IoT, Self-Driving Cars, Research, and more!

Share on facebook
Share on twitter
Share on linkedin
Share on pinterest

Arduino Weather Station (Updated 2019)

Disclosure: Some of the links below are affiliate links. This means that, at zero cost to you, I will earn an affiliate commission if you click through the link and finalize a purchase. Learn Robotics is a participant in the Amazon Services LLC Associates Program, an affiliate advertising program designed to provide a way for websites to earn advertising revenues by advertising and linking to Amazon.com.

Liz Miller Learn Robotics

Attention: Engineer Wanting a Career in Robotics

Liz here 👋, Engineer,  Robotics Expert & founder of this website.

If I offered to help you advance your 6-Figure+ Robotics, Automation, or AI Career with a $10,000 sign-on bonus in the next 90 days or less…

…without wasting time on unnecessary certifications…
…without studying another coding language or tactic…
…without needing to get another degree and wasting years…

…would you take me up on that offer?

LIMITED SPACE: I have 2 more client spots open this week!

Want a spot? Click the button to access my 12-min training below and then apply if it makes sense.

Recently I shared tutorials on using BME280 sensor and OLED Display with Arduino. I recommend you check it out if you haven’t already. In this article, we will make an indoor Arduino weather station. Previously, we made a simple weather station without sensors. But, for this project we will use an Arduino nano, a BME280 sensor, and an OLED display, along with a breadboard and jumpers for prototyping.

Once you gather the materials for this project, let’s start by assembling the circuit.

Assembling the Arduino Weather Station Circuit

We will use I2C for communication, so this is very simple wiring. Refer to the circuit diagram, below.

arduino weather station fritzing

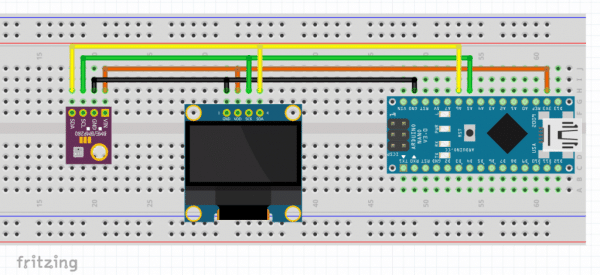
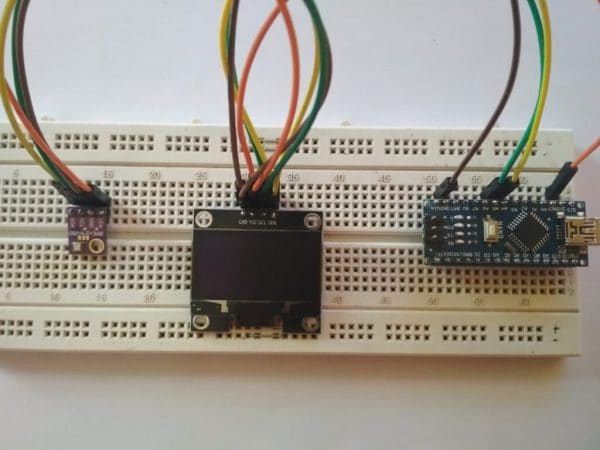
The connections are very simple, we use 4 wires to connect all the components. Just connect all the Grounds (GND) together and VDD/VIN to 3.3v. Next connect the SDA and SCL to A4 and A5 respectively. That’s all for the connections. Here is a picture of the circuit on actual breadboard.

arduino weather station assembled circuit

After making the circuit, it’s time to program it.

Program Arduino Weather Station

Next, it’s time to create a new sketch. Open the Arduino IDE. You’ll want to combine the code from the BME280 sensor and output the readings to the OLED display. While it’s always better to practice writing the code yourself, we’ve included some sample code below.

Here’s your download!

Download arduino_weather_station.ino

After the code is successfully uploaded to your Nano, you will notice the OLED light up and start displaying Temperature, Pressure, and Humidity.

Improvements and Modifications

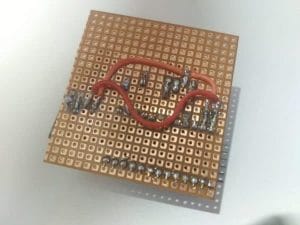
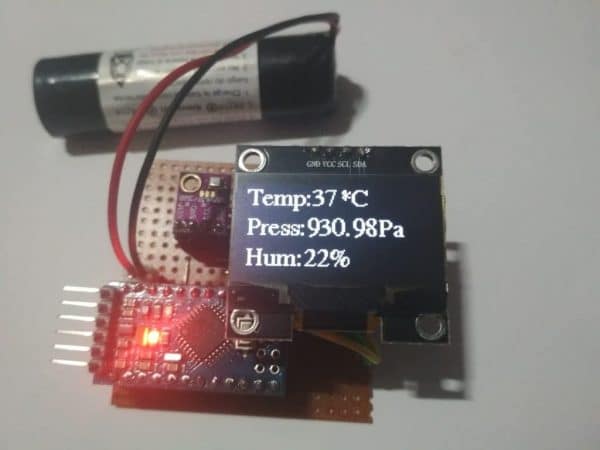
We can improve this prototype by making the circuit more permanent. To do this, you can solder everything on a perf board. I used an Arduino Pro Mini for the perf board circuit because it has a small footprint and low power requirement. The connections are same as the Nano. Just make sure you check the pinout diagram before finalizing the wires. Here are some pictures of the build.

soldered prototype for arduino weather station   full perf board arduino weather station assembly

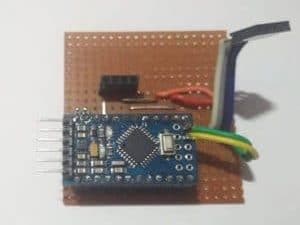
You’ll notice that this prototype is small but has some extra room on the top. This was intentional because I wanted extra enough room to add other sensors in the future.  The design depends on what you plan on making. I powered everything using 3.7v Li-ion battery.

This guide was designed to give you an overview of the electronics and coding for your very own Arduino weather station. In the next tutorial, I plan to add some more features to this project, and walk you through designing a custom enclosure.

completed arduino weather station with battery pack

I hope you enjoyed this article and learned something new. If you have questions or face any problems, feel free to ask in the comment section below.

Lastly, if you are into robotics, don’t forget to check out my eBook, “Mini WiFi Robot.”

Liz Miller Learn Robotics

Attention: Engineer Wanting a Career in Robotics

Liz here 👋, Engineer,  Robotics Expert & founder of this website.

If I offered to help you advance your 6-Figure+ Robotics, Automation, or AI Career with a $10,000 sign-on bonus in the next 90 days or less…

…without wasting time on unnecessary certifications…
…without studying another coding language or tactic…
…without needing to get another degree and wasting years…

…would you take me up on that offer?

LIMITED SPACE: I have 2 more client spots open this week!

Want a spot? Click the button to access my 12-min training below and then apply if it makes sense.

Leave a Reply

Your email address will not be published. Required fields are marked *

This site uses Akismet to reduce spam. Learn how your comment data is processed.

Did this content help you? 🤖
...say thanks and send us a coffee!

Experience Engineers & Tech Pro’s:

Gain personalized guidance and direct mentorship from Liz in her Robotics Mentorship Program.

This 12-week professional advancement program will help you soar to the next level in your engineering career. My clients earn $100k+ with a $10k+ sign on bonus.

You’ll uncover strategies they *don’t* teach you in engineering school to help you earn more and live a meaningful life, all while working in high-impact robotics, automation, and AI roles.

Are you next? Check out the 12-min training I put together and then apply if it makes sense.

WHAT IS LEARN ROBOTICS?

Learn Robotics helps self-starters, hobbyists, and tech professionals get started in the robotics industry. 

We leverage a simple formula to make it easy to gain highly marketable and high-value 6-figure robotics & automation skills. 

Learn Robotics was founded by Robotics Engineer, Liz Miller, and leverages the Robotics Success Equation, our unique methodology that helps people learn to build robots while enhancing their careers for the future.

liz's featured robotics PROJECT ON YOUTUBE

Learn Robotics Botly Favicon

MORE LEARN ROBOTICS ARTICLES

Apply to Work with Liz in her Robotics Mentorship Program for Tech Professionals

Liz Miller Learn Robotics