Have you ever wanted to make a simple weather station to see current weather condition? Do you have a YouTube Channel and want to gather the number of subscribers and the view count?
Then, you’ll want to stick around for this tutorial. A lot of tutorials use various sensors and devices to get the data. But when you are beginner you don’t really know how these sensors work or how to use them. So, today I’m going to share with you a simple method to make a weather station and YouTube display without any additional sensors. All you need is an ESP8266 development board, a breadboard, a momentary switch, a 220-ohm resistor, and a 10 K-ohm potentiometer. I recommend checking out this IoT kit, which includes everything you’ll need to get started. We’ll also use another website, RemoteMe.org, to complete this project.
This tutorial assumes you’ve used Arduino before and have the Arduino IDE downloaded. If not, check out our Simple Guide to Arduino Programming before you continue. So without wasting any time, let’s get started!
Setting Up Variables At RemoteMe
First, we will create variables at RemoteMe.org that will send data to our device over internet.
To create RemoteMe variables follow the steps below:
Head over to RemoteMe.org and login to your account (Create an account if you don’t already have one).

After logging in go to “Variables.” You will find it on the Menu on left side, Bellow “Devices”

On the Variables page there will be an add option on top right corner. Click on that option. A pop-up will appear where you will fill all the details. First you have to name the variable. Name can be anything depending on what the variable will be used for.
To create variables to fetch Weather Information, Name the variable “Weather.” Then select the mode “Remote.” Next, set the Remote Mode Group as “Weather.” Then select your country, timezone, and the date and Remote Mode to “Weather Now” to get current report. Refer to the image below.

The above variable will collect weather information like Temperature, Pressure and weather condition along with Time and Date.
Bonus: Display YouTube Subscriber Count
As a bonus, I wanted to show you how to monitor your YouTube channel’s growth using a similar methodology. First, you’ll need to find your channel ID which can be found in the URL.
Copy the Channel ID and make new variable. Name it “views” and fill in the information as shown in the image below. You can paste the Channel ID we copied before.
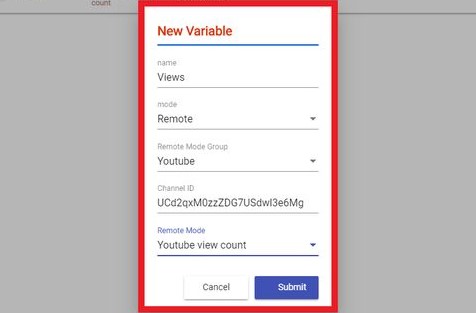
Now make a new variable for subscriber count the same way as the previous one. Here’s what it should look like:
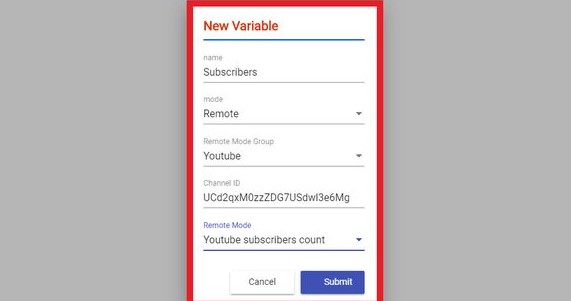
With that done, all the necessary variables are ready! Now we can move on to the next step.
Set Up the Device On RemoteMe
Once we have Variables setup on RemoteMe, we need a way for the NodeMCU to read them. The variables just store data gathered by RemoteMe. We can connect to these variables using some code in Arduino. First, let’s create an Arduino Device in RemoteMe.
Go to “Devices” and click on “New Device.” From the drop down menu, select “New Network Device,” and a pop-up will appear. Here select the device type “Arduino,” and name it something memorable, and give it a unique ID. Toggle on the active button, and click submit.

With that, you will see a new device created. Now it’s time to generate a code using Code Generator Wizard which can be found in the Burger menu in the top right corner (see red arrow below).

When you open the Code generator you will see a pop-up where you will select the variables which needs to be added to the code. So select the 3 variables we created, and hit next.

Then, enter your WiFi name and password and hit Next. This will connect your device to the network.

Now turn on the debug option. It will add Serial print statements in the code so all the data is displayed on the Serial Monitor.

In this step you will have two options either download or view the code. Go ahead and download the code.

Load the Code on your NodeMCU
Before we can upload the sketch to the NodeMCU, we need to install some additional libraries. Open up the Library Manager.
Here are the steps:
- Goto >> Sketch >> Include Library >> Manage Libraries.
- In the search bar, enter the name of the libraries. (ESP8266WiFi , ESP8266WiFiMulti, & RemoteMe)
- Install the Libraries
Now you can upload the code to the NodeMCU, and open Serial Monitor to watch the data.
Displaying Data On LCD
Now that you have successfully displayed data on ‘Serial Monitor,’ you can move on to display the data on a LCD screen so the project is more portable.
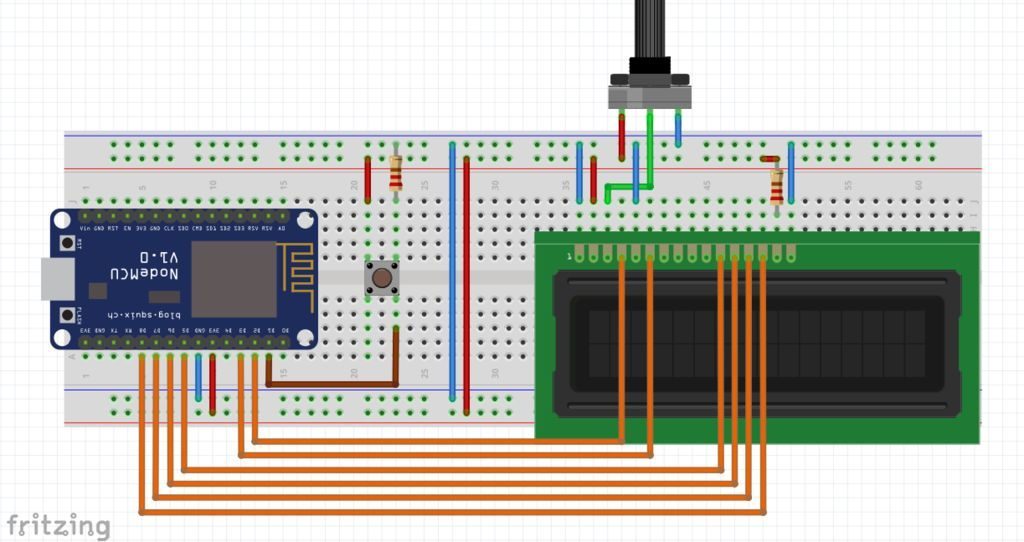
First place the NodeMCU board (ESP8266) on a breadboard, Connect its ‘3.3v’ to the ‘+ve’ rail of the breadboard and ‘Gnd’ to ‘-ve’ rail.
Next, connect a push button next to the MCU and connect its one pin to ‘-ve’ rail of breadboard through a ‘220 ohm’ resistor. And connect the same pin to ‘D2’ pin of the MCU. Connect the other pin of the push button to ‘+ve’ rail of the breadboard.
Now connect the LCD on the breadboard and follow the connections carefully.
- VSS >> -ve rail of breadboard.
- VDD >> +ve rail.
- V0 >> Middle terminal of potentiometer. (connect other two terminals to -ve and +ve)
- RS >> D2
- RW >> -ve rail.
- E >> D3 of MCU
- D4 >> D5
- D5 >> D6
- D6 >> D7
- D7 >> D8
- A >> +ve rail of breadboard through a 220 ohm resistor.
- K >> -ve rail
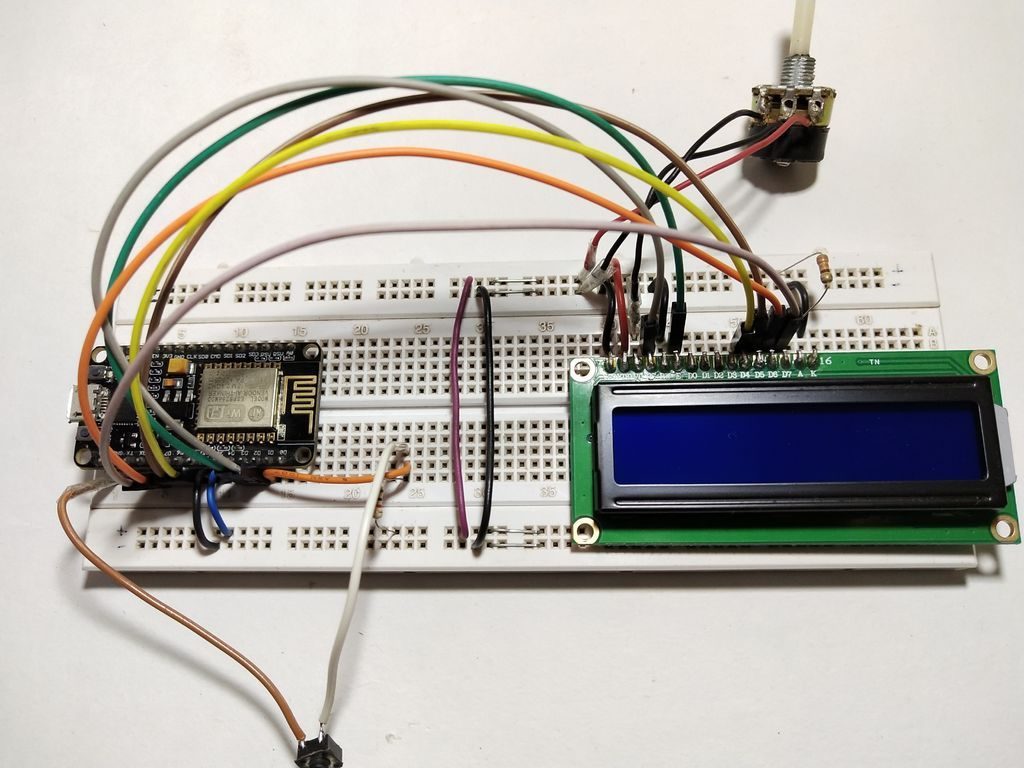
I know this is a bit confusing but check out the picture to get a better idea. Once that is done, upload the code. The code needs to be edited in order to work with LCD.
Let’s edit the previous code:
#define WIFI_NAME "WiFi Name"
#define WIFI_PASSWORD "WiFi Password"
#define DEVICE_ID 1
#define DEVICE_NAME "Device Name"
#define TOKEN "Add Token"
#define btn D1  //Declare a button variable for push button

#include<RemoteMe.h>
#include<RemoteMeSocketConnector.h>
#include<ESP8266WiFi.h>
#include<ESP8266WiFiMulti.h>
#include<LiquidCrystal.h> //including library to use LCD

LiquidCrystal lcd(D2, D3, D5, D6, D7, D8); //mapping LCD pins to ESP's pins

/* Variables to store data from RemoteMe */
int16_t i, i1, i2, temp, pres;
int32_t subs, views;
String hr; //Only needed if you want to display time.

long lastDebounceTime = 0, debounceDelay = 50; //To eliminate button bouncing.

ESP8266WiFiMulti WiFiMulti;
RemoteMe& remoteMe = RemoteMe::getInstance(TOKEN, DEVICE_ID);
void onSubscribersChange(int32_t i)
{
    subs = i; //Storing subscriber data in variable 'subs'
}

void onViewsChange(int32_t i)
{
    views = i; //Storing views in variable 'views'
}

void onWeatherChange(int16_t i1, int16_t i2,String s1,String s2)
{
    temp = i1; //storing temperature
    pres = i2; //Storing Pressure
}

/*New functions to display the stored data*/

void youtube()
{
  //Display YouTube info.
  Serial.printf("Subscribers : %d\n", subs);
  Serial.printf("Views : %d\n", views);

  lcd.clear();
  lcd.printf("Subscribers : %d", subs);
  lcd.setCursor(0,1);
  lcd.printf("Views : %d", views);
  lcd.setCursor(0,0);
}

void weather()
{
  //Display weather info.
  Serial.printf("Temparature : %d °C\n", temp);
  Serial.printf("Pressure : %d Pa\n", pres);
  lcd.clear();
  lcd.printf("Temperature : %d", temp);
  lcd.setCursor(0,1);
  lcd.printf("Pressure : %d", pres);
  lcd.setCursor(0,0);
}

void setup()
{
    Serial.begin(9600);
    lcd.begin(16, 2);
    pinMode(btn, INPUT);

    WiFiMulti.addAP(WIFI_NAME, WIFI_PASSWORD);
    while (WiFiMulti.run() != WL_CONNECTED)
    {
        delay(100);
    }
    remoteMe.getVariables()->observeInteger("Subscribers" ,onSubscribersChange);
    remoteMe.getVariables()->observeInteger("Views" ,onViewsChange);
    remoteMe.getVariables()->observeSmallInteger2Text2("Weather" ,onWeatherChange);
    remoteMe.sendRegisterDeviceMessage(DEVICE_NAME);
    Serial.print("Connected...");
    lcd.print("Connected...");
}

void loop()
{
  int btn_state = LOW; //button state is initially set LOW
  static int flag = 0; //flag is set 0

     btn_state = digitalRead(btn); //button input is read.

     if((millis() - lastDebounceTime) > debounceDelay)
     {
       if((btn_state == HIGH) && (flag == 0)) //if button is pressed & flag is 0
       {
         weather(); //show weather data
         flag = 1; //set flag to 1
       }
       else if((btn_state == HIGH) && (flag == 1)) //if button is pressed & flag is 1
       {
         youtube(); //show YouTube info
         flag = 0; //set flag to 0
       }
       lastDebounceTime = millis();
     }
    remoteMe.loop();
}
So after the changes are made, you can upload the code to the board and you should see “connected…” on the LCD as well as on the Serial Monitor.
Sample Code & Downloads
Below you can download a couple versions of this code. I cleaned it up to make the results more presentable. To use it, add your WiFi name & password in the required fields. Also add the Device ID which is used on the previous step ‘1’.
To add token manually Goto RemoteMe >> Applications >> Tokens. Copy the Token and paste it on the code. Upload and check the Serial Monitor for results.
NOTE : To program ESP boards with Arduino IDE, you have to setup the IDE.
[pretty-locker id=”339508″]Download Weather Station (.ino)
Download Weather Station (With LCD)
Test Your Weather Station Device
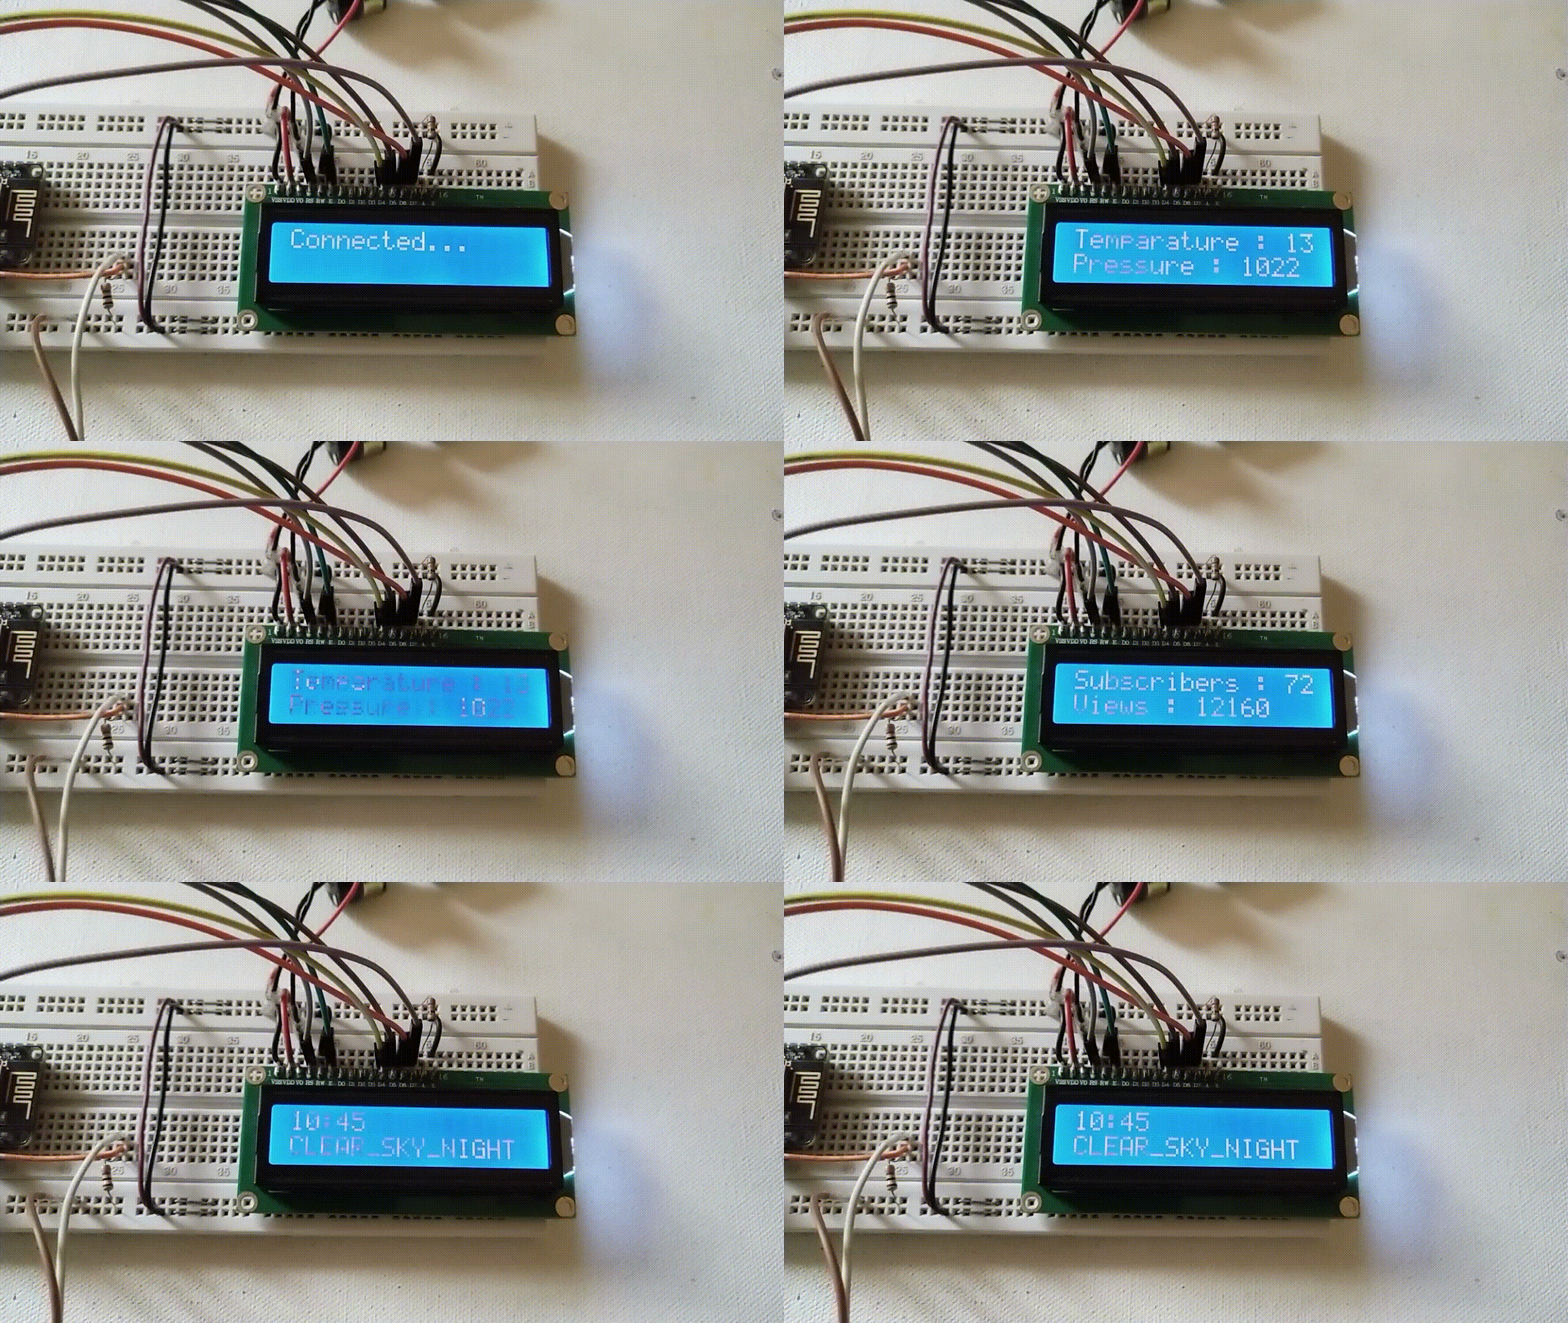
Once the code is up and running, you can test it to see if everything works fine.
When the ESP board is connected to the network, the LCD will display “Connected…”
Pressing the button will display Weather (Temperature and Pressure info) , pressing again will display YouTube Subscribers and Total views.
You can edit the code to display other information like Time, weather condition etc. as well. If you have any questions or face any problems, you can let me know in the comment section, below.
Did you enjoy this tutorial? Consider sending us a Coffee using Ko-Fi.
You can also Like us on Facebook and Follow us on Instagram (@learnrobotics). We post real-time updates and a behind-the-scenes look at Learn Robotics projects. Go check us out!


