

In the previous tutorial, I showed you how to use a BLE module to control an LED. For this tutorial, we will expand upon that knowledge to create an Arduino Bluetooth Car that can be controlled using a Smartphone.
You can pick up an Arduino Robot kit or source all the materials separately to build a custom robot car. At a minimum, you’ll need an Arduino Uno, a motor controller (such as the L293D or L298N), a BLE module (AT-09 or HM-10), Geared DC Motors, 1KΩ and 2KΩ resistors, and batteries to power everything. I recommend using 18650 rechargeable batteries. You can choose to make the chassis from scratch using foam board, acrylic, 3D printing, or you can buy one online.
Related Article: How to power your mobile robot
This tutorial assumes you already have some basic Arduino programming skills and have downloaded and installed the Arduino IDE. You’ll also need to download and install the BLE Joystick App for Android or for iPhone. Once you have all the materials and software for this project, it’s time to assemble the robot chassis.
Make a Chassis for Arduino Bluetooth Car
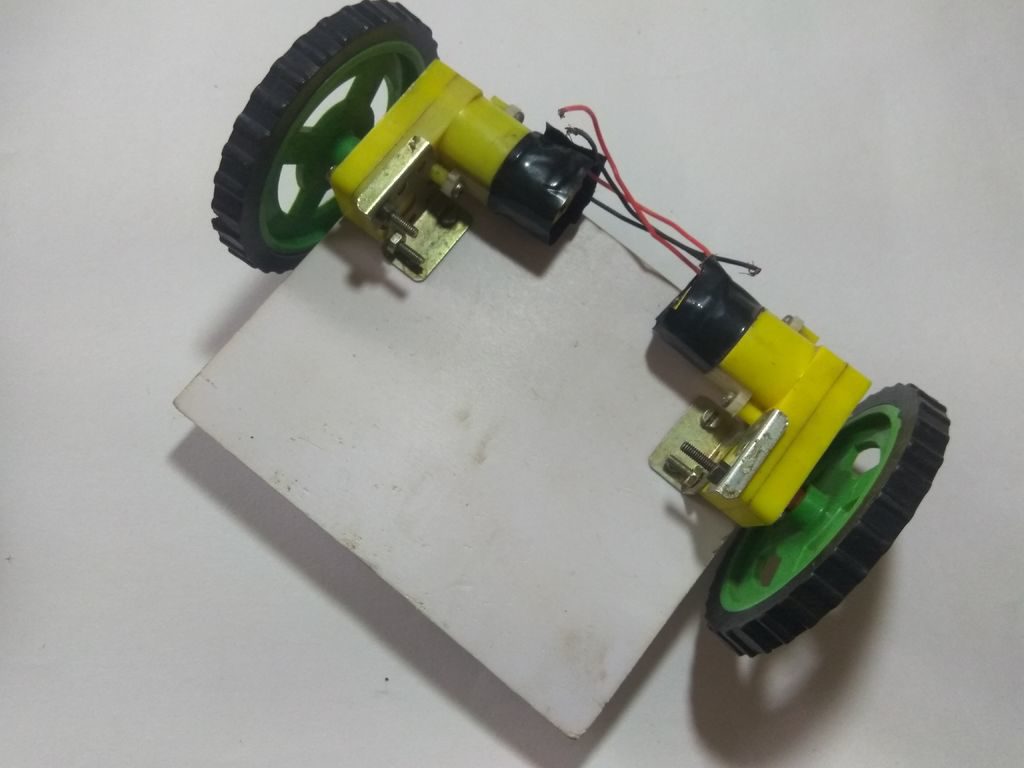
Here I made chassis using a 5mm thick foam board. You can use any other material of your choice. Just make sure it is light and strong. First, mount two motors on the base board as shown in the image below.
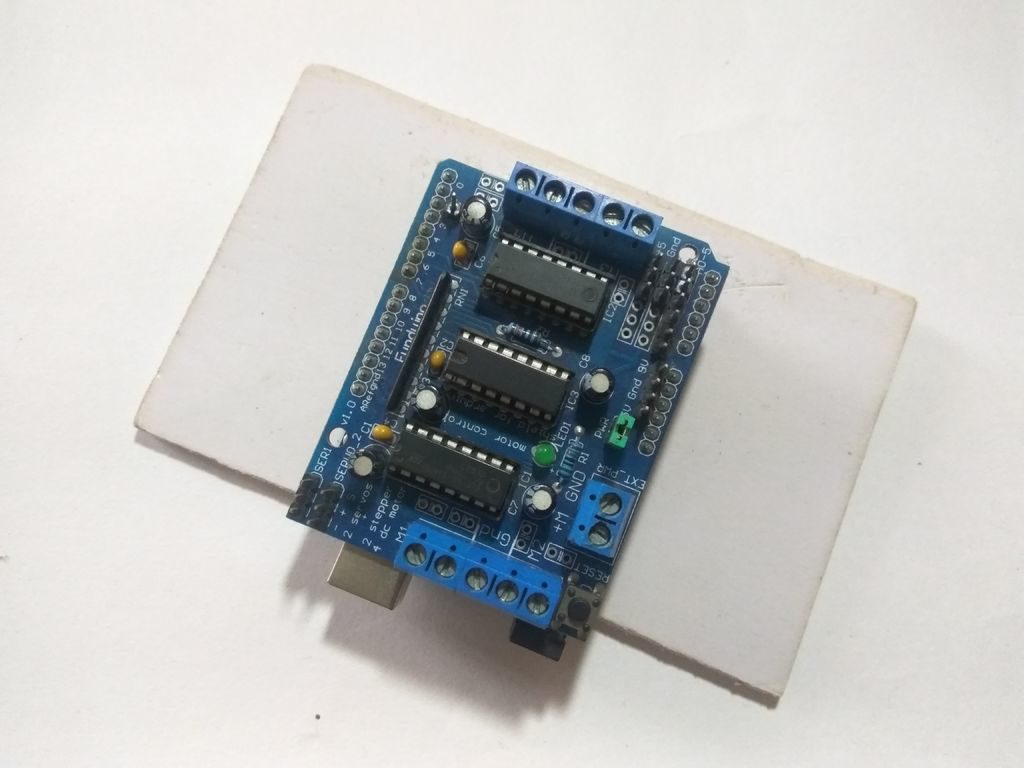
Next, attach the Arduino on another board and connect the motor shield. I’m using the L293D shield, below.
After that, place the second board on top of the base.
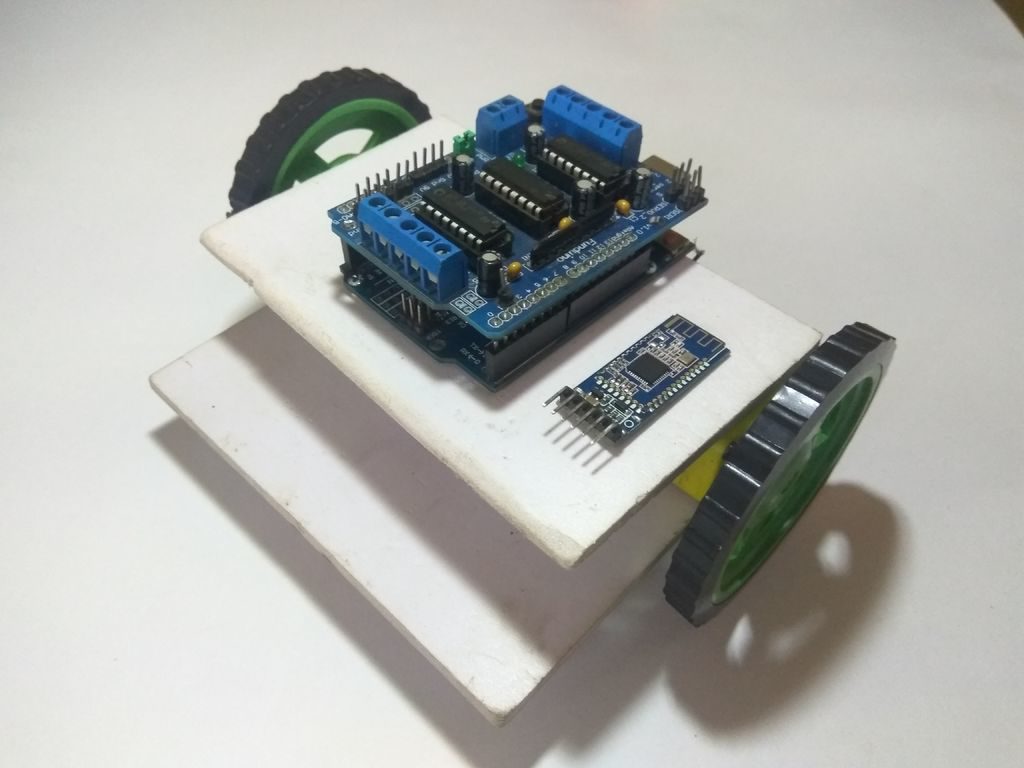
Once the robot is built, it’s time to wire up the electronics. Remove the motor shield to expose the Arduino pins.
Arduino Bluetooth Car Wiring
Before you connect the components, make sure you carefully read the pin labels on the BLE module because not all modules have same pin configuration. Refer to the wiring diagram, below.
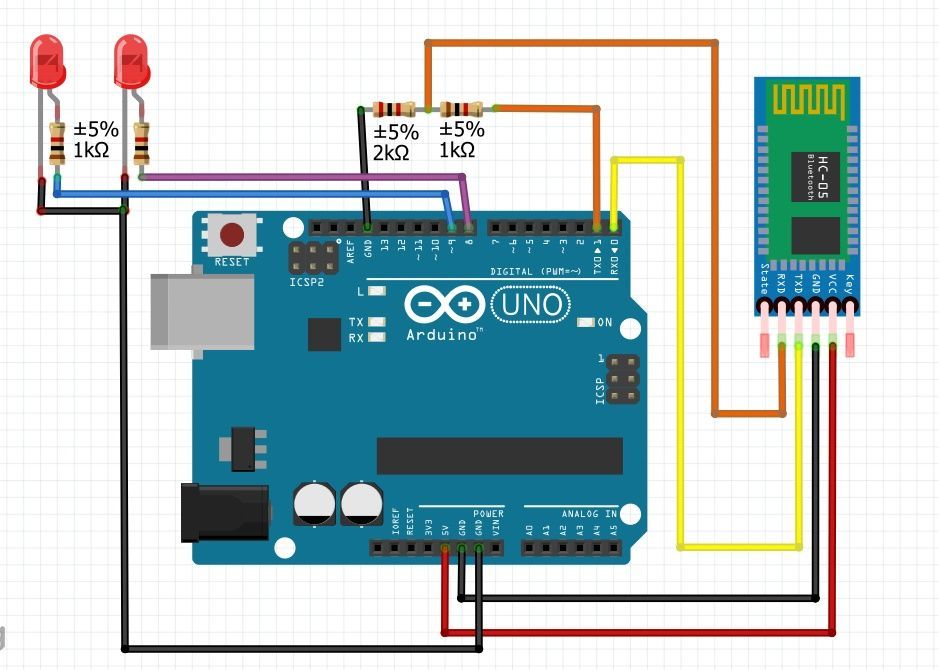
TX goes to RX on the Arduino (Digital Pin 0)
RX goes to TX on the Arduino (Digital Pin 1)
GND goes to GND
VCC goes to +5V
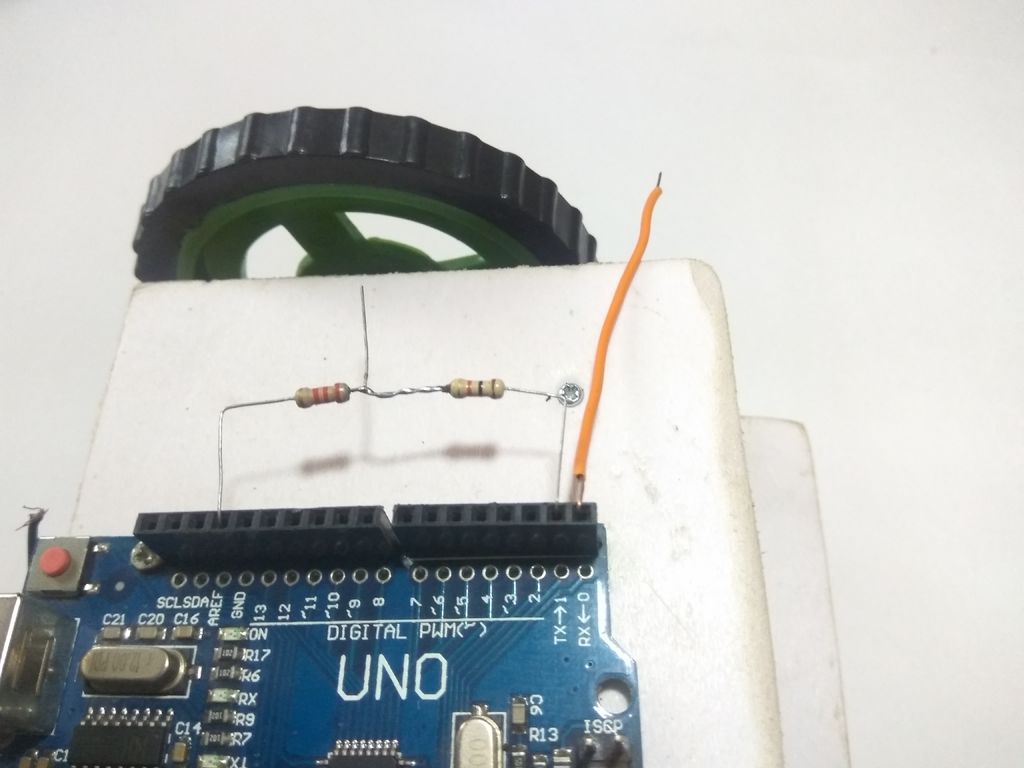
You will need to create a voltage divider using two resistors. Solder them together and connect the 2KΩ end to the Arduino GND pin and the 1KΩ end to the TX pin on the Arduino.
The point where the two resistors are connected goes to the Rx pin of Bluetooth module. Here’s what it looks like on the Arduino Bluetooth Car.
After that, reconnect the motor shield to the top of the Arduino. If you want, you can solder the wires directly to the shield for a more permanent solution. Lastly, connect the motors to M1 and M2 of the motor shield. Now, you’re ready to write some code for the Arduino Bluetooth Car.
Writing Code for Arduino Bluetooth Car
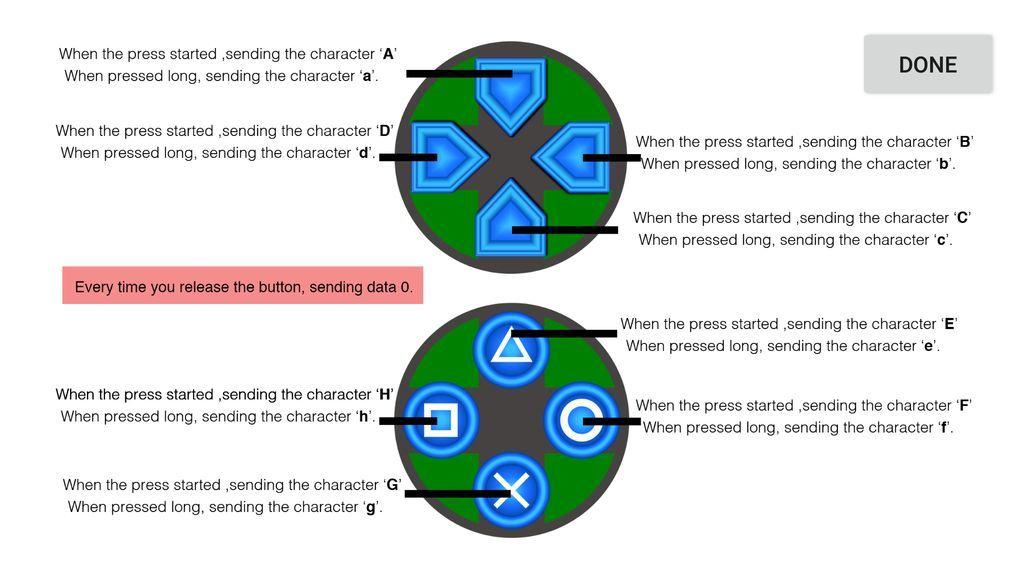
Before writing the code, check out the values used by the BLE joystick app. Here is an image you can refer to:
We will use the AFMotor library, which will make the coding easy. You can download the library from here (click to download), or you can Goto >> Tools >> Manage Libraries >> Enter AFMotor.h in the search bar and install the library. Now, let’s talk about the code. Unlock the code walk-through by signing in below.
[pretty-locker id=”339508″]Let me explain the code in short so you can use it or write your own code to perform different tasks.
First, import the library and initialize variables and pins required in the code :
#include<AFMotor.h> //AFMotor library

AF_DCMotor motorR(1); //Right motor connected to output 1
AF_DCMotor motorL(2); //Left motor connected to output 2
char data = 0; //variable to store characters received via bluetooth
Next, write the setup() method where we will set the pin functions :
void setup()
{
    Serial.begin(9600);
    Serial.println("Motor test!");
    motorR.setSpeed(200);
    motorL.setSpeed(200);
}
Create Control Methods to Move the Robot Autonomously
After this function, write five different control methods that control the robot when a joystick button is pressed.
- Forward: drives the robot forward
void forward() { Serial.println("Going Forward..."); delay(500); motorR.run(FORWARD); motorL.run(FORWARD); } - Backward: makes the robot move backwards or in reverse
void backward() { Serial.println("Going Backward..."); delay(500); motorR.run(BACKWARD); motorL.run(BACKWARD); } - Right: Turns the robot right
void right() { Serial.println("Turning Right..."); delay(500); motorR.run(RELEASE); motorL.run(FORWARD); } - Left: makes the robot turn to the left side
void left() { Serial.println("Turning Left..."); delay(500); motorR.run(FORWARD); motorL.run(RELEASE); } - Hold: stops the robot from moving
void hold()
{
  Serial.println("Stop...");
  delay(500);
  motorR.run(RELEASE);
  motorL.run(RELEASE);
}
These are the basic functions for moving the Arduino Bluetooth Car. If you wish, you can add more features by writing additional methods. Now, it’s time to call these methods so that when a particular button is pressed from the BLE Joystick App, the robot responds accordingly.
Configure BLE Joystick App for Robot Control
Now finally we will write the loop() method which will call the functions from above when a button is pressed.
void loop()
{
   if(Serial.available() > 0) //if data is received
   {
      data = Serial.read(); //read and store it in variable data
      Serial.println(data);

      if(data == 'a')
      {
        forward(); //if received data is 'a' move forward
      }
      else if(data == 'c')
      {
        backward(); //if received data is 'c' move backward
      }
      else if(data == 'b')
      {
        right(); //if received data is 'b' turn right
      }
      else if(data == 'd')
      {
        left(); //if received data is 'd' turn left
      }
      else if(data == 'g')
      {
        hold(); //if received data is 'g' stop the bot.
      }
   }
 }
Before you upload the code, make sure that you disconnect the TX and RX wires to the Arduino. If you forget to do this, the code wont upload, and the IDE will throw an error. Once the code is uploaded you can connect the TX & RX to module again, and you are good to go.
We’ve compiled the code for you into a sketch. Feel free to download it, make modifications, and try this for yourself!
Download the full Arduino Sketch (.ino)
Test Arduino Bluetooth Car
Now that we have the robot build, wired, and programmed, it’s time to power it up. I used two separate batteries: one for powering the Arduino, and another to power the motor shield. Make sure to remove the jumper from the shield before you connect the batteries, because if you don’t, it may damage the Arduino board.
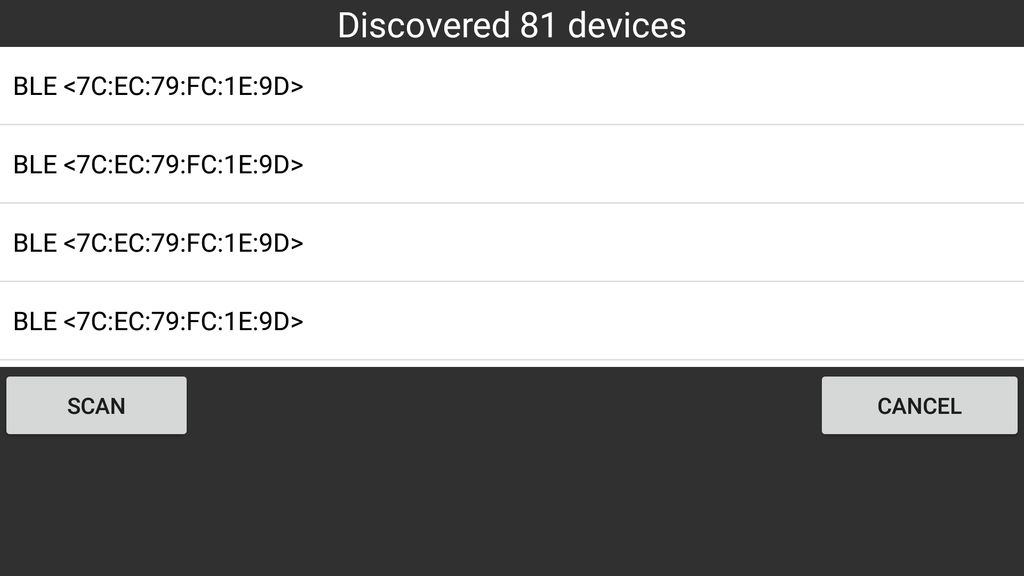
Once the robot is powered up, you will see the light on Bluetooth module blinking. Now open the BLE Joystick app. Click on the top right corner (Bluetooth Symbol), and you will see a list of bluetooth addresses. (For some reason it shows the same address multiple times.) Select the first one on the list.
When you select the bluetooth address, you will notice that the LED on module stops blinking and becomes solid. That indicates connection is established. Now you can start using your smartphone to control the robot.
Did you enjoy this tutorial? If so, be sure to share it with a friend who enjoys robotics.
We also have a brand-new online robotics course designed to get you building, wiring, and programming mobile robots in 30-days! Check it out here.


