

In this tutorial I will show you how to make a simple line follower robot. Normally these type of robots use microcontrollers and complex logic to track and follow line. But today I will be showing you how you can make a simple line follower without a microcontroller. Before we start making the robot, let’s understand what a line follower is and how it works.
What is a Line Follower?
Line Followers are Automated Guided Vehicles (AGVs). These robots follow a line (black or white) using some logic. They’re mostly used to carry material around inside a factory.

A microcontroller is like a brain of the robot that can be programmed to add unique features. But we don’t really need any coding knowledge or fancy microcontrollers to make this particular robot.
How does it work?
A line follower is an array of Infrared (IR) sensors. These sensors have a set of IR LEDs and Photodiodes. The LEDs emit infrared light on a surface (floor) and the Photodiode receives reflected light. The amount of reflected light depends on the color of the surface.
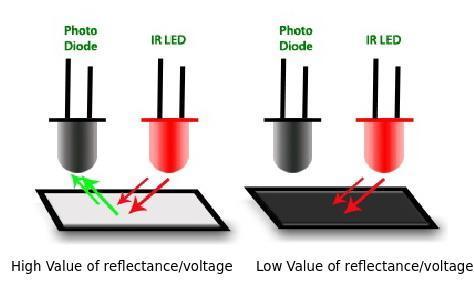
More light is reflected from the white surface which generate higher values. Surface that is dark absorbs most of the light and hence very less or no light is received by the sensor. Using this information, the robot can distinguish between a black line on white surface and vice versa.

Case a: Both sensors are high, both motors run.
Case b: Right sensor is high, only right motor will run.
Case c: Left sensor is high, only left motor will run.
In this manner, the robot will follow the line. We can use a microcontroller, like Arduino to build a line following robot, or we can create a circuit that performs these calculations automatically. In this tutorial, we’ll show you how to build a line following robot without a controller.
Requirements
For this project, you’ll need a few parts:
- Motor driver (L298N);
- 2X IR sensor modules;
- DC geared motors with wheel;
- 9V battery connector or AA battery case;
- A 9V-12V battery to power it all.
Once you have the materials, place all the components onto your base. You can use cardboard, foam board, or acrylic sheet for your base. Now that we have the parts, you can also grab copies of the CAD and Wiring Diagrams for this project.
[pretty-locker id=”339508″]Download the SketchUp File (.skp)
Download the Wiring Diagram – Fritzing (.fzz)
Building the Robot Line Follower
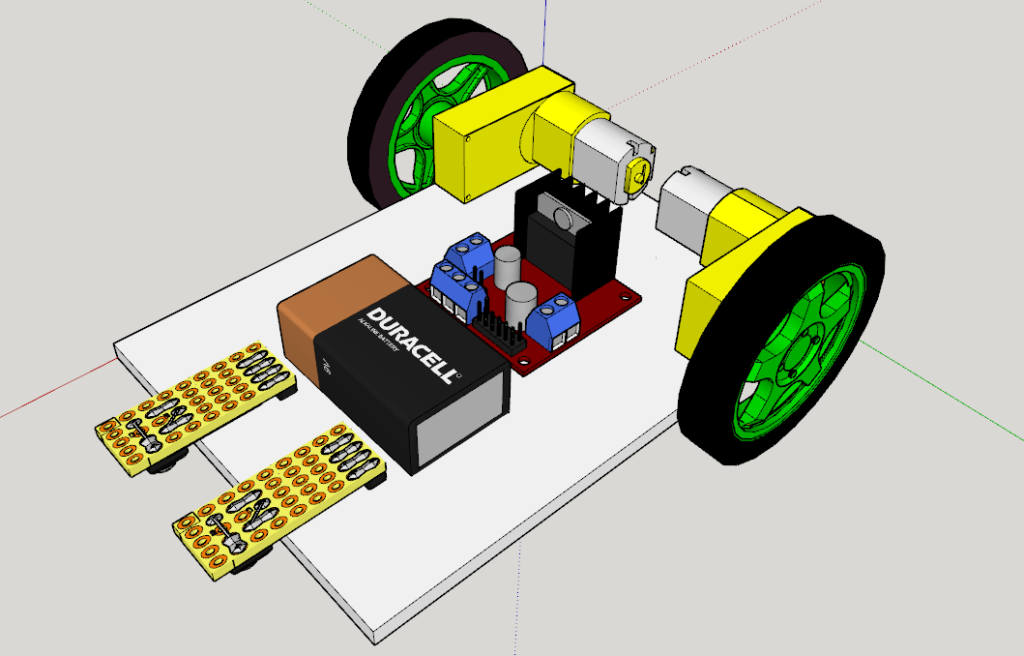
Refer to the picture below to get a basic idea of how to make the robot. I used SketchUp for the design.
Here are the steps to help build your robot line follower:
- First, make a base using any material of your choice (cardboard, foamboard or acrylic).
- Next attach two geared motors to the base which will drive the robot. Then attach a caster wheel to balance the bot. You can use screws or hot glue to attach these components.
- Fasten the motor driver board on top of the base.
- Next attach the IR proximity sensor modules in the front, facing down. Make sure there is about 1.5-2 inch distance between each of the sensors.
- Lastly, Mount the battery to your base.
Once everything is placed and secured properly. It’s time to build the line following circuit.
Making the Robot Line Follower Circuit
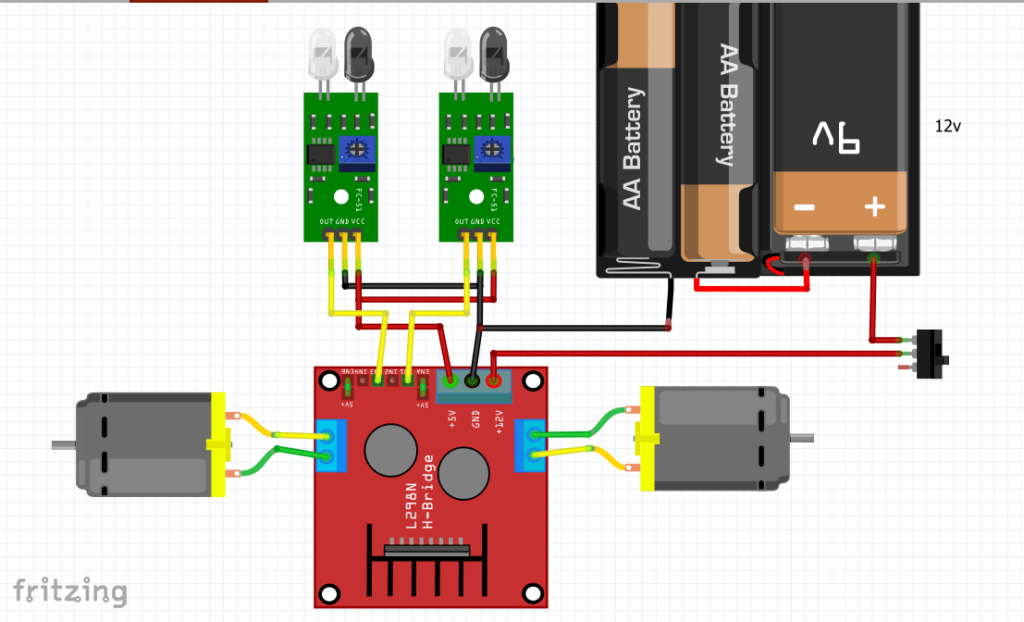
As shown in the picture above, the connection is simple. As we are not using a microcontroller.
- The GND pins of both the sensors are connected to GND terminal of Motor driver.
- VCC pins of both sensors are connected to +5v terminal. This will power both the sensors.
- The out pin of first IR sensor is connected to IN1 and out pin of second sensor is connected to IN3.
- Connect the motors to terminals labeled ‘OUT’ on either side.
- At last connect a 9v-12v battery on the +12v terminal of Motor driver
If you want, you can add a switch on the +ve terminal of battery as shown in the picture. The switch will allow you to turn the robot on or off.
Testing the Line Follower
To test the robot, first create a track. You can use black electrical tape to create a line on any white surface. Create a circle with the tape and place the robot in a way that both the IR sensors are on either side of the tape. Toggle on the switch and watch the robot follow the line.
If the robot does not follow the line properly try these troubleshooting tips:
- Double check the connections.
- Make sure you use a fully charged battery.
- Try swapping motor leads.
- Try adjusting the sensitivity of IR sensors. (You can tune the sensitivity using the trimmer pot on the module.)
Lastly, if you’ve tried these tips and your robot doesn’t work properly, feel free to leave a comment, below.
What can I build next?
Line Following robots are a lot of fun to build. I challenge you to check out our robotics tutorial and use Arduino to program your line follower. You can also take it a step further and try this project using photoresistors to build a light-following robot.
And, if you’d like a more complex robotics project to work on, check out my eBook, Mini WiFi Robot, available now in the Learn Robotics shop.

Build your very own WiFi-controlled robot and drive your robot from anywhere! We’ll be starting a global competition soon, so be sure to grab your copy today!


4 Responses
how does it work? Why does it not need a microcontroller?
It measures voltage using the sensors and provides a HIGH/LOW reading to the motor controller as an input. No controller needed. ~Liz from Learn Robotics
will the same circuit work for white line on black background?if not ,what are the modifications?
Yes, you can use the same configuration. You’ll have to calibrate the IR sensors using the trim pot to adjust the sensitivity. Good Luck ~ Liz from Learn Robotics