

In my last tutorial, I showed you how to build the pan-tilt servo assembly. So, if you haven’t already built yours, I recommend checking that out first. This tutorial will show you how to program pan-tilt servos using buttons and potentiometers. The goal is to have (wired) manual control in all directions (pan: left/right and tilt: up/down).
The first thing we’ll do is create our circuit. There are three options to control the pan-tilt movement: potentiometers, buttons, or a joystick. The programming methodology will be similar to all of these examples.
Which controller is right for me?
When deciding on which circuit to build, I recommend thinking about how the user will use this system. Would it be easier for the user to push a button, rotate a dial, or jog a joystick?
Without further delay, let’s get started!
Pan-Tilt Wiring Diagram using Potentiometers
The first wiring diagram uses two potentiometers: one for pan and one for tilt.
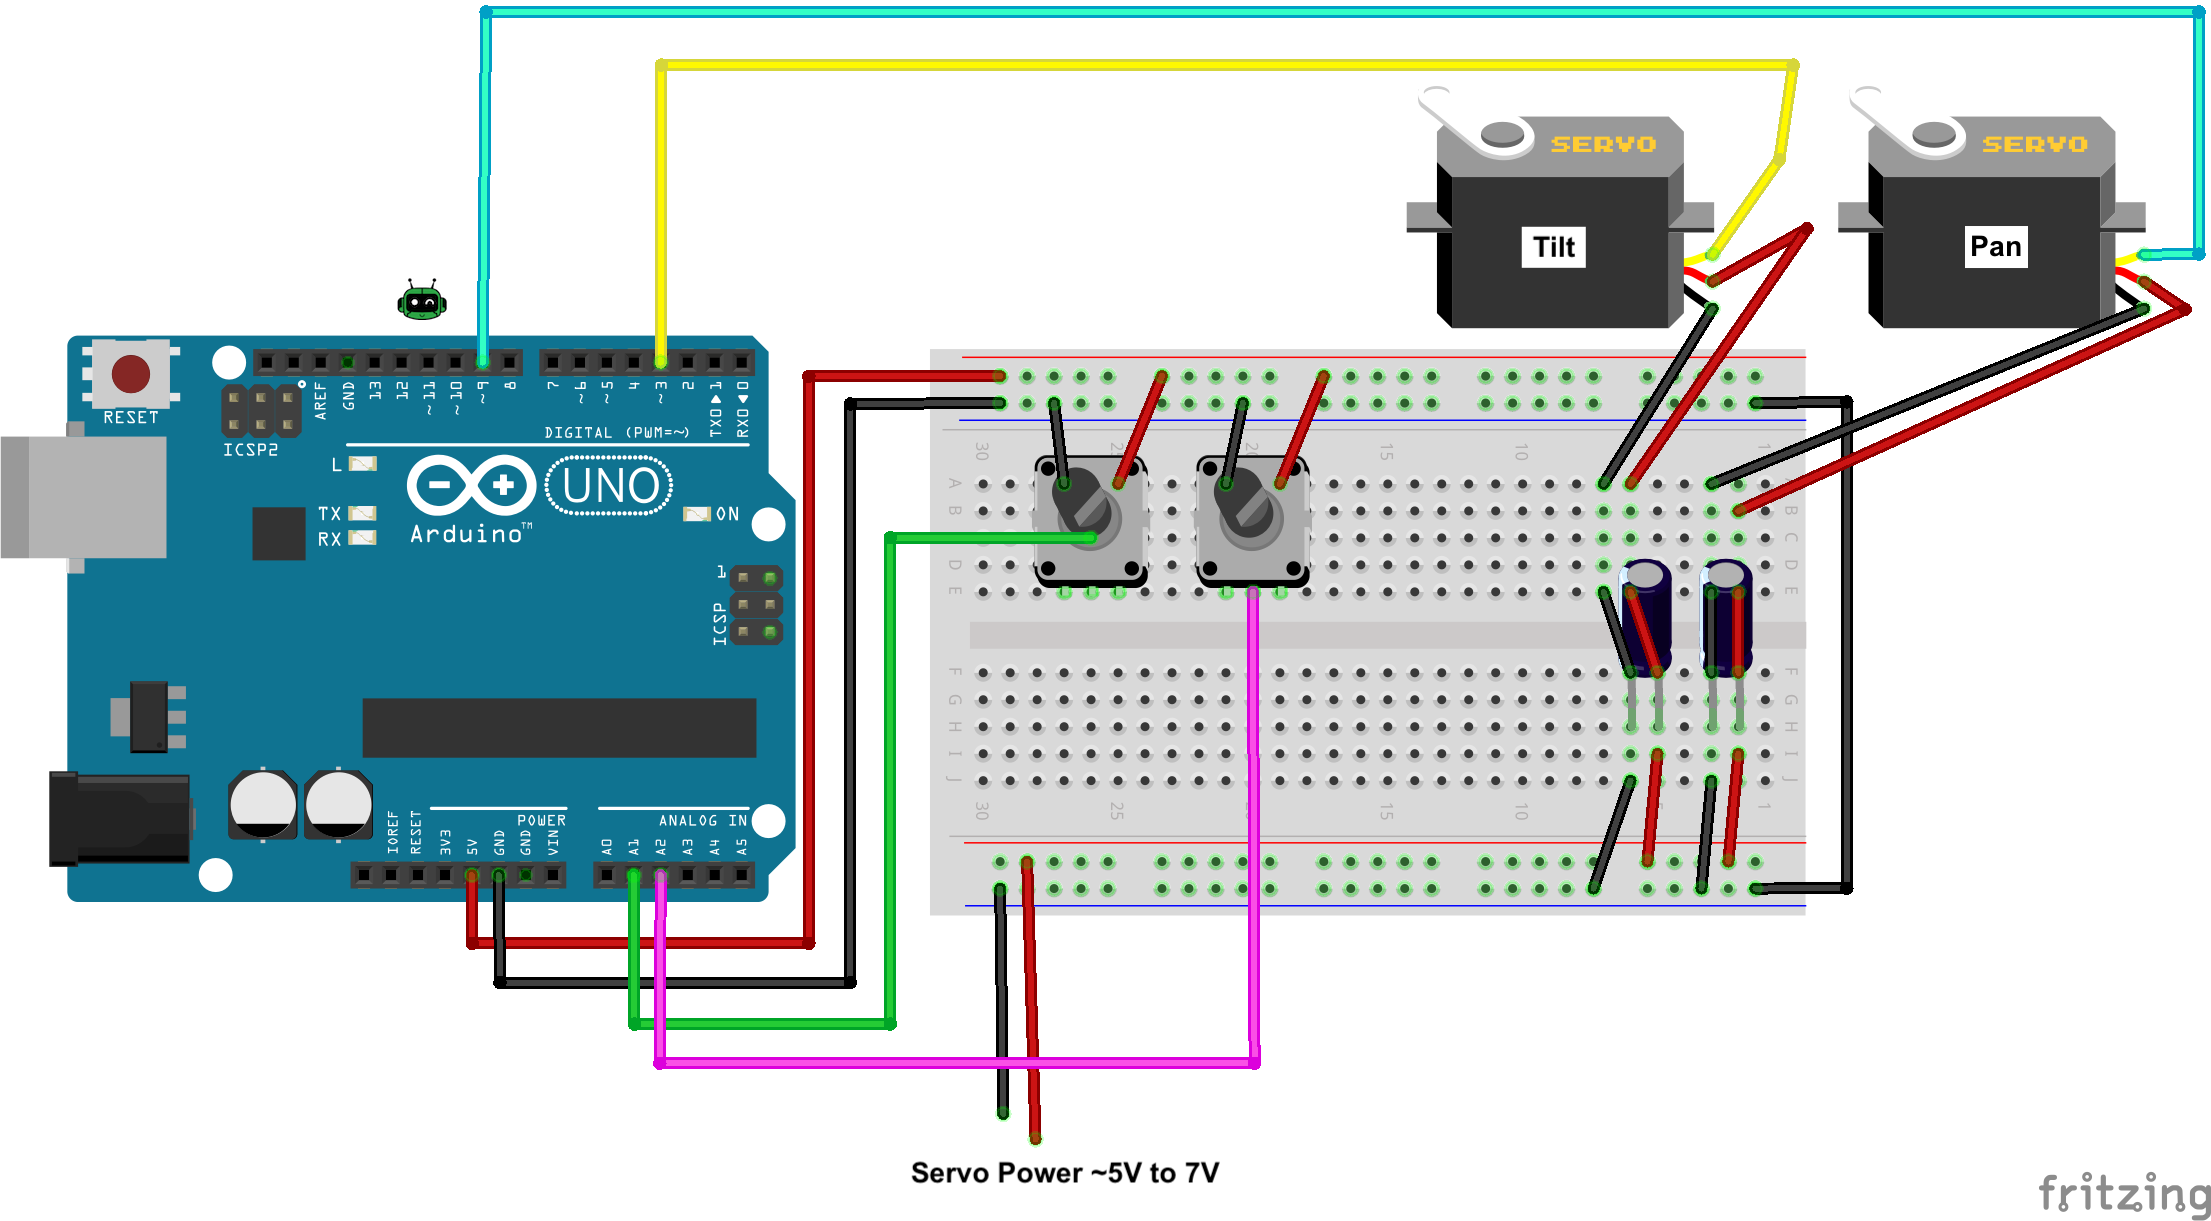
You’ll notice a couple of capacitors (bottom right corner) connected to the servos. The servos are powered by a separate source. The capacitors are there to reduce the amount of noise on this line. Furthermore, the servo connections will stay the same throughout this guide.
Pan-Tilt Wiring Diagram using Buttons
Also, you may opt to control the movements using four buttons. When the user presses and holds a button, the servo will move accordingly. When the user releases the button, the servo will stop in its current position. Here’s a diagram for pan-tilt using buttons:
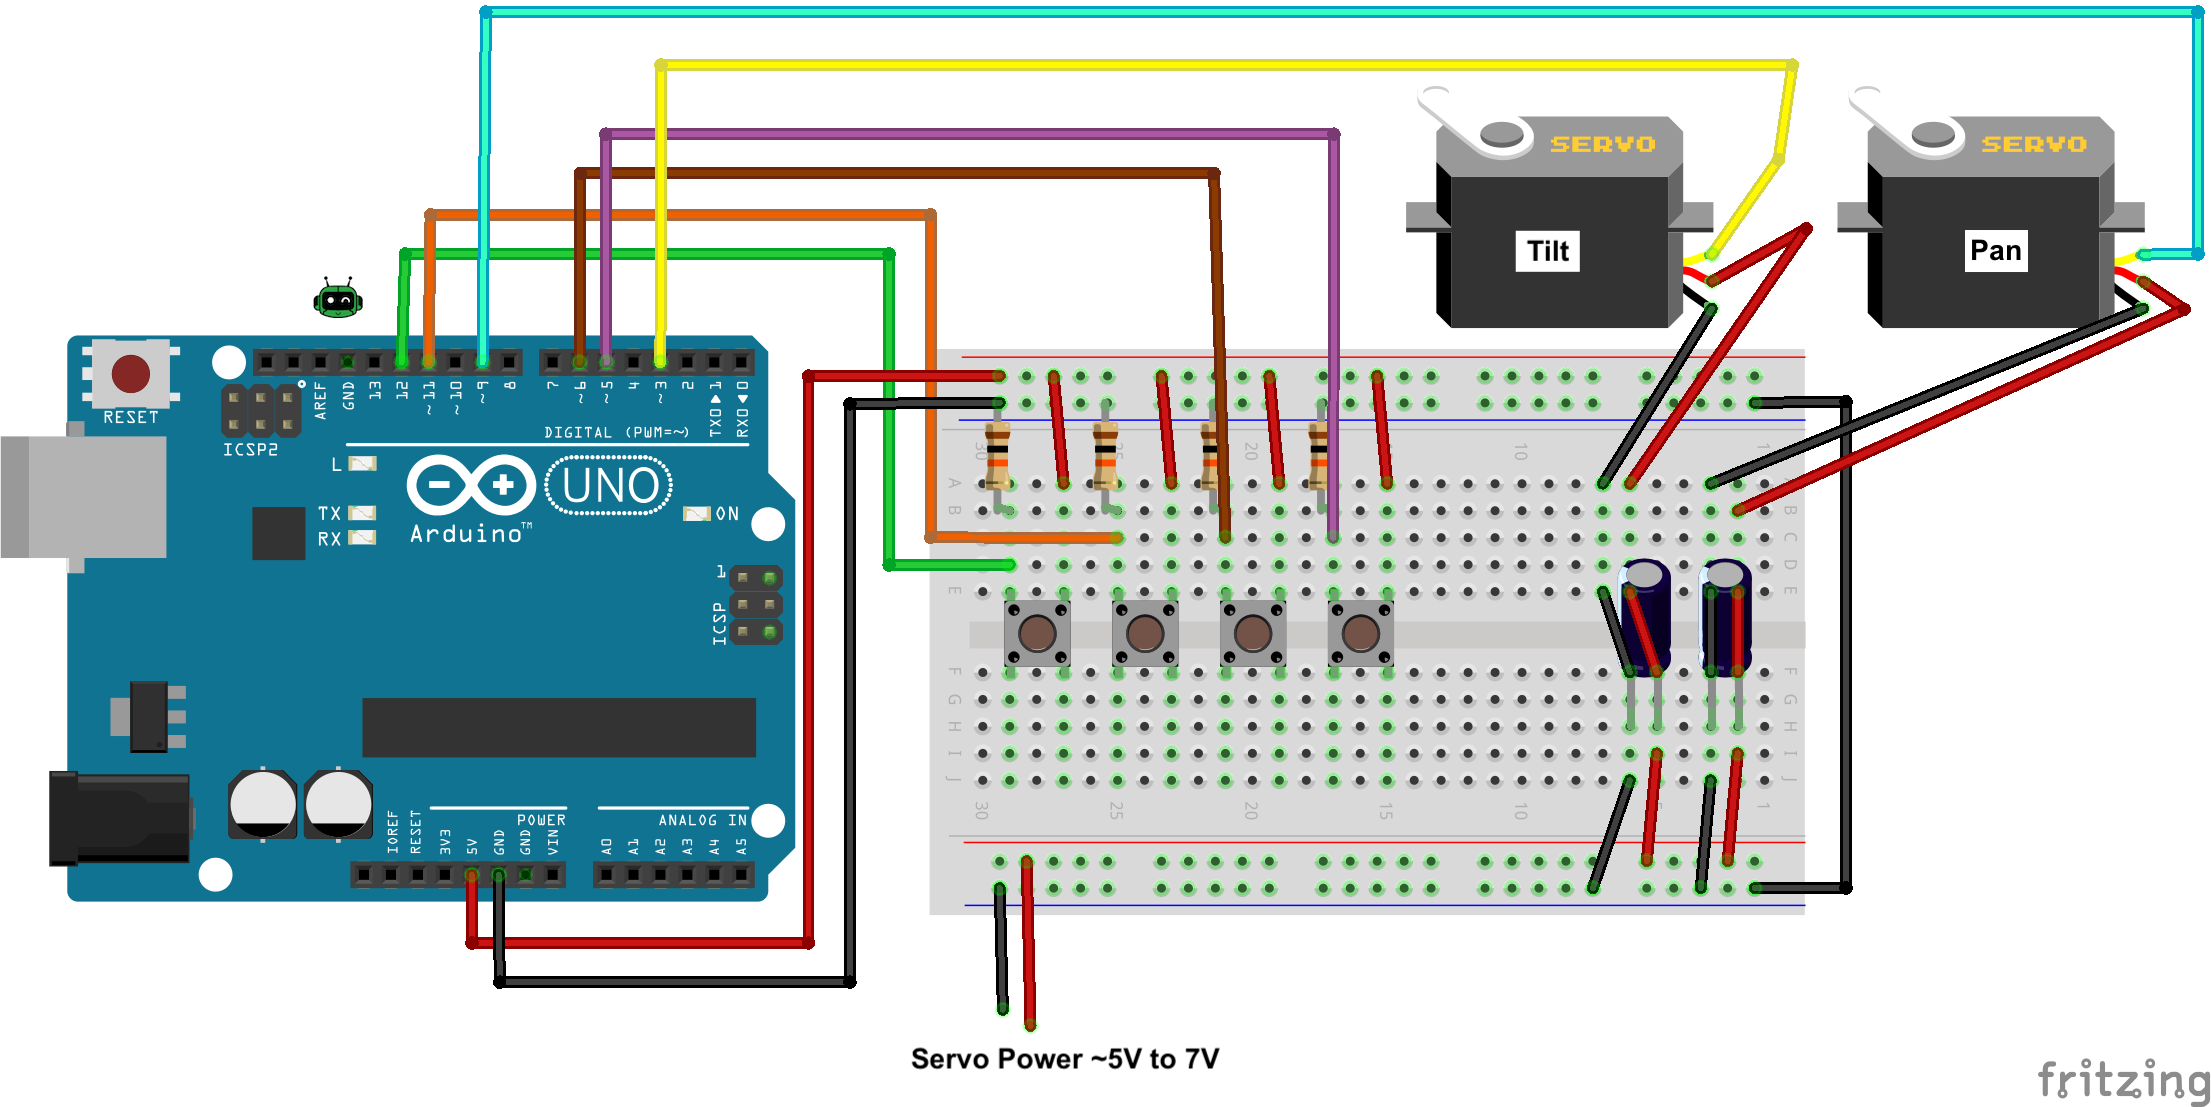
We will assign functionality to the buttons in the code, so this can be configured however you like. This is just a starting point for getting it wired up!
Pan-Tilt Wiring Diagram using a Joystick
Lastly, we can program pan-tilt servos using a joystick. If you want a user experience similar to a video game controller, this is the option I’d pick.
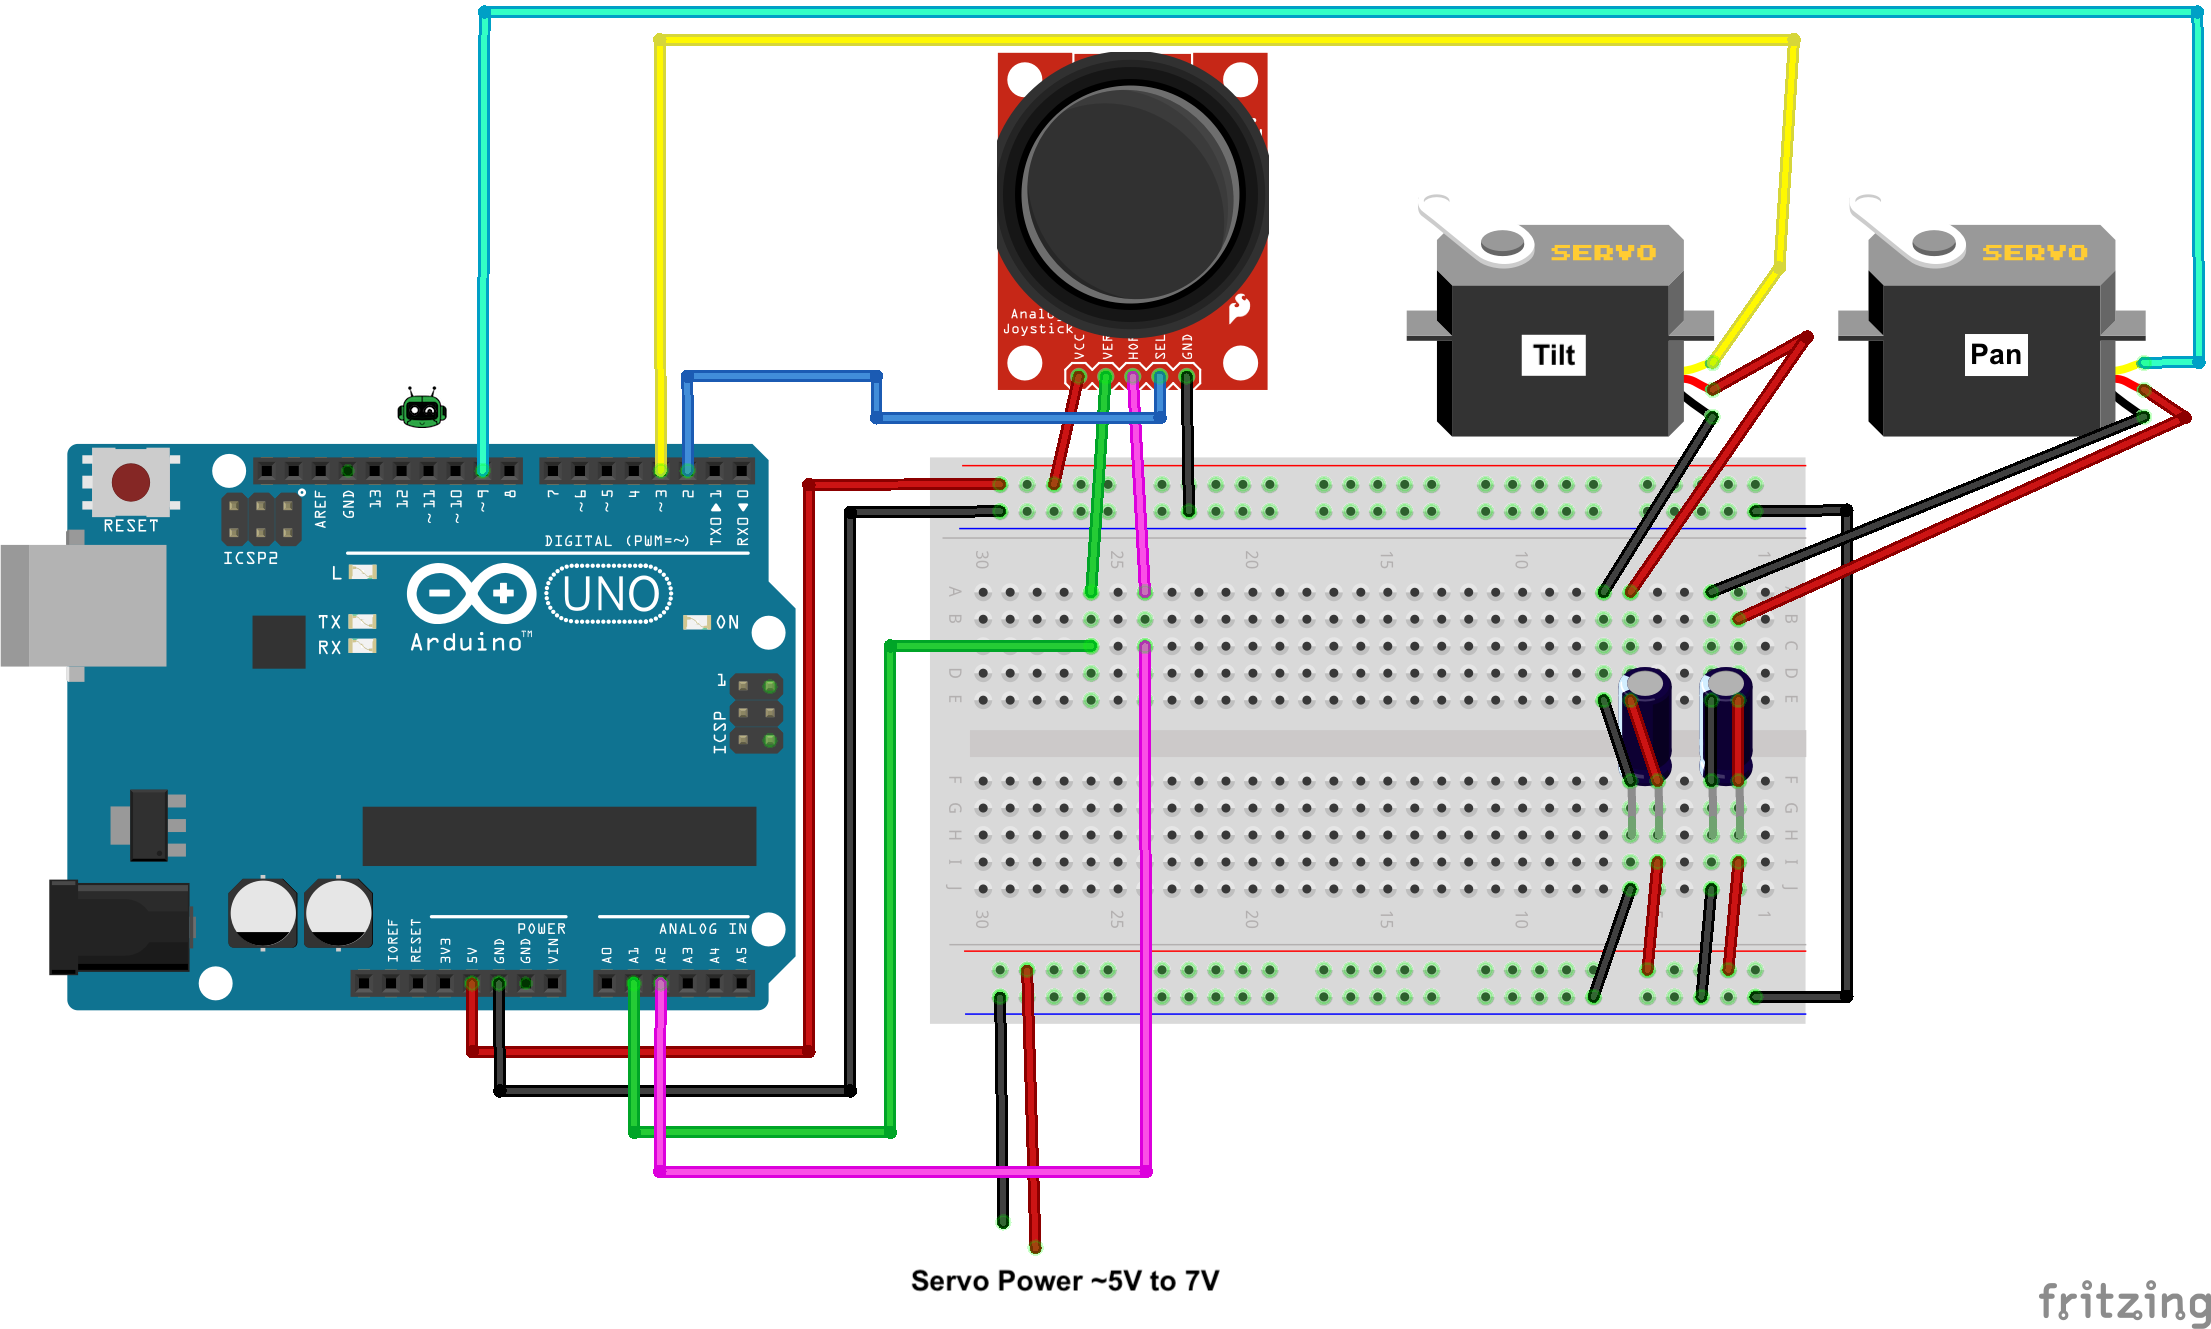
There are also Joystick Shields that you can get for Arduino. They include both a joystick and a set of four buttons. This would be another great option! (And would combine the programming logic from the joystick and button sections.)
Go ahead and pick one (or all) of these options, wire up the circuit(s), and then come back to this article to learn how to program it.
Program Pan-Tilt Servos using Arduino
In this guide, I will show you how to program pan-tilt servos using potentiometers, buttons, and a joystick. Realistically, once you have one control pattern written, the others are very easy to develop. We will be using the Arduino IDE for our code development.
Code for Pan-Tilt Servos controlled by Potentiometers
 First, import the Servo library for this project. Next, create some constant global variables to store the potentiometer pins. Then, initialize the Serial Monitor within the method.
If these concepts are foreign to you, please check out my article on Four Steps to Writing Any Arduino Program. I’ll be following these guidelines loosely, so some prior Arduino programming experience is expected.
Next, you’ll want to read the value of the first potentiometer using analogRead(pin) and store that into a variable. This will be reading from 0-1023 because we have a 10-bit ADC on the Arduino. We’ll need to map this value to the range of our servo (in degrees). Most hobby servos are 0-180 degrees of rotation. Therefore, we can use the mapped value to command our servo into a position.
tiltVal = map(tiltVal, 0, 1023, 0, 180); //map reading from 0-1023 to 0-180
If your servo has a different range of rotation, be sure to map your potentiometer reading to match this spec!
Then, repeat this process for the second potentiometer. When you’re done, you can command your servo into position by using the myservo.write(pos) method. For example, if our tilt servo is named “tilt”, we can tell the servo to move to the mapped position using the following code:
tilt.write(tiltVal);
Finally, give the servo enough time to get into position. I recommend adding in at least a 15-millisecond delay. You can test out this number to see what works best for your application. I’ve used up to 50-millisecond delays in some projects!
Here’s your download!
Click here to download the full Arduino Potentiometer sketch (.ino)
Code for Pan-Tilt Servos controlled by Buttons
Now, we’re going to look at programming pan-tilt servos using four buttons.
We want to use the buttons as momentary switches. That means, when the button is pressed, the servo will move. When the button is released, the servo will stop. We’ll use four buttons to move the servos in four distinct directions: up, down, left, right.
First, we’ll import the Servo library and define our buttons as globals. Then, we’ll define a few auxiliary variables for button debouncing. These include button state, last button state, debounce delay, and last debounce time.
Here’s what it should look like:
The Logic for Button Control
Next, we’ll set up the buttons using pinMode(), initialize the servos, and start the Serial Monitor. I recommend creating a new method to store all the code for button control. We’ll use principles from debouncing to check if the button has been pressed.
If so, we’ll increment our servo position (in bits), then set a variable for the servo position (in degrees). I used a multiplier so that I could control how many bits per degree. That way if you want to fine-tune the movement, all you have to do is decrease the multiplier.
Because we have multiple directions, I used two buttons for +/- tilt (up & down) and two buttons for +/- pan (left & right). We’ll check the button state for the direction we want to move in and verify that we’re less than the degree limit. There’s no point in commanding the servos past their limits!
Once you have the calculations, you can command the servo to move into a position using the write() method. Again, you’ll want to delay at least 15-milliseconds so that the servo has enough time to reach the position before it’s triggered again. I created a “smoothTime” variable, which allows me to modify how much time I need to wait based on the bits per degree multiplier. You don’t have to do this, but I’ve included it as an example of what you could do.
Finally, include the button control method in loop(), and test it out! With a little tweaking and timing, you should have pretty clean control over your pan-tilt mechanism.
Here’s your download!
Click here to download the full Arduino Button sketch (.ino)
Code for Pan-Tilt Servos controlled by a Joystick
Lastly, we can program pan-tilt servos using a joystick. The program for this is very similar to the code using the potentiometer. A joystick is essentially a two-axis potentiometer!

First, create two variables to store the X and Y joystick analog pins. Then, attach the servos to the pins they’re connected to on your Arduino.
Next, read the values from the X analog pin. Store that into a joystick position variable. This will be a 10-bit reading from the ADC. We’ll map this from 0-1023 to 0-180 to convert bits to degrees. Repeat this step for the Y analog pin.
Then use the write() method to move the servo into the mapped joystick position. Your servos should start to move accordingly. Include at least a 15-millisecond delay to complete the move.
If you want to make the control more complex or intricate, this is a great starting point. You’ll notice that when you move in both X and Y directions, that pan and tilt will move simultaneously. If you don’t want this feature, then you’ll have to write some code to prevent multi-axis movements.
Here’s your download!
Click here to download the full Arduino Joystick sketch (.ino)
Pan-Tilt Servo Control isn’t too difficult
With a little planning, you can easily program pan-tilt servos to work with whatever inputs you desire. Whether it’s a couple of potentiometers, buttons, or a joystick, the configuration is pretty much the same.
In future tutorials, I will show you how to create wireless control for your pan-tilt assembly. Until then, give these projects a try, and let me know if you have questions in the comments below!


One Response
Good job!