

A couple of years ago, I replaced my Mom’s clunky old PC (lol) with a gorgeous 2017 5K iMac. And let me tell you, this computer has one of the best user experiences I’ve had. From the bold sound to the 5K screen, it’s a dream computer for most. However, unbeknownst to me, I realized I ordered the iMac with a mechanical hard drive. (Shame, shame!) After just a few months of regular use, the iMac became sluggish, slow, and painfully unproductive.
If you ever used a tortuously slow iMac, then you’re probably looking for ways to make it faster without spending a bunch of money.
Rather than dump your multi-thousand dollar investment, you can follow these steps to speed up your iMac for less than $100.
[amazon box=”B09327H62Y, B07Z8732QX,B08F92GZG7″ template=”list”]Listen to this Episode on Learn Robotics with Liz
Testing Your Slow iMac with a Benchmark using Blackmagic Disk Speed Test
If you’re a numbers nerd like me, then you’ll want to run some preliminary speed tests before completing the upgrade. You can skip this test, but I encourage you to run it once to ensure that you are, indeed, getting a faster experience (and not just a placebo effect).
Here’s how to run the test:
- Download Blackmagic Disk Speed Test from the App Store
- Close any open programs.
- Then launch BlackMagic, and Press Start.
- Let the test run and record the read/write numbers.
Here are the results from my Mom’s iMac internal HDD.
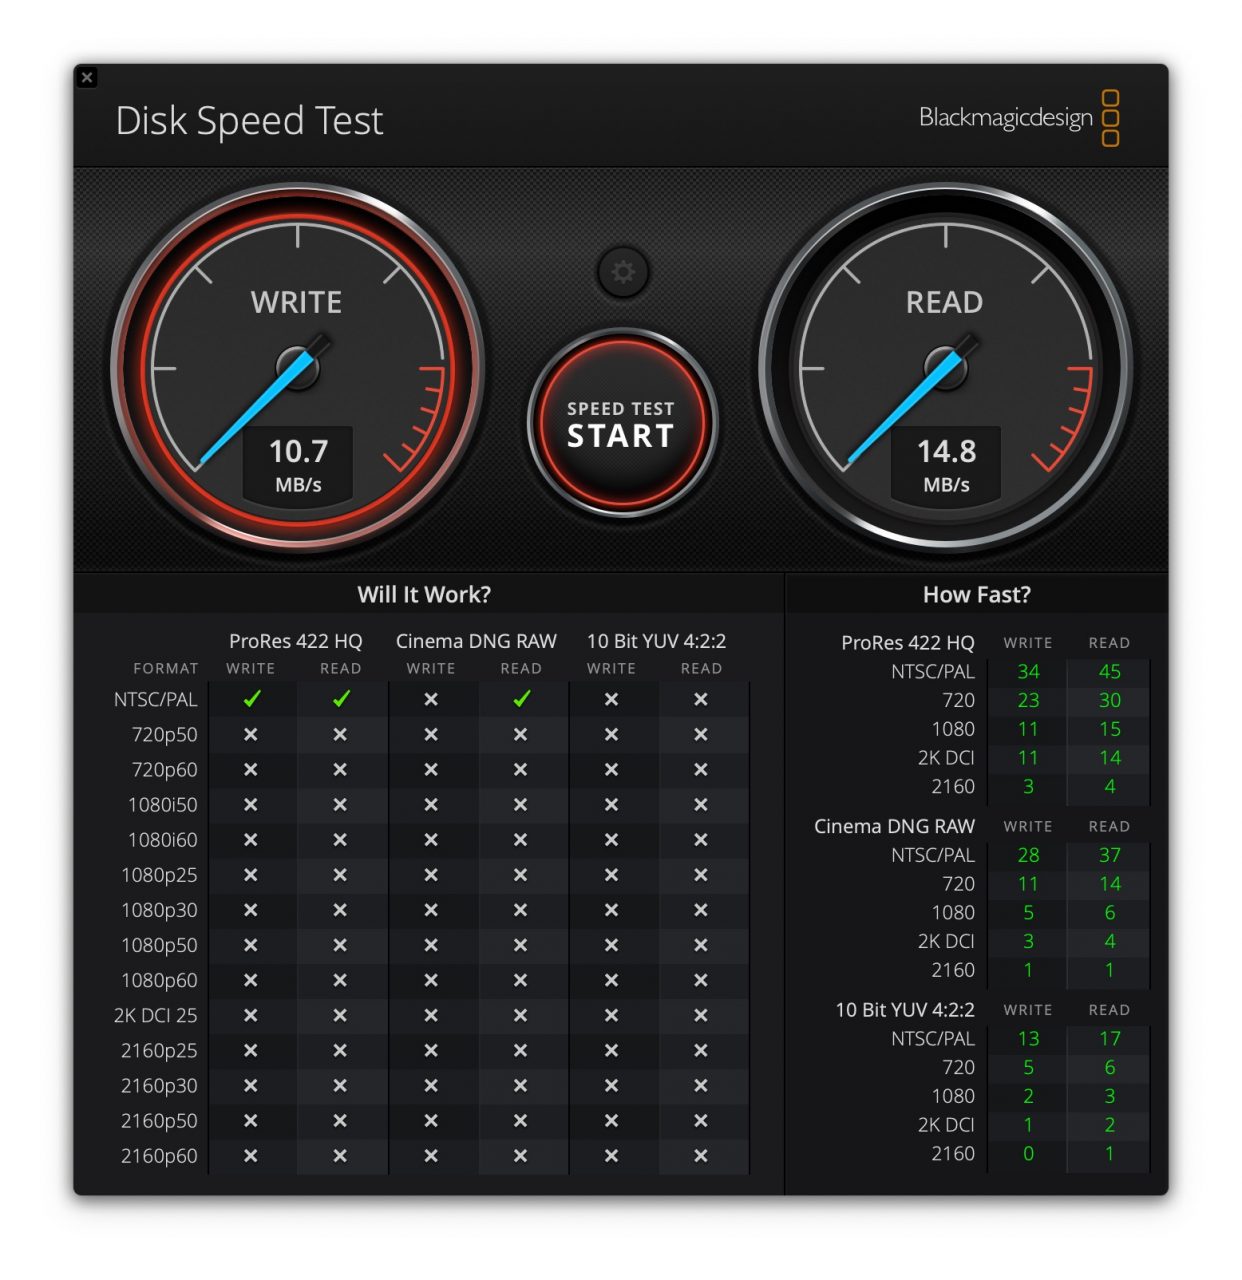
As you can see, the speeds are 10 MB/s Write, 15 MB/s Read. Super slow!
So, this wasn’t an unwarranted complaint. Moms never lie (lol). There was a real speed problem with the iMac. No one likes using a slow computer, so I dreamed up a plan to make my Mom’s iMac faster, and now I’m sharing the fix with you.
How to Speed Up Your Slow iMac: The Solution
This fix will take advantage of an external Solid-State Drive (SSD). We’ll then set this external drive as the default bootable hard drive to speed up your slow iMac. Additionally, if you have an older MacBook Pro (or non-Mac computer) with a Hard Disk Drive (HDD), you can use these steps to speed up those devices as well.
The benefit to using an external SSD is that you don’t need to open up the iMac or replace any internal components. Plus, I’ve included three bonus steps to help you transition from using the internal Hard Disk Drive to automatically using the Solid-State drive for daily use.
Should You Follow this Tutorial to Speed Up Your iMac?
This tutorial is designed for you if you’re looking for a way:
- To quickly, inexpensively, and easily upgrade your iMac;
- To keep using your iMac without replacing it;
- To avoid opening the iMac (and avoid the risk of damaging it); and
- To dramatically improve the speed of your iMac, making the user experience AWESOME.
Furthermore, this tutorial is easy. Anyone can do it. If you know how to download files and follow instructions, you should be good to go within an hour.
On the contrary, we will be focusing on computers that have an internal HDD. If your computer already has a solid-state drive, then I’d only recommend using this tutorial if you want the “new” computer setup. You may only see a slight increase in speed if the SSD you purchase has a higher read/write speed than the hard drive installed on your computer.
The difference between Hard Disk Drives (HDD) and Solid State Drives (SSD)
If you already know the difference between HDD and SSD, then go ahead and skip to the next section and begin the upgrade. If not, let’s talk quickly about HDD and SSD and why you’d want to pick an SSD over HDD for today’s computers.
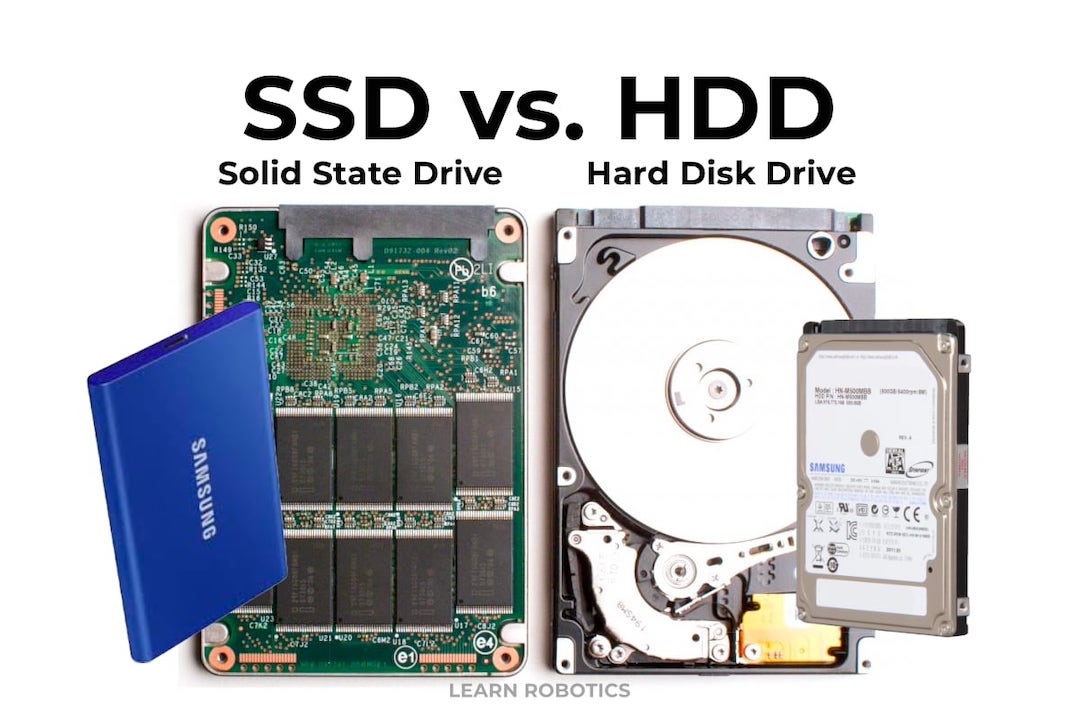
Traditional computers use Hard Disk Drives, which use mechanical actuator arms to read and write data to magnetic platters. These mechanical drives can only move so fast and are limited to the speed ratings (RPM).
Newer computers have Solid State Drives, which use NAND Flash Storage and integrated circuit assemblies to store data. SSDs lack the physical spinning disks that HDDs have. You can think of SSDs as a digital storage solution that doesn’t require mechanical components to work. As a result, SSDs have significantly faster read/write speeds when compared to HDDs.
A Tip for Buying New Computers
Word to the wise, if you’re going to buy a new computer, make sure it has an internal SSD (or Flash Storage) drive. When you purchase computers, they will list the Hard Drive spec. For example, through Apple, you may have the option to choose a 750 GB 5400 RPM Hard Drive or a 750 GB SSD. Choose the SSD. The 5400 RPM drive is a hard disk drive, which will be slower. Now that we know that SSDs are better than HDDs, we can talk about which SSDs to purchase to speed up our slow iMac.
Step 1: Purchase an External Solid State Drive
When determining which SSD to purchase to speed up your computer, it is important to consider a few features:
- Read/Write Speeds
- Storage (Capacity in GB)
- USB Connection (USB 3, Thunderbolt 3, etc.)
I recommend purchasing the fastest drive you can afford. The capacity should be greater than or equal to the size of the internal hard drive. For example, if your computer currently has a 500 GB internal drive, then you’ll want to pick up a 500 GB or 1 TB SSD as a replacement.
If your computer is almost out of space, then choose the next size up. Or, if you don’t care how much it costs (or are working with large file sizes), get a 2 TB or 3 TB drive. This should last you a while, especially if you’re working with hi-res photos or 4K videos.
Need to Speed up your iMac: Choose a Fast USB Connection
Additionally, you’ll want to choose the fastest USB connection available on your iMac. That way, you can take advantage of the full speeds available between the drive and your device.
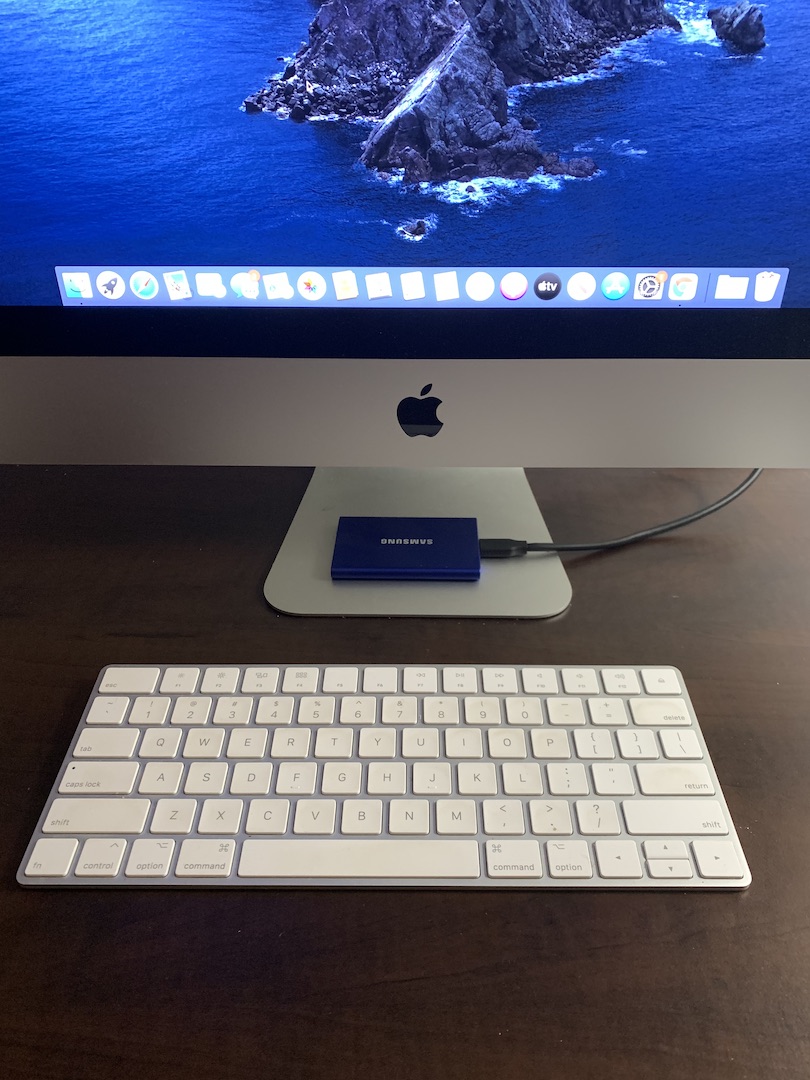
For my Mom’s 2017 iMac, I picked the 500 GB Samsung T7 Portable SSD in Blue with reads/write speeds of up 1,050 MB/s and 1,000 MB/s, respectively. It connects to the computer via the Thunderbolt 3 port (same as USB-C). And it only cost $80. Not bad!
Here’s what it looks like.
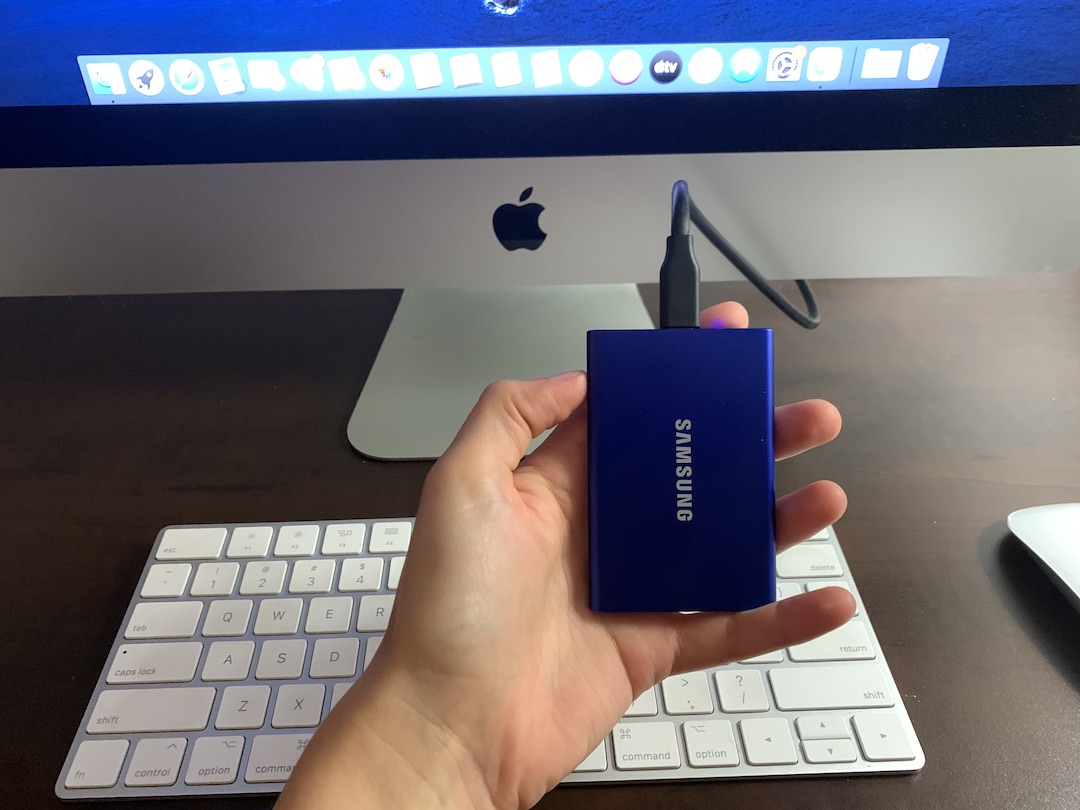
I was amazed that it had such a small footprint! For comparison, it’s about the size of the Apple Magic Mouse. Pretty small!
[amazon box=”B0874XJL6M, B016QO5YNG”]Where to Buy an External SSD for your iMac
You can buy an external SSD just about anywhere including Amazon, Target, or Staples. I picked mine up at Best Buy (mostly because I didn’t want to wait 2 days for it to arrive in the mail).
Overall, I think Samsung makes great storage products (both internally and externally), so I’d highly recommend the T7 drive for quality, speed, and price. Here are some additional drives I recommend below:
[amazon bestseller=”External SSD” items=”5″]
Step 2: Download macOS
Once you purchase your drive, you’ll need to download a fresh copy of macOS. You can download this file directly to your computer desktop. You can opt for the same version of macOS that you currently have or pick the latest flavor.
Click here for instructions on how to upgrade to macOS Big Sur.
Download and install macOS from the App Store on your Mac. Launch the App Store and search for macOS. Then choose macOS > Get. This will download the software to your computer.
This is a rather large file (8 GB), so give yourself about 30-60 minutes to complete the download. The exact time will depend on your internet speed, so if you have a wired internet connection, that will help.
Step 3: Erase, Format, and Install macOS on the External SSD
While the file is downloading, you can prep the external drive. You’ll need to erase and reformat it before installing macOS.
Here are the steps to follow:
- Connect the SSD to your computer using the USB cable.
- Open Disk Utility
- Choose the External Drive on the left sidebar
- Press “Erase” in the top bar
- Rename the Drive: I called the external SSD, “iMac” for simplicity.
The Scheme is GUID Partition Map, and the Format is Apple File System (APFS). Once the drive is reformatted, you’re ready to install macOS on the external SSD.
To install macOS on the external SSD, follow these steps:
- Open Finder and navigate to the macOS installer.
- Launch the macOS installer and click “Continue”
- Read the terms and conditions. Proceed with “Agree”, then “Continue”
- Click “Show All Disks” > Select Your External SSD
- Choose Install
macOS will be installed on your External SSD.
For Macs with the T2 Chip
If your Mac has a T2 chip, then you may have to bypass the default security settings. By default, Macs with the T2 processor will not boot from an external drive. This is to prevent malicious activity with external devices (and theoretically make the computer more secure).
In our case, though, we need to boot from the external drive that we’re creating, so we must disable the Startup Security Utility.
To fix this, reboot your Mac and press the Command + R keys until you see the Apple logo. Then go to Utilities > Startup Security Utility. Go to the section that says “External Boot” and change it from Disallow to “Allow booting from external media.”
Then quit the utility and reboot. You should be able to proceed with setting up the bootable drive.
Step 4: Set Boot Settings and Boot to SSD (by default)
To make life easier, you can set the default boot drive to the external SSD. Here’s how:
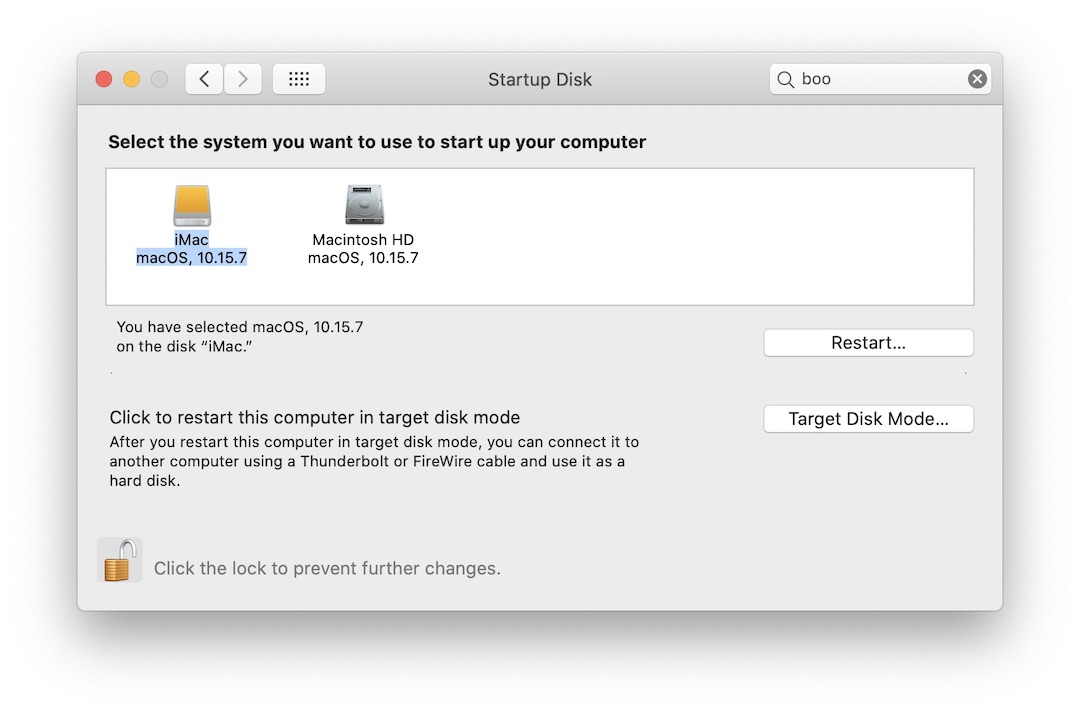
- On your Mac, choose Apple menu > System Preferences, then click Startup Disk.
- If the lock at the bottom left is locked, click the lock and type in your computer’s username and password.
- Click the icon of the disk you want to use, then click Restart.
If you’d want to pick a drive to boot to, you can skip the previous step and press the OPTION key when you power on the iMac. Then select the drive you want to boot to, either the internal or external drive.
Step 5: Setup your iMac & Enjoy!
Boot to the new SSD. You’ll be prompted to set up your computer as if it was a brand new Mac from Apple!
[amazon bestseller=”iMac” items=”3″]
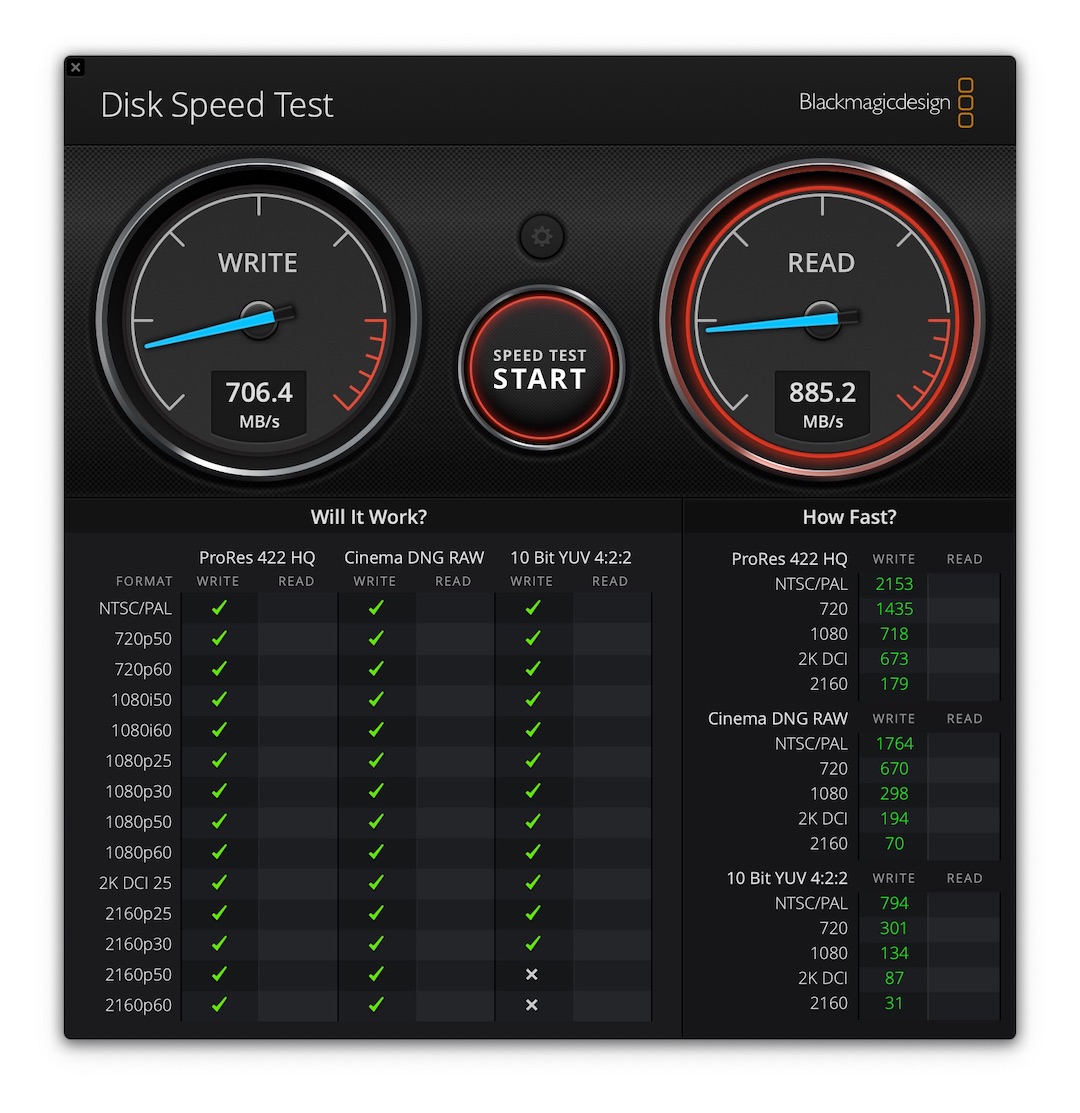
The only thing left to do is rerun the benchmark using Blackmagic.
Install Blackmagic on the external SSD and run through the test again.
Record the speeds and compare them to your preliminary tests from before. My Mom’s upgrade resulted in 700-900 Mb/s read/write, which are effectively 70X the speeds from before. Not too bad for a few hours and $100.
Finally, you can install the computer programs you use the most (MS Office, Final Cut Pro X, Chrome, etc.) and get on with your life.
Bonus Step 6: Access your internal HDD Files
Once you’ve configured your computer, you can open up the HDD files through Finder. Launch Finder and scroll down to the “Locations” section on the left pane. You should see the internal HDD listed. Click on the drive, and you can navigate the file system as usual. You may need to enter the original username and password for protected files.
Bonus Step 7: Configure a Backup Device (Time Machine or MyCloud)
Now that you have a sick new setup, it’s a good idea to set up your backup drive. (That way if something fails or you accidentally delete an important file, you have a way to recover it.) Most people know the importance of having a backup drive but somehow forget to set one up! It’s crazy.
Don’t be that person who loses years of photos or info because you forgot to set up a backup.
You can do this in a few different ways: My Cloud, Time Machine, or another cloud backup service.
Backup Option A: My Cloud
For my Mom’s computer, we have it synced to the family’s 4 TB My Cloud. The Western Digital (WD) My Cloud is a storage device that is connected to your home network via ethernet. Think of it like a personal Google Drive or your cloud storage that you can manage locally.
I love this device because once you have it set up, you own the drive (it’s a lot more private than Joojle or other providers), and it works with computers, phones, and tablets. Set it and forget it!
I’d highly recommend going this route if you need to set up a family or multi-device wireless backup and want an easy, affordable way to manage your data without handing it over to big tech.
[amazon box=”B076CTK55W,B01AWH05GE”]Backup Option B: Time Machine
A classic choice is Time Machine. Purchase a second external SSD or use an HDD as your Time Machine device. Follow the setup prompts for Time Machine, and you’re good to go. The big difference between this and MyCloud is that the Time Machine will only back up your Mac.
If you have phones, tablets, or family devices, you’ll have to manually back these up separately. Nonetheless, it’s better to have some form of backup, and Time Machine is a breeze to configure.
[amazon bestseller=”External HDD” items=”3″]Backup Option C: Cloud Services
Finally, you can opt for free and paid cloud backups. Cloud services allow you to store your files on their servers. Google (10% off), Microsoft OneDrive, Dropbox (Bonus 500 MB with the link), and MEGA are popular services to choose from.
The biggest thing to consider is if you want your documents on these systems (and whether you’re willing to pay for the hosting). Many cloud services are convenient because they work with computers, tablets, and phones.
Plus, you’ll have peace of mind that your files are automatically synchronized.
Deal: Get 2-months free when you purchase a MEGA annual plan.
Bonus Step 8: How to Attach an External SSD to Your iMac
The iMac isn’t portable, so having an external SSD plugged in isn’t a big deal. The Samsung T7 SSD has a small footprint, so I placed it on the iMac stand for easy reach.
If you’re looking for a way to attach or mount the SSD to your iMac, here are a couple of things you can try:
- Print a 3D tray for the SSD: Here’s a drawing. Need it printed? Submit the file here, and I can print and ship it to you.
- Use double-sided tape or velcro. Attach the drive to the back of the iMac.
Of course, this is unnecessary and has nothing to do with the functionality, but some people would rather integrate the external drive with the iMac instead of just letting it rest on the bottom stand. The choice is up to you!
Don’t want to upgrade? Mac specs for 2021
If you have a computer that is a 2012 model or older, you may want to consider upgrading to a newer model. 2012 models and older may become incompatible with the new macOS flavors (Big Sur and beyond).
At a bare minimum, if you’re looking to buy a new computer, I recommend the following specs:
- 16 GB RAM (or more)
- 500 GB SSD (or more)
- i5 or i7 processor
If you’re a computer junkie, you’ll know your spec better than I would, so that may not be enough juice for your application.
However, if you’re not a computer whiz, and you’re using your computer for basic activities (Internet browsing, business tasks, office, streaming videos, etc.), the spec above will last you for the next few years.
For engineers, I recommend checking out the best computers for engineering students and robotics engineers. Or, you can check out some top picks, below.
[amazon bestseller=”laptop over $1000 16 gb ram 500 gb ssd” items=”5″]
Did this help you speed up your iMac?
Have you tried this trick with other computers? Did this dramatically improve your iMac’s speed?
Let me know in the comments below!


