Have you ever wanted to host a robotics class for your school, club, or kids? Well, look no further! In this tutorial, I’m going to show you how to make a DIY robot.
This project is great for kids and also affordable for community groups such as Girl Scouts and Boy Scouts. Earn the robotics badges when you complete this project!
Grab the Maker’s Manual for this Project
Pick up our handy Maker’s Manual for Beginner Robotics and learn to build a custom robot for less than $30. Includes worksheets, step-by-step guides, and a full tutorial on how to create your robot from the ground up. Designed for beginners interested in robots who want to design, program, and code a robot from A to Z, easily!
Robotics kits can set you back hundreds of dollars per kit or more. However, this article will show how to create robots for less than $50 per kit.
For about $300, you can create a custom classroom set of robots that will teach hands-on concepts in mechanical design, electronics, and programming.
Not too shabby right?
Plus, students will have a great time designing and decorating their custom chassis. That means no two robots will look alike!
Let’s get started!
Cheap DIY Robots Materials List
The DIY robotics materials list will create ten robots. Feel free to scale the materials list to best suit the number of robots you want to build.
If you’re working in a group, you can have students work in pairs to maximize your resources.
Furthermore, I wouldn’t recommend having more than two students work together because then one person won’t be as engaged as the other two.
Without further ado, here’s the shopping list for do-it-yourself robots.
| Item | # per robot | Quantity to Buy | Unit Price | Total | Link to Buy |
|---|---|---|---|---|---|
| Continuous Servo Wheels 2 pack | 2 | 10 | $13.99 | $139.90 | Check Price on Amazon |
| Arduino Nano 3 pack w/ USB cords | 1 | 4 | $13.99 | $55.96 | Check Price on Amazon |
| Arduino Nano Shield 5 pack | 1 | 2 | $15.59 | $31.18 | Check Price on Amazon |
| 9V battery connectors 10 pack | 1 | 1 | $5.55 | $5.55 | Check Price on Amazon |
| IR Sensors 10 pack* | 2 | 2 | $9.98 | $19.96 | Check Price on Amazon |
| 9V batteries 10 pack | 1 | 1 | $10.99 | $10.99 | Check Price on Amazon |
| Assorted Ribbon Cable* | 4 | 1 | $5.99 | $5.99 | Check Price on Amazon |
| Caster Wheels | 1 | 1 | $12.99 | $12.99 | Check Price on Amazon |
| Grand Total | $282.52 | ||||
| Cost per robot | $28.25 | ||||
*Optional Items if you want to add sensors to your robot.
Lastly, you will need to get a couple of cardboard boxes to make your chassis. If you’re looking for cardboard, check with your local grocery store.
You can also buy some foam board. It’s better to break down the boxes and cut them into pieces before your class. That way students can spend time designing their chassis, rather than fighting over who gets a box.
If you’re looking for a ready-made system, then I recommend our robotics training program.
Required Tools to Build the Simple Robot
To assemble your robot, you will need the following tools on hand. The quantities given below are the recommended amounts. You can always purchase extra if you feel you need more hot-gluing stations or tools available.
| Item | Quantity to Buy | Unit Price | Total | Link to Buy |
|---|---|---|---|---|
| Hot Glue Gun w/ Glue Sticks | 2 | $8.99 | $17.98 | Buy on Amazon |
| Mini Screwdriver set | 2 | $4.55 | $9.10 | Buy on Amazon |
| Double-sided tape | 1 | $4.82 | $4.82 | Buy on Amazon |
| Electrical tape | 1 | $5.35 | $5.35 | Buy on Amazon |
| Exacto Knife | 1 | $5.71 | $5.71 | Buy on Amazon |
| Scissors | 2 | $7.99 | $15.98 | Buy on Amazon |
| Grand Total | $58.94 | |||
If you still haven’t gotten on the Prime bandwagon, you can get Free 2-day shipping for 30-days on Amazon.
Get Organized by Creating Individual “Kits”
Once the parts arrive, make sure you have everything on the list. You don’t want to get started building and realize you’re missing components.
If you’re teaching this project to a group, I recommend creating your own “kits.” Sort the parts so that each kit has enough components to make a single robot. The quantities of parts per robot are listed below.
If you’re short on time or not really up for the task of putting together all these parts, you can buy a group set already pre-packed and ready to go for your next class!
| Item | # per robot |
|---|---|
| Continuous Servo w/ Wheels | 2 |
| Arduino Nano w/ USB cords | 1 |
| Arduino Nano Shield | 1 |
| 9V battery connectors | 1 |
| IR Sensors | 2 |
| 9V battery | 1 |
| Assorted Ribbon Cables | 4 |
| Caster Wheel | 1 |
Build your robotics kit for kids by dividing the bulk components into kits. You can put the components in paper or plastic lunch bags or storage containers to keep them together. Then, distribute a kit to each student or pair when you’re ready to teach the lesson.
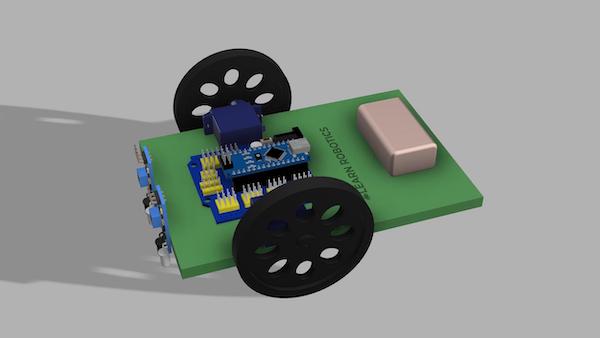
Now that we have the components and the kits, it’s time to assemble our robots.
How to Assemble a Robot
This section will guide you through the process of building a simple robot with do-it-yourself components. If you don’t have a technical background, you may need to spend some time reviewing this and/or building your robot in advance.
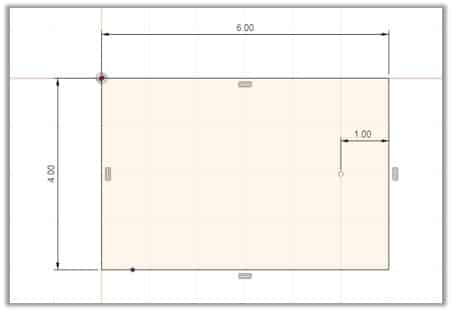
Create the Chassis
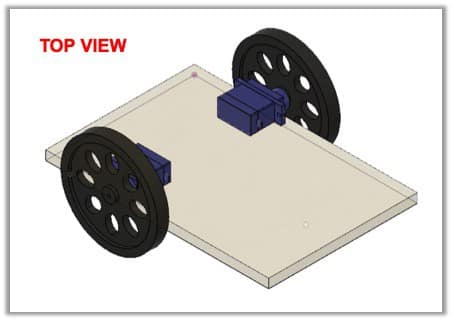
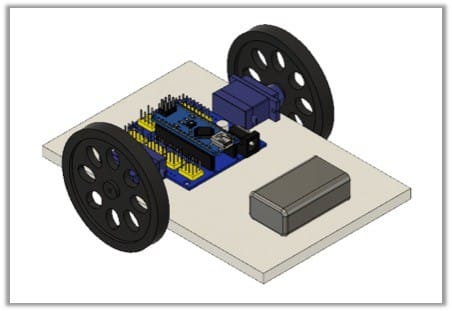
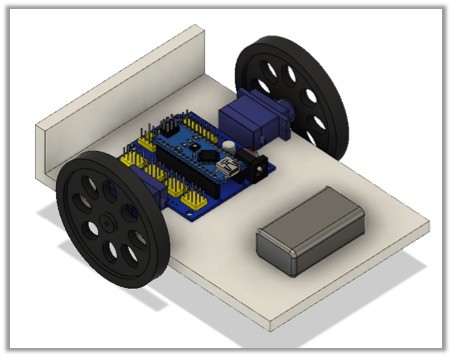
First, create your chassis with cardboard sheets. This will be the structure that the components are mounted to. The minimum dimensions required for this robot are 4 inches by 6 inches to fit the controller, motors, and battery.
Here’s the basic rectangular design. Feel free to use your imagination and create other shapes and cutouts for your robot chassis. You can also spend time decorating your robot so that it has your flare! Stickers and markers are good for adding customizations.
Another idea is to have students design their chassis. You can tie this project into other classes such as Geometry, Computer Science, or other math classes.
Attach the Motors and Wheels to the Chassis
Once you have your chassis cut, it’s time to add the components from the kit you made earlier.
Secondly, attach the servos using a hot glue gun. You must use hot glue for this because the servos are heavy and will not stay attached using double-sided tape.
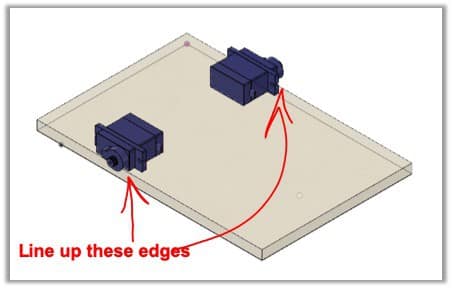
Ensure the edges of the servos are lined up with the edges of the chassis. This will prevent unnecessary friction between the wheel and the frame.
Next, connect the wheels to the servo horns. Make sure the wires are leading toward the center of the robot (not toward the ends).
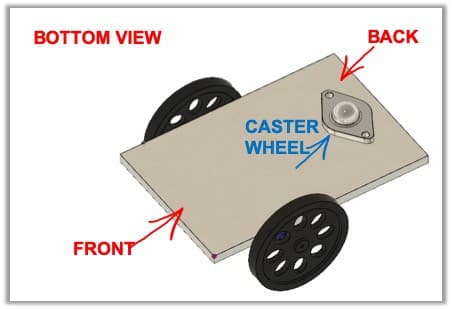
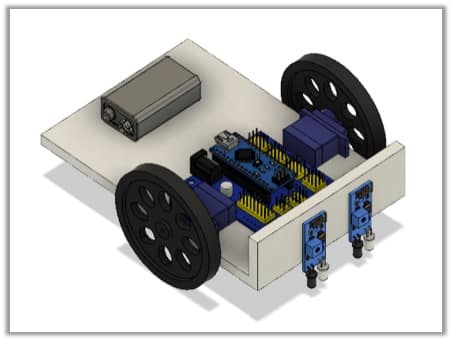
Thirdly, flip the robot over and hot glue the caster wheel to the back of the frame. Make sure the caster wheel is centered horizontally and about 1 inch from the back of the chassis.
Our simple robot is now looking like, well, a robot! It’s time to add some electronics to our bot.
Mount the Arduino Nano to the Robot
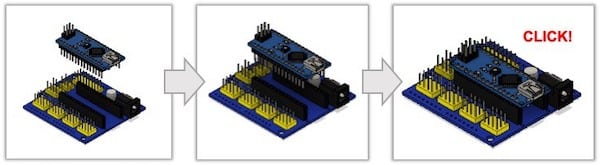
Rotate the robot back to the upright position. Connect the Arduino Nano to the Arduino Nano Shield. Ensure that the pins are lined up and the USB connector is in line with the DC Barrel Jack. Refer to the diagrams below.
Then place a bead of hot glue on the back of the Nano Sensor Shield. Affix it to the Top of the Chassis. I mounted mine between the two servo motors. You can attach it anywhere it will rest flat towards the front of the robot.
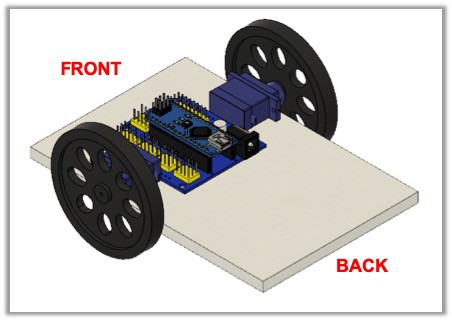
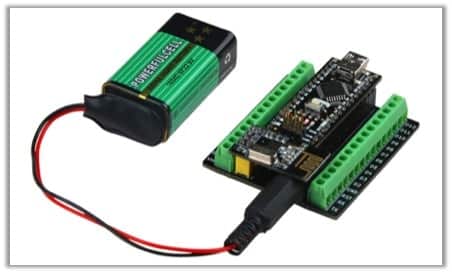
Finally, plug the battery connector into the 9V battery connector. Hot glue the 9V battery onto the back of the chassis (preferably over the caster wheel).
Do not plug the battery into the Arduino Nano Shield. This will turn on the Arduino, which is what we don’t want while we’re plugging in electronics!
That’s it for building a basic robot! Now it’s time to wire up the electronics!
Wiring Electronics for an Arduino Robot
If you’ve never built a robot with Arduino before, this will be an exciting experience for you. The Arduino Nano is a microcontroller that we will program to move the robot around autonomously. You can think of it similarly to the brain of a person.
In this section, I’m going to give a very abbreviated version of how to wire the Arduino Nano. If you’re completely new to Arduino, I recommend checking out these resources to get you on-boarded fast:
- Four Steps to Writing an Arduino Program
- The Simple Guide to Arduino
- How IR Sensors work for mobile robots
Arduino Nano Pinout Diagram
The Arduino Nano has pins that we will connect our motors and sensors to. Here’s the pinout diagram for the Arduino Nano.
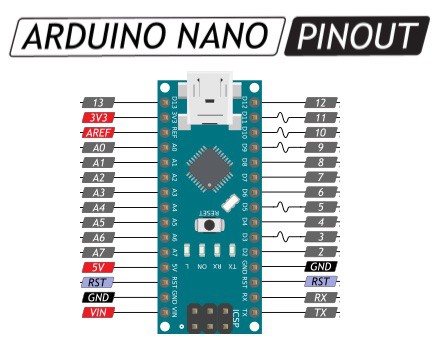
You don’t have to worry about understanding the diagram 100% to complete this project. However, I want you to pay attention to the two sets of pins on the controller.
On the left side, you can see a group of pins labeled A0, A1… through A7. These pins are Analog Input pins. They provide a 10-bit reading from sensors. If you read a sensor on any of these pins, the data will come in the range of 0-1023.
We won’t be covering analog signals in this tutorial, but if you’re interested in learning more about how Arduino works, check out my self-paced Online Robotics Certification training. It’s designed to get you up to speed with building and wiring sensors for rapid prototyping.
Furthermore, on the right side, you’ll notice a group of pins labeled 0, 1, 2… through 12. (13 is on the left.) These pins are Digitial Input and Output pins. Digital signals provide an input or output value of 1 or 0 (1-bit).
Lastly, find the pins labeled 5V (red) and GND (black). These are your power pins. You’ll use them to power the servos and sensors added to the robot.
Now that you have a brief overview of the controller, let’s start wiring our components.
There are only two components that you’ll need to wire into the Arduino Nano Sensor shield. (Three if you choose to install the IR sensors.)
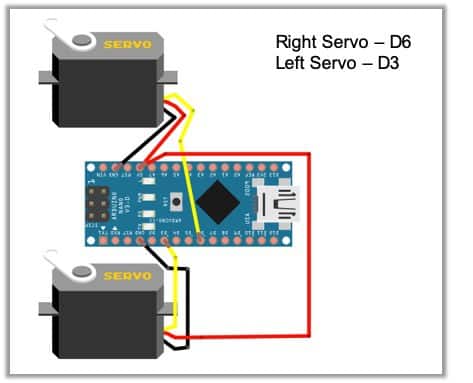
Servo Motors Wiring to Arduino Nano
Most servos have limited degrees of rotation (typically 270 degrees); however, these servos are Continuous Rotation Servos, which means they rotate the full 360 degrees.
Servo Motors have 3 wires: Ground, Power, and Signal. Connect them to the controller as shown in the diagram below. The right servo will be controlled on Digital Pin 6. The left servo will be controlled on Digital Pin 3.
Now that the robot is wired, it’s time to program the servos to get our robot moving!
Program a Simple DIY Robot
The moment you’ve been waiting for is here! Finally, we can program our simple robots!
If this is your first time using Arduino, I recommend reading my article, Four Steps to writing any Arduino Program, before getting started.
Preparation Checklist: (You must do these before beginning the projects.)
- Download and install the Arduino IDE.
- Download and install CH340G drivers.
- Read how to download code to the Arduino
- Have your USB cord nearby.
The Servos can be controlled using the Servo Library from Arduino.
The write() the method can be used to control how the servos turn. On a continuous rotation servo, we can provide an input parameter to control speed and direction.
It works like a sliding scale. Think of 90 as the center of a line. 0 is full-speed back and 180 is full-speed forward. Any numbers in between are a fraction of the speed in that direction.
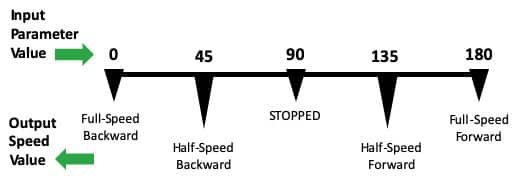
We will use this information to create solutions for the example projects. Because we have motors mounted in opposing directions, we’ll have to modify the Input Parameter Value for the right side by flipping our timeline. For example, 180 will be full-speed backward and 0 will be full-speed forward.
Project #1 – Learn how to move the robot
It’s important to know how the motors work on our robot. This example will teach you how to set the speed and direction of the servo motors for various challenges.
I recommend propping the robot up on a book so that it doesn’t roll off the table for this activity. Keep the battery unplugged from the robot until you’ve uploaded the sketch.
First, include the Servo library. In the Arduino IDE Go to Sketch > Include Library > Servo.
Now, let’s create some Servo instances.
#include
/*
* Simple Robot Sample Code
* by Liz Miller
*
*/
Servo left;
Servo right;
int go = 1; //initialize the main loop
Next, assign a pin to the servo instances. This will be the PIN the servo is connected to on the Arduino Nano. (The Arduino Nano and the Arduino Nano Shield share the same pin connections.)
void setup() {
  // put your setup code here, to run once:
  left.attach(3); //left servo on D3
  right.attach(6); //right servo on D6
}
It’s a good idea to initialize the servo speed to zero to prevent unnecessary motion during startup. See below.
void setup() {
  // put your setup code here, to run once:
  left.attach(3); //left servo on D3
  right.attach(6); //right servo on D6
  left.write(90);
  right.write(90);
}
Remember the sliding scale we talked about earlier. If 90 is the center at full-stop, then 0 is full-speed backward and 180 is full-speed forward.
All the numbers in between are fractional speeds in that direction. Let’s look at how the robot moves when we control the left servo motor.
void loop() {
  // put your main code here, to run repeatedly:
  left.write(180);  //run the left servo full speed forward
}
Notice the direction that the servo moves in. Next, let’s move both motors.
void loop() {
// put your main code here, to run repeatedly:
  while(go==1){
    left.write(180);  //run the left servo full speed forward
    right.write(180); //run the right servo full speed forward
    delay(2000);
    left.write(90);
    right.write(90);
    go=0;
   }
}
You’ll notice that the robot spins because the right motor is mounted in the opposite direction. Update the right motor value from 180 to 0. Then, rerun the code. You should see your robot move forward for 2 seconds and then stop.
Need help? Download the full example code below by purchasing our Maker’s Manual for Beginner Robots, below!
Connect the Battery to the Arduino Nano
Finally, when you’re ready to run the robot untethered from your computer, disconnect the USB cable and connect the 9V battery to the Arduino Nano shield barrel plug. The robot should turn on and start moving!
Add Sensors to the Simple Robot
This guide was meant to be a starting point for robotics. I want to briefly touch on how to take the next step and add sensors to your robot. In this section, I will show you how to install and wire IR sensors for your robot.
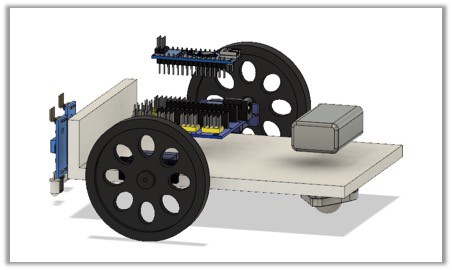
Mount IR Sensors to the Robot
If you decided to purchase a few packs of IR Sensors, follow these mounting instructions.
First, cut a 1” tall strip of cardboard and hot glue the base to the front of the robot.
Next, affix the IR sensors in the vertical position on the front of the cardboard using a couple of dots of hot glue. Make sure that the bottoms of the LEDs are close to the ground, but not touching the ground. Place the IR sensors about ½” to 1” away from each other.
Now that the robot is built, we will move on to wiring up the components.
Wire an IR Sensor to Arduino Nano
The IR Sensors can be wired as Digital or Analog sensors depending on how you want to read data from the environment.
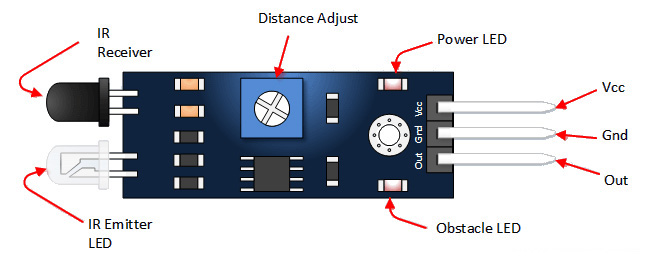
IR Sensors have 3 pins: Ground (GND), Power (Vcc), and Signal (Out). Peel off a section of 3 cables to connect the IR sensor to the Arduino Nano Shield. Repeat this process for IR sensor 2.
The Signal Wire will be connected depending on if you want to read the sensors digitally or using analog pins. Analog readings are more accurate but also more challenging to program.
Digital Wiring: Connect the Signal Pins to D4 and D5 for 1-bit Digital readings (0 or 1).
Analog Wiring: Attach the Signal Pins to A0 and A1 for 10-bit Analog readings (0-1023).
For a detailed guide on how to wire and program an IR sensor, check out this tutorial.
How to Program an IR Sensor with Arduino
To program an IR sensor with Arduino, you’ll want to use some if-statements to check the readings from the IR sensors. Because we have two IR sensors, we can capture readings from both sides and turn ourselves closer to the line. This gives the perception of “line following.”
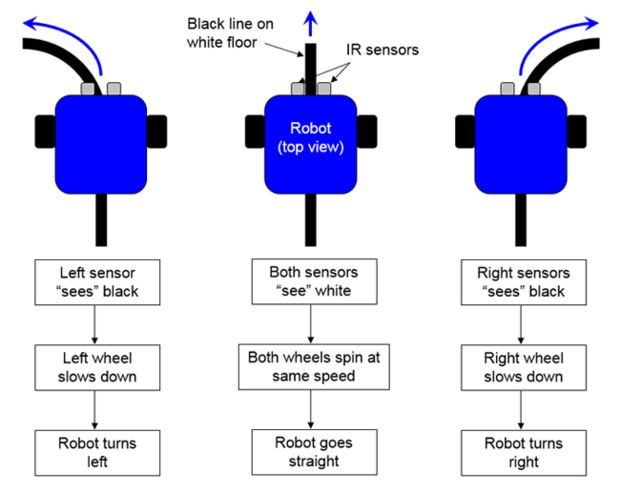
Now let’s translate this to code. If the sensor is on the line, keep going, otherwise, rotate towards the center of the robot. We’ll use an if-statement and the reading from each IR sensor. Here’s an example:
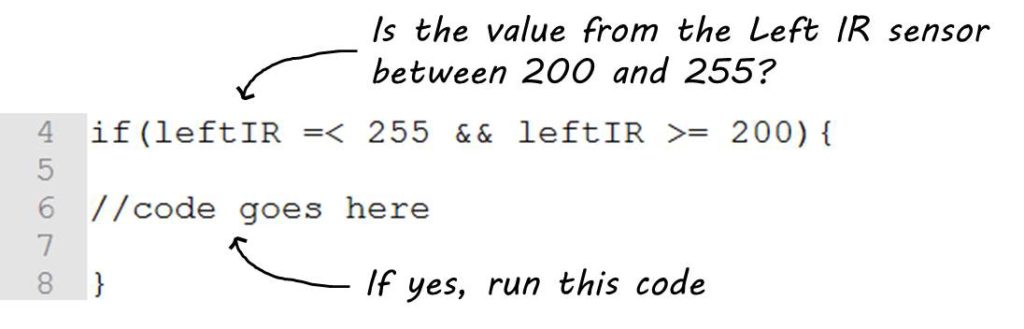
You’ll have to capture readings from your sensors before writing the conditional statements. That way you’ll be comparing the current condition against your desired condition (i.e. on the line).
This is beyond the basics for beginners, so don’t worry if you don’t fully understand this step. I recommend checking out this guide.
Looking for a turnkey robotics education program?
This guide is designed for instructors with experience in developing robotics and engineering curriculum. While comprehensive, it isn’t designed if you don’t have some background in robotics. That’s why we offer Robotics Education Consulting for Schools and Organizations.
This includes hardware kits for every student plus online access to the Learn Robotics curriculum, auto-graded quizzes, and lab-based projects. The best part is that you don’t need to know anything about robotics to run your robotics class!
Bring Robotics to your school with Consulting by Learn Robotics! Click here for more information.