

The Robot Maze Challenge a classic lesson that I like to teach at demos, showcases, short presentations, and guest lectures. With minimal equipment, you can teach students the fundamentals of flowchart programming, logical thinking, process flow, and introductory programming all in one simple activity.
Why this STEM Challenge is My Favorite
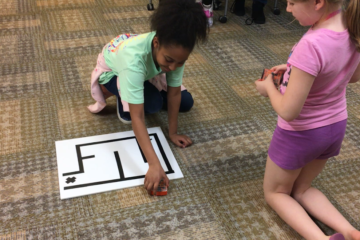
The reason why I like this lesson so much is that students are already familiar with solving mazes — either on paper or in a corn maze, and can understand how to figure out the challenge. Then as educators, we can take this lesson a step further and introduce the concept of sending a robot in to solve the maze.
Expand Upon this Challenge with Additional Lessons
There are lots of topics you can explore with your students using the Robot Maze Challenge. While this list isn’t comprehensive, it should give you a few starting points to get the creative juices flowing. Feel free to expand upon this list by dropping some comments below.
- Precursor lesson for the Engineering Design Process
- Intro to Programming using Flowcharts
- 30-minute warm-up activity to get students ready to learn computer programming, science, or STEM-related courses
- A full-blown challenge where students program robots to solve the maze and this is just the first step
Things you’ll need for this lesson
- Posterboard or Foam Board (17″x24″ or 24″x36″)
- Maze Pattern (See below)
- Black Sharpie or Black Electrical Tape
- Maze Challenge Worksheet
- Optional: Mobile Robot Kit & Laptops to program the robots to complete the maze
Download the Maze Challenge Worksheet
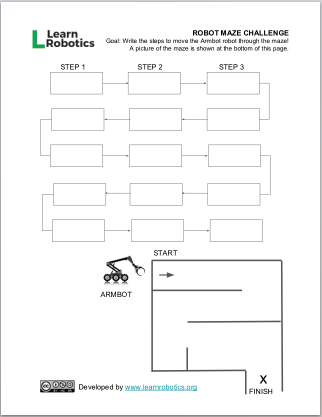
Enter your email to download the accompanying worksheet to use in your class.
Here’s your download!
Download the Lesson Plan Template (PDF)
Lesson Overview
We’ll first create our Maze poster board then print out worksheets for the students.
Grab your poster board and a pencil, then use the maze stencil below to draw on the maze. Cover your pencil lines with a black sharpie or electrical tape. If you decide to take this challenge a step further, you can use this poster board as a testing field for the robots!
Maze Stencil
Feel free to copy the maze template below, or search online for maze designs. We don’t want the maze to be “too complicated” because then there will be too many process steps to list out to get the robot through the maze. The template that I provided below provides just enough of a challenge to make it fun without being frustrated.
Tip: I recommend leaving about 2″ from the edges to ensure the robot has enough space to “see” the line before moving off the page.
Objectives & Lesson Overview
Like with any maze, the objective is to drive the robot from the starting point to the finish point without driving through walls or leaving the course. You can choose to use “dead reckoning“, a hard-coded methodology for programming the robot through the maze, or you can elect to program onboard sensors to “see” walls and make decisions.
I recommend starting off with dead reckoning and then using IR or Ultrasonic sensors for your early-finishers or those students who need a bit more challenge.
For the purpose of this article, we will focus on using dead reckoning to create a manual set of instructions to hard-code the robot to the finish line.
Instruct your students to use the following commands to solve the maze:
- Forward
- Backward
- Left
- Right
- Stop
- Time Duration (to be tested)
Teacher’s Notes & Instructions
We’ll now fill out the Worksheet with steps needed to guide the Armbot through the maze. For this section, I’m going to use the Maze template (above) to walk you through the solution. If you use a different maze template, the solution will most likely be a little different.
Let’s get to it!
The first step is to drive the robot forward. We’ll write “forward” in the block for STEP 1.
When we program a robot to move in a direction, we also have to specify “how long” we want the robot to move for. We’ll use a “time duration” block for STEP 2. Students will have to test out the time duration to figure out how many seconds the robot needs to run to reach the first maze wall.
Next, we want to tell the robot to Stop. I highly recommend stopping your robot before changing directions. It’s good practice to include this rather than coasting into a turn. We will write Stop for STEP 3.
For STEP 4, we need to make a 90-degree right turn. You can supplement this part of the lesson with a lesson on angles and protractors if you desire.
Finally, we will go through the maze, guiding our robot through the process steps. You can walk your students through each step, assign small groups to work together to figure out the rest of the maze, or have students work independently. Once students have the full list of steps written on their worksheet, be sure to review the steps for correctness.
Next Steps
If your classroom has laptops or a computer lab and robotics kits, instruct students to build a mobile robot and program it to move through this maze. Students can use the worksheets from this lesson to help them create a program.
This is a great activity for students to work in pairs or groups of 3. I wouldn’t recommend large groups because then some students won’t have anything to work on, and they’ll become disengaged.
Programming Classes for Educators
Did you like this article? If so, I offer online and on-site professional training for educators. Join my class and I’ll show you how to program robots to use in your classroom. Classes are guaranteed to be interactive, individualized, and designed with your class in mind!
Contact Me if you’d like to explore robotics kits and curriculum options for your school. I can connect you with an appropriate robotics solution for your school’s STEM program!


