

Did you inherit or pick up a Meet Edison Robot?
No? Maybe you want to get yours here. Or, maybe not… (don’t buy one!)
But, for those of you who have a robot and can’t figure out how to get it working, this article is for you!
I decided to put together a “crash-course” for programming the Meet Edison Robot. My goal is to get you up and running with your robot in 15 minutes or less. Ready to get started?
Parts of the Meet Edison Robot
The Meet Edison Robot has 7 built-in sensors plus motor control. You can even connect Legos to build a variety of prototypes and gadgets! Here’s a map of all the components.
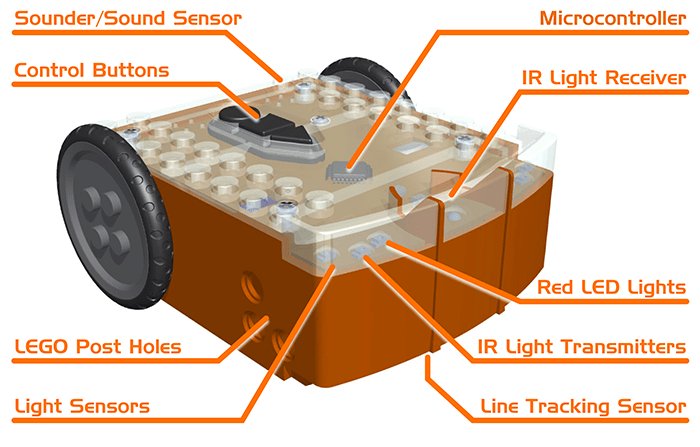
Let’s check out each of these components in more detail. Watch the video to learn more about the Meet Edison Robot.
Program your Robot with Scratch or Python
Pick your poison. If you have never programmed anything, I recommend using Scratch (flowchart language). Otherwise, you can use EdPy (typing language), a version of Python to write programs for your robot. Both languages have their own online development environment. You will need an internet connection to program the Meet Edison Robot.
For the purpose of this tutorial, we will walk through how to write a simple program and download it to the robot. We will use the EdScratch environment.
Quick Overview of Scratch
Scratch is a visual programming languages created by MIT Media Lab. There is a built-in library of Scratch blocks specifically for the Meet Edison Robot. The blocks are categorized by function: drive, LEDs, Sound, Control, etc.
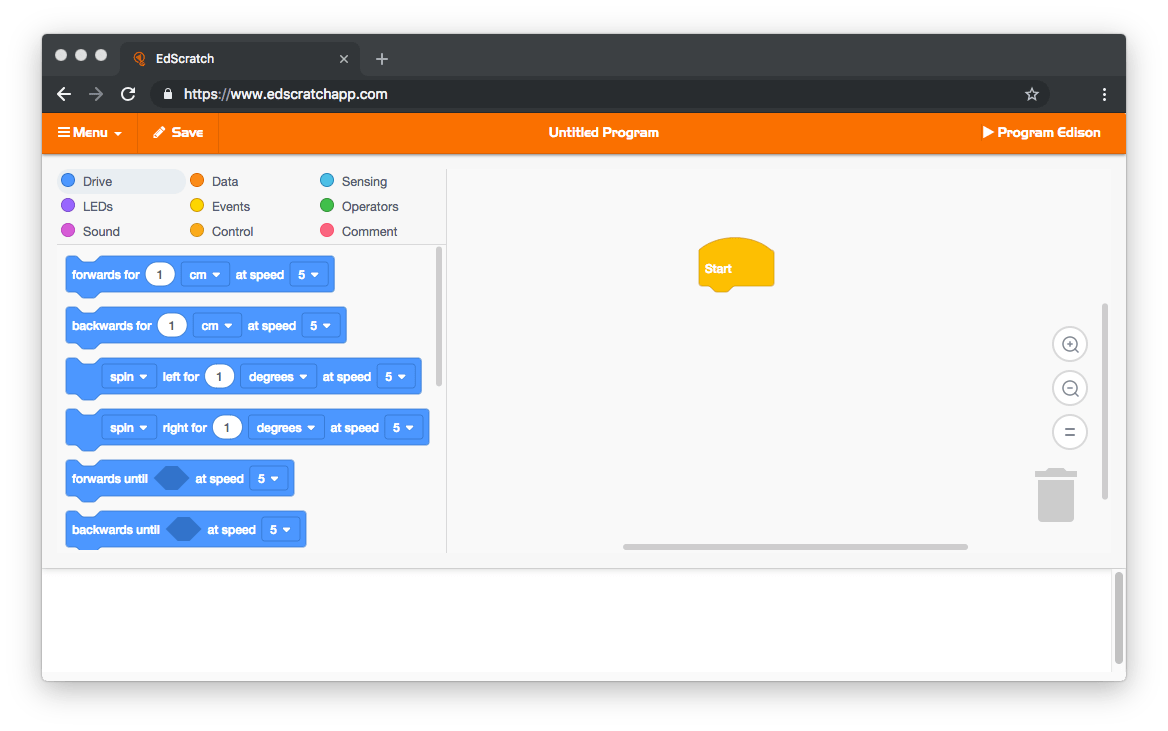
To use the blocks, drag the one you want into the programming environment on the right. Make sure that the blocks “snap” or “connect” together on the screen. The program is read and executes from top to bottom in sequential order. Keep this in mind while you’re programming.
Simple Program with Meet Edison
Now that you have the basics of Scratch, let’s use this knowledge to illuminate the Left LED on the Meet Edison Robot.
I recommend writing, step-by-step, the actions you’d like to do with your robot. Then you can translate these steps into Scratch blocks and test it out.
Our illuminating LED problem is fairly simple. First, we set the LED ON and then we run this program FOREVER.
Here’s a walk through of writing this program.
Pretty nifty, right? Now, that we have our program, it’s time to download the code to the robot.
Download Code to the Meet Edison Robot
The most important part of this guide is this section. So don’t skip it! To run programs on the robot, you’ll have to download the code from your computer. Here’s how to do it. Follow along with the video, below.
Here are the step-by-step instructions to download code to your robot:
- Power the Edison ON
- Plug the EdComm programming cable into the bottom of the robot.
- Connect the headphone end of the EdComm programming cable into your computer’s headphone jack.
- Turn the Volume Up to the HIGHEST setting on your computer.
- Go to the top right corner of the EdScratch App IDE and click Program Edison
- Click the Circle Button ONCE so that both LEDs are ON (not flashing)
- Press the “Program Edison” button on the computer EdScratch App IDE
- You should hear a buzzing noise and then a beep once the program is uploaded.
Do NOT unplug the EdComm cable until the buzzing noise has stopped. This could interrupt the download and corrupt the file.
Once the code is on the robot, press the Triangle button to run the program. If everything is working correctly, you should see the left LED turn on.
What’s next?
Now that you understand the basics of programming and downloading code to your robot, the possibilities are endless. You can build robots to detect obstacles, play songs, or flash patterns with the LEDs. There’s no limit with what you can create with these projects!
If you’re an educator or homeschool parent, I invite you take my online eCourse using the Meet Edison robot. Our eCourse is designed to walk you through how to teach Meet Edison, and includes lesson plans, projects, quizzes, and a Course Certificate.
All of our courses are mapped to NGSS and CSTA standards in Education. Feel free to check that out here.
As always, if you have questions, leave a comment below or find me on Facebook or Instagram.


