

If you’ve ever tried to build a mobile robot, then you’ll need to learn how to program motor controllers. In our Beginner Bots tutorials, we use the L298N motor controller with the Arduino Uno to drive four motors. You can pick up a Smart Robot Car and follow along with this article if you’d like!
For this tutorial, I’m going to show you how to translate motor controller specifications into the Arduino code.
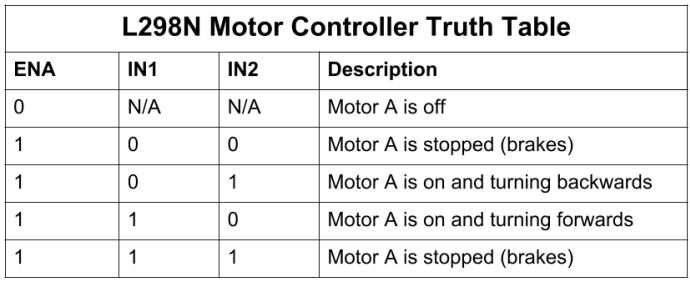
First, we will take a look at the L298N Motor Controller Specifications. Typically the manufacturer will include a truth table outlining key functionality. I’ve moved a copy of the L298N truth table below, for your reference.
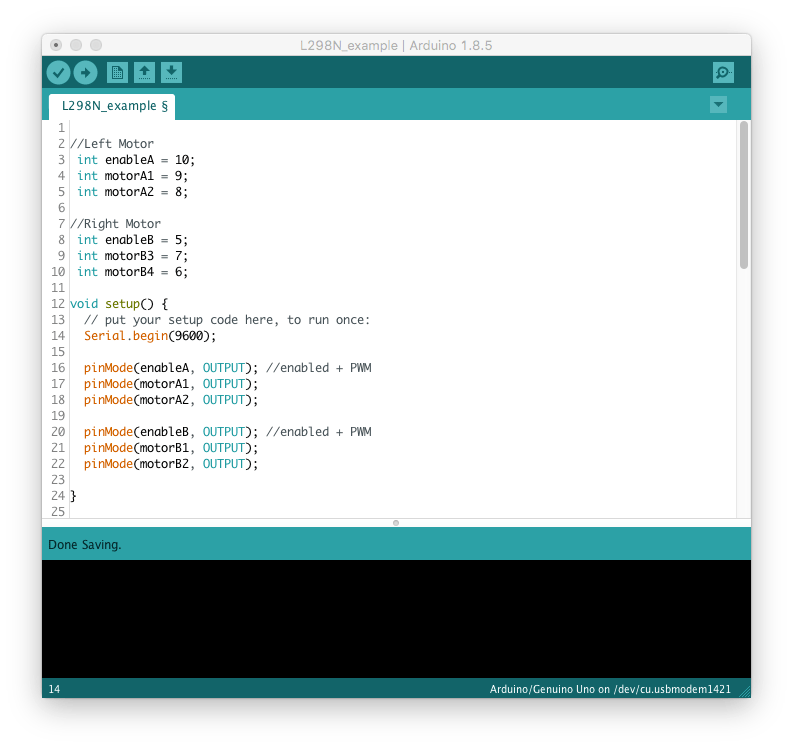
Next, we will create global variables for each of the motor pins. There are three pins per motor, so we will map each pin to a global variable. In the setup() method, we’ll declare each pin as an OUTPUT using the built-in pinMode(...) method.
Now, we’ll use the truth table to map out motor functionality for the robot. We want to create methods for forward, backward, left, right, and stop.
Here’s what the forward(...) method looks like.
Here’s your download!
We can use digitalWrite(...) to set the pin to a 1 or 0 (HIGH or LOW), respectively. To control the speed, we’ll use the analogWrite(...) command on the enable pin for each motor. Use a value of 0-255 because digital pins support 8-bit PWM control.
Also, the stop() method will set the Enable pin to 1 and Input 1 and 2 to 0. Then, you can repeat the translations for left, right, and backward moves using the remaining rows in the truth table.
When you’re finished, call the methods in loop() so that they execute on the robot. Be sure to test out your code on the floor and make modifications to the speed and/or direction, as necessary.
Tutorial Video
Are you more of a visual learner? Here’s a demonstration of how to use the L298N with Arduino.
If you have any questions about how to program your robot using a motor controller, be sure to comment below. You can also follow Learn Robotics on Facebook and Instagram for insider tips, robotics news, and updates!


7 Responses
Dear Liz,
Tenho trabalhado com o LM298 e não consigo variar a rpm via PWM nas porta ENA e ENB apenas nas IN1,2,3,4 . ENNA e ENB HIGH all the time.
Carlos bruni
Carlos, Thanks for the comment.
First, make sure that the ENA pin is connected to a PWM-enabled digital pin. Any of the pins with a ~ next to them are PWM enabled. In this example ENA is on pin 10. Then, set the ENA pin to HIGH using
digitalWrite(ENA, HIGH);Finally, to control speed, you’ll need to use theanalogWrite(ENA, 127);command. This one sets the motor to roughly half speed.Give this a try, and let me know how it goes!
Dear Liz,
Tenho trabalhado com o LM298 e não consigo variar a rpm via PWM nas porta ENA e ENB apenas nas IN1,2,3,4 . ENNA e ENB HIGH all the time.
Carlos bruni