

I see you! Well, at least the robots will after this lesson!
Last lesson we learned about infrared IR sensors, IF statements, and line following/avoiding.
This week, we are learning about Ultrasonic Sensors, FOR loops, and object avoidance.
Robot using Arduino and Ultrasonic Sensors – Objectives & Materials
Each week I will provide you with the objectives (goals of the lesson) and any materials you will need to complete the project.
I absolutely LOVE seeing what you guys are working on, so please don’t forget to tag me (@learnrobotics) on Instagram and Facebook with any progress you’ve made!
Part 4 – Goals & Objectives
- Wire ultrasonic sensors
- Configure the ultrasonic sensors in the Arduino IDE
- How to use For Loops for Iterations
- Complete Robot Challenges in Object Avoidance
- Time Duration: Approximately 2 hours. This lesson is shorter because we can configure the Ultrasonic Sensors similarly to the IR sensors from Lesson #4!
Materials for this Lesson
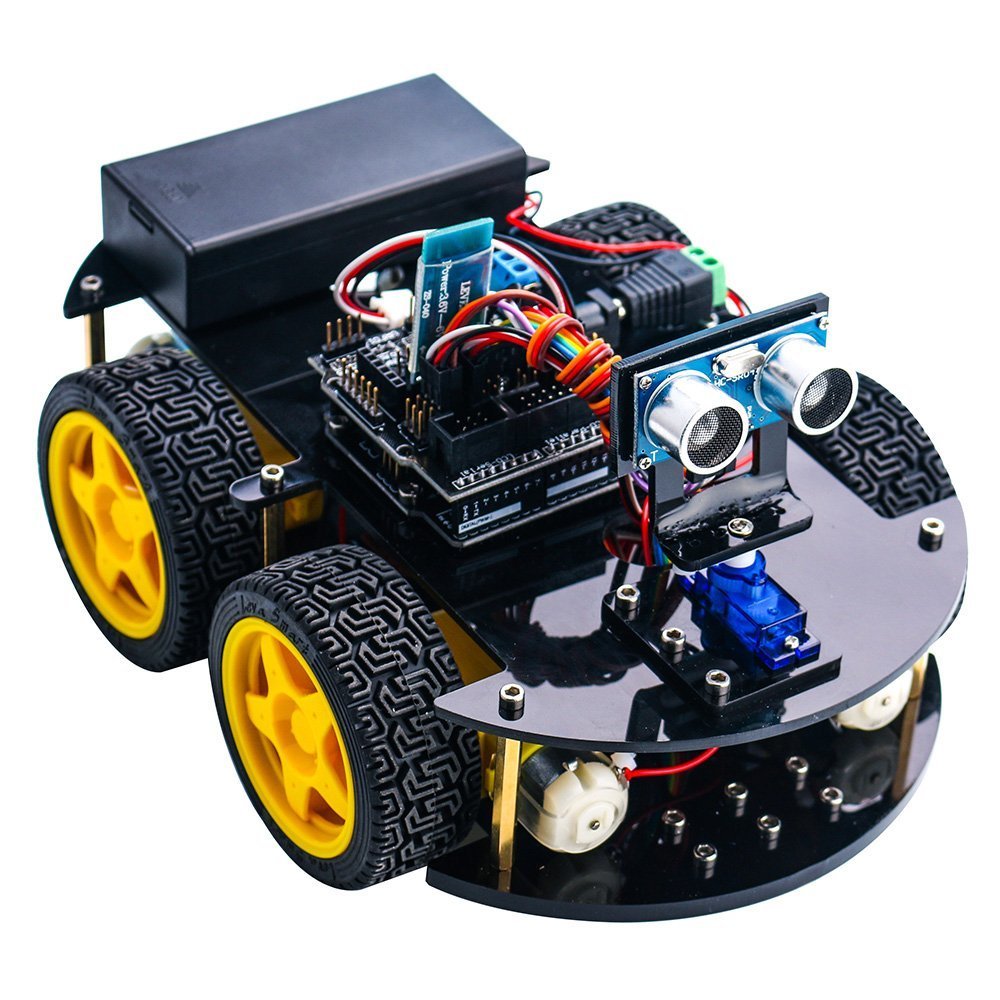
This tutorial series is based on the Elegoo Arduino Smart Robot Car kit. You can purchase the kit on Amazon for about $70. I recommend this kit because it provides a lot of value for the money and the components can be utilized in a number of robotic projects.
While you can follow along without purchasing the kit, it’s always more beneficial to be hands-on with a robot and try out the lessons for yourself. With that said, if you’re on a tight budget, I listed out the full components in Part 1 of this tutorial series.
Additional Materials
Required this week:
- BLUE Tape or BLACK Tape
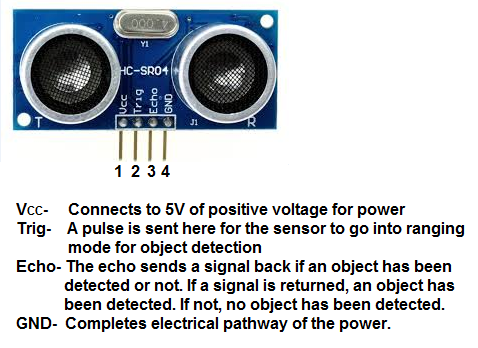
- HC-SR04 Ultrasonic Sensor (included in kit)
- Cardboard or a wall to test with
- Included in Elegoo Robot Kit:
- L298N
- Arduino Uno
- Arduino Uno Sensor Shield V5
Other Materials:
- Multimeter
- Multitool (I use a Leatherman Wingman)
- Wire Cutters/Strippers
- Household Tool Set
- Screwdriver Set
- Drill (Faster to construct everything)
- Computer with at least 1 USB port (any OS is fine)
Using Ultrasonic Sensors to Avoid Objects
There are a few Ultrasonic sensors you can find either in your kit or on Amazon. The most common one is the HC-SR04. The Challenge of the Week from 20170509 was on the HC-SR04. Check that out if you like a good programming problem!
What is an Ultrasonic Sensor?
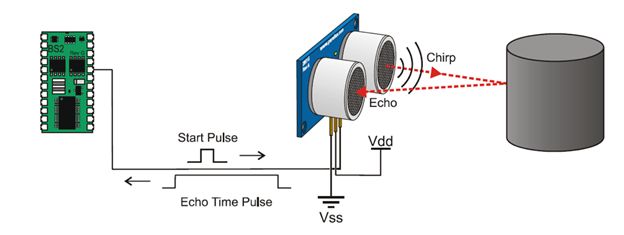
An ultrasonic sensor works by transmitting a pulse (chirp) and receiving a signal back (echo) if an object has been detected. We can calculate a distance based on how long it takes to receive the signal back. This is similar to echolocation in bats.
Ultrasonic Sensor Application on our Robot
We will use the ultrasonic sensors to detect if there is an object in our path and if so, measure how far away it is.
Once we wire our ultrasonic sensors to the Arduino, we can read in distance values like we did with the IR sensors in lesson #4.
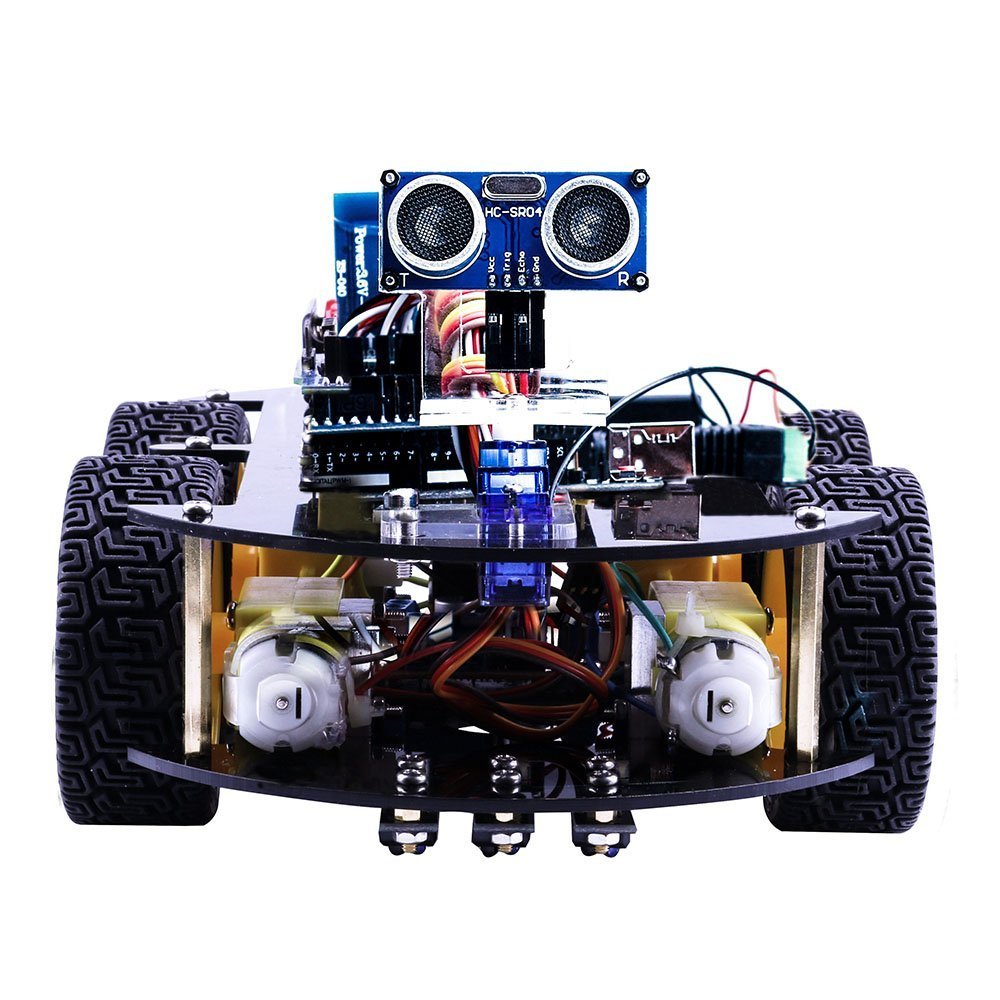
For this purpose of this tutorial, we’ll be using the HC-SR04, which is a 4-pin ultrasonic sensor. You could very well use a “ping” sensor, which is 3-pin, but, in this tutorial, we focus specifically on the 4-pin configuration.
Ultrasonic Sensor (HC-SR04) Wiring to Arduino
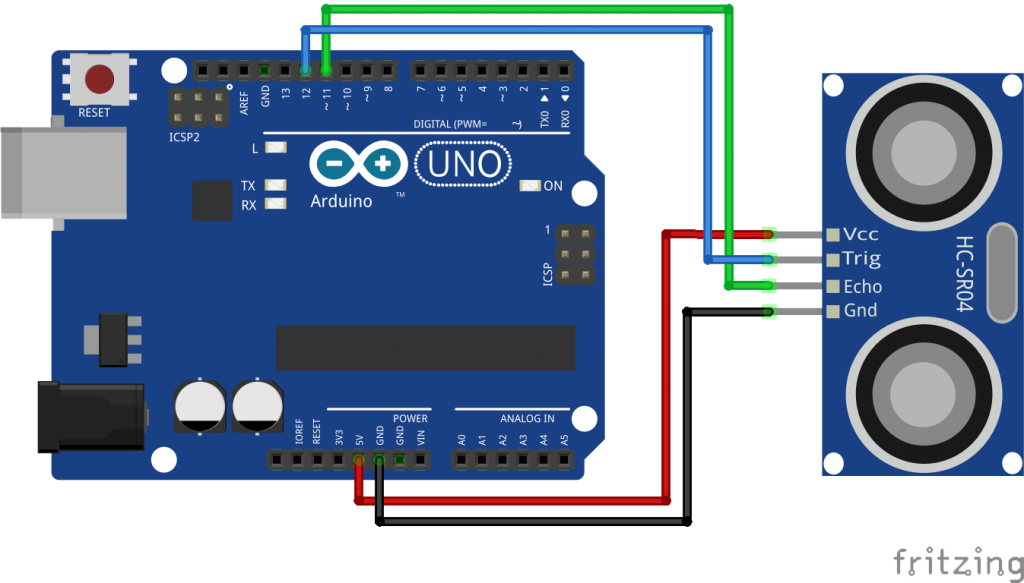
Here’s the wiring diagram for the Ultrasonic Sensor (HC-SR04).
Note: Your wire colors DO NOT need to match the wire colors in the diagram!
Red: +5V
Black: GND
Green: Echo – Connect to an open Digital or PWM (~) pin. Here it’s pin ~11.
Blue: Trig – Connect to an open Digital Pin. Here it’s attached to pin 12.
Add multiple Ultrasonic Sensors by connecting their Red & Black wires to +5V and GND, respectively, and their Trig and Echo Signals to any open Digital Pin. Trig is wired to a Digital Pin whereas Echo can be wired to a Digital or PWM (~) pin.
Ultrasonic Sensor software configuration in the Arduino IDE
Next, configure the global variables for each Ultrasonic sensor. We’ll use 2 Ultrasonic Sensors for this example.
Left Ultrasonic – Echo is on Pin 3 & Trig is on Pin 4
Right Ultrasonic – Echo is on Pin 6 & Trig is on Pin 7
PRACTICE!
How do we define global variables for the left and right ultrasonic sensors? What does the setup() method look like?
Based on the echolocation picture above, is trig an INPUT or an OUTPUT? What about echo (INPUT or OUTPUT)?
The answer is shown below. Make sure the global variable code is added to the TOP of your sketch before the setup() method declaration.
PRACTICE! (Answer below)
/** Global Variables **/
int echoLeft= 3;
int trigLeft= 4;
int echoRight = 6;
int trigRight = 7;
void setup(){
   // Setup the serial communication
   Serial.begin(9600);
   // echo is an INPUT
   pinMode(echoLeft, INPUT);
   pinMode(echoRight, INPUT);
   // trig is an OUTPUT
   pinMode(trigLeft, OUTPUT);
   pinMode(trigRight, OUTPUT);
}
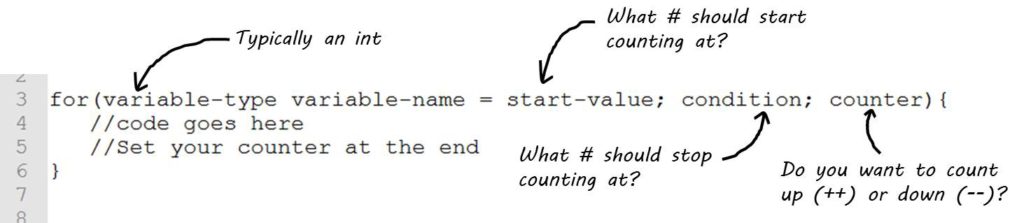
For Loops and Iterating through Code
Before we can continue on with our Ultrasonic Sensors, I want to introduce you to another type of loop, called the “for” loop. Feel free to use it in this week’s code. It’s not required but could be helpful!
FOR loops allow you to run a set of code for a specified number of times. This is also known as iterations.
Here’s the format of a FOR loop:
Example:
Let’s run some code 3X. Here’s what the FOR loop code would look like.
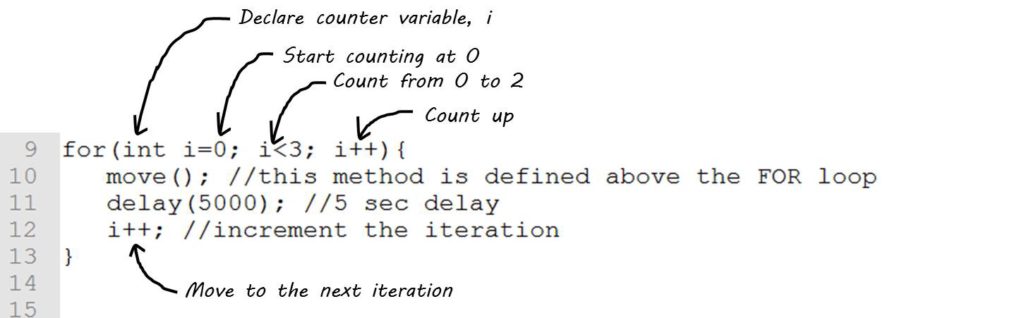
You can put an IF statement in the body of a FOR loop to check a condition for a set number of times. We mentioned this briefly in lesson #4, and I promise, next lesson we will learn about nested statements.
Ultrasonic Sensor Method
Now, it’s time to create methods to check our Ultrasonic Sensors.
The method we will write is bool isPresent(int ultraSensor). Here’s the method information.
Return Type: boolean (bool)
Method Name: isPresent
Input Parameters: int ultraSensor
Function: Checks if there is an object detected by a specified ultrasonic sensor. If an object is detected, the method returns TRUE.
When you’re done with the first method, let’s also create a method that returns the distance (in cm) if an object is present. We’ll call this method, int getDistance(int ultraSensor)
Here’s the method information.
Return Type: Integer(int)
Method Name: getDistance
Input Parameters: int ultraSensor
Function: Returns the distance (in cm) of a detected object
PRACTICE!
Complete the code for both methods above, if you haven’t already done so. Then, answer the following question.
How do we calculate the distance away in inches?
Next, let’s create a method to avoid objects. Use the getDistance() and isPresent() methods from above to create the avoidObject() method.
void avoidObject(int ultraLeft, int ultraRight, int distance){
// ... code to be written...
}
Here’s the method information.
Return Type: void
Method Name: avoidObject
Input Parameters: int ultraLeft, int ultraRight, int distance
Function: Object Avoidance Program – robot will avoid objects that are within 20cm of the front bumper.
When the robot detects an object within 20cm of its front bumper, it will back up and turn around.
Coding Solution
Now, you may notice that I haven’t posted any code for these methods, and that’s done intentionally. I want you to try to write these first, and then in the coming weeks, I will reveal the solutions!
You’ll learn a lot more if you use the information outlined in this lesson to attempt the solution yourself, than you would by copying and pasting the answer off this website.
With that said, let’s continue with some more practice!
PRACTICE!
Create the avoidObject() method described above.
TIP: List out your process steps in English (or your native language), first. Then translate that into Arduino code.
Submit your solution on Facebook or Instagram (@learnrobotics)
Lastly, add the function calls to your loop() and test out the code. Then you’ll be ready for Challenge #3.
// --- Globals and methods are defined above ---
/** loop method - required method **/
void loop(){
   // run the lineFollow method
   avoidObstacles(...)
}

The theme of this week is obstacle avoidance, therefore, the goal with this challenge is to not hit anything!
LEVEL 1: Using your ultrasonic sensors, program your robot to drive up to a wall and stop within 3 inches.
LEVEL 2: Using your ultrasonic sensors, program your robot to:
- Complete Level 1 then move to step 2.
- Back up 5 inches
- Make a U-Turn (180-degree turn)
- Drive forward 18 inches
- Stop
LEVEL 3: Complete Level 2 while having a blinking red LED during the back up step. Power a green LED while moving forward and turning.
LEVEL 4: Find some boxes, stack some books, buy some cones, to serve as “obstacles.” Put them in a random assortment. Have your robot navigate the area without hitting anything.
What’s next?
The Beginner Bots tutorials were designed to give you a fundamental crash-course in mobile robots. Throughout the 5 lessons, we selected parts, constructed the robot, programmed autonomous moves, and learned how to use both infrared and ultrasonic sensors.
Now that you have a beginner-level understanding of mobile robots, you can begin to add more features to your robot. I recommend checking out this article on Intermediate Arduino Robot Projects. If you enjoy hands-on projects with robotics, you’ll love these additional Arduino projects!
If you liked this article, you’ll LOVE our eCourse.
Join our Robotics eCourse and go beyond these tutorials with interactive lessons, discussions, projects, and a course certificate! Click here to enroll.


