

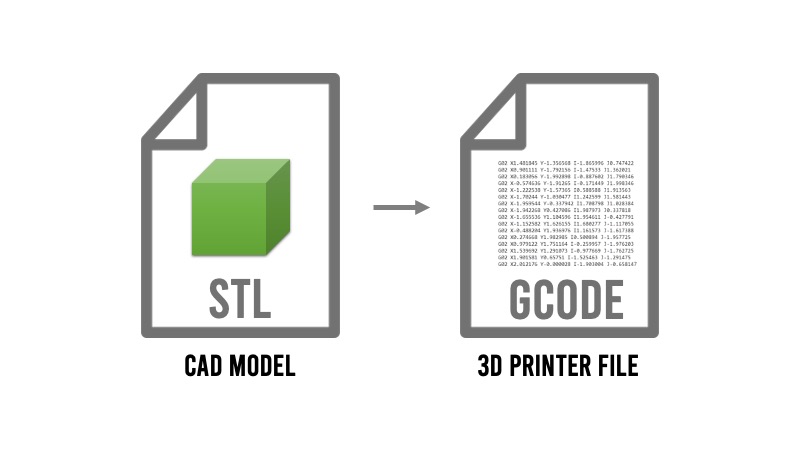
An important part of the 3D printing process is to convert an STL into G-code so that your 3D printer can print it out.
In this article, I’ll walk you through the process of slicing and printing 3D models. No matter which 3D printer you own, this high-level process will give you a set of steps you can take to go from an STL file to a 3D-printed part.
By the end of this tutorial, you’ll know how to take an STL and convert it to G-code, then use the G-code file to run a 3D print.
Let’s get started.
Step 0. Get the 3D Printing Guide for Beginners
This pocket guide will help you start 3D Printing from A-to-Z. Includes troubleshooting, printer setup guides, and makerspace printing sign-out sheets. Buy your copy, then follow along!
Step 1. Install a Slicing Program
To print out a 3D CAD Model, you have to convert an STL to G-code for 3D printing.
This is essentially a conversion between the 3D model of the part to a set of layered positions that your 3D printer will use to make the part.
A lot of people in the 3D printing space have their preferred Slicing Software, so here are a few popular (and free) options to choose from:
For this tutorial, I’m going to focus on showing you how to slice files using Cura. This was the first slicing tool I learned, and it’s been my go-to for many 3D printing hours.
Once you learn the basic methodology of preparing an STL for 3D printing, then you can download a few other ones to see which one you like the best.
I will mention; however, that depending on your 3D printer, there might be a particular slicer you have to use.
For FlashForge Printers, it’s easiest to use FlashPrint. For MakerBot printers, you’ll probably be coaxed into using the MakerBot Print utility.
Does it matter which 3D Slicer Program I choose?
It doesn’t matter which Slicer you use.
Some slicers have more features and are easier to use than others.
But they ultimately do the same thing: translate a 3D model (i.e. STL) into a format that a 3D printer can understand (i.e. G-code).
Slicing & Cloud Connectivity Options
OctoPrint and AstroPrint have cloud and wireless 3D printing options in addition to slicing. If you’re looking for an all-in-one option, both of these programs are worth checking out.
In my experience, AstroPrint is a little easier to set up than OctoPrint. However, if you’re looking for a flexible option, then OctoPrint is better for dev-work and customizations.
After you figure out which slicer you want to use, download and install it on your computer.
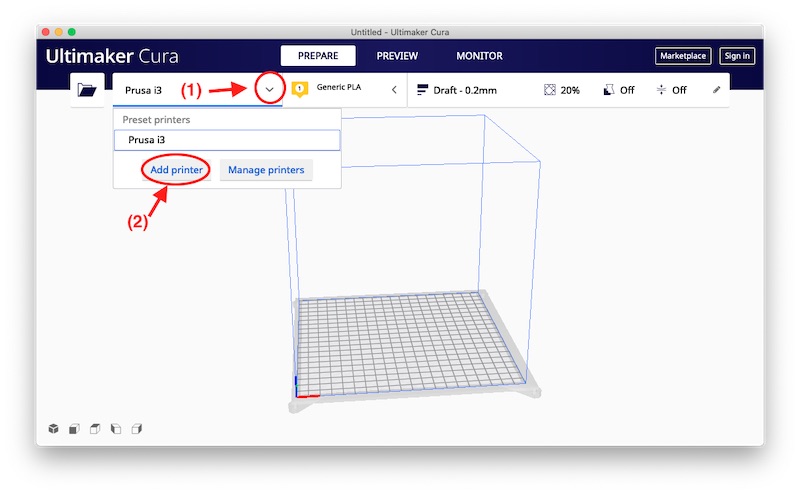
Step 2. Add your 3D Printer within the Slicer
Before you can 3D print using a slicer, you’ll have to set up your 3D printer settings.
Here’s how to do it:
- Go to the Printer Preferences in the Top Left Corner and click “Add Printer”
- Add your printer.
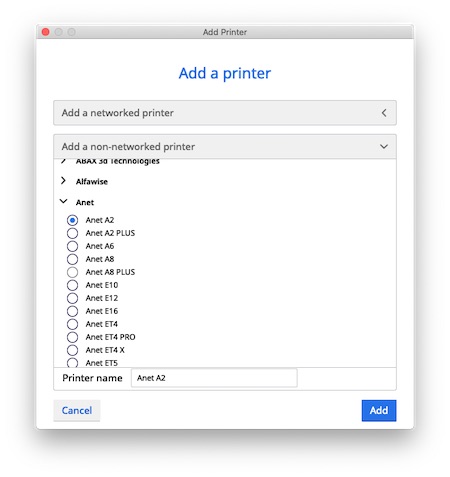
- For network printers, you can add a printer by its IP Address or by scanning your network.
- For local printers, you can search the list of printers and add them by brand.
Step 3. Draw or download a 3D Model to Print
If you’re looking to print out a 3D model you drew, then you’re all set. Just make sure you export the model as an STL and save it locally on your computer.
Some CAD modeling programs, like Fusion 360, allow you to export directly into a slicer.
Cura is a native option for this feature; however, I think you can also select a different slicer as long as it’s installed on your computer.
Either way, you can skip the next section and move to Step 3 if you’re using models you drew yourself.
Where to Find 3D Models Online
Otherwise, you can find community-contributed files to 3D print.
There are many websites online to find 3D models to print. Thingiverse is a popular 3D printing website where users can upload their designs for the community to use.
I’m a fan of the STL Finder search engine. STL Finder is like the “Google” of finding 3D models and files.
This online tool aggregates files from various sources (including Thingiverse) and makes it easy to find different variations of the same part.
Find a file you’d like to print, and download the STL to your computer. (Make sure to remember where it’s saved.) Then move on to the next step.
Step 4. Open the STL File and Prepare the Printer Settings
Next, go into the Slicer and open, import, or load the STL file.
Position the Part on the 3D Printer Bed
You can click on the part and adjust the position on the printer bed using the tools on the left.
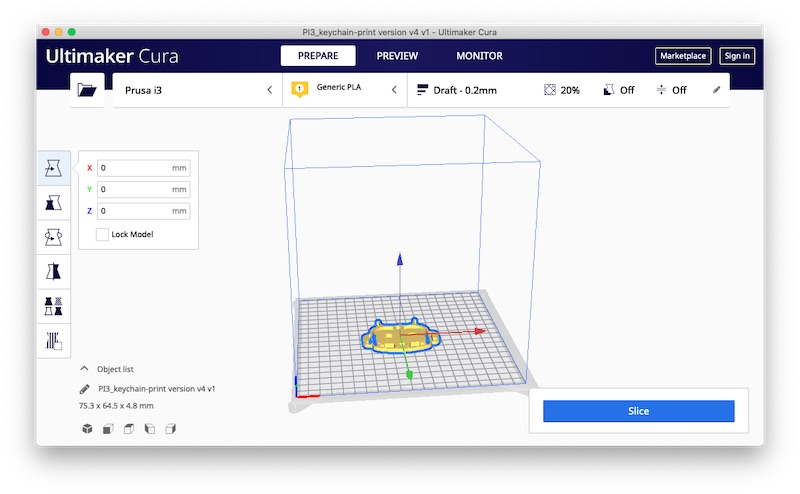
I typically like to have the part centered on the bed. But sometimes, you may need to adjust the part.
Your slicer might import the part at a weird angle. It’s important to rotate the part so that it sits flat on the bed.
You can also adjust the size of the part using the scale tool.
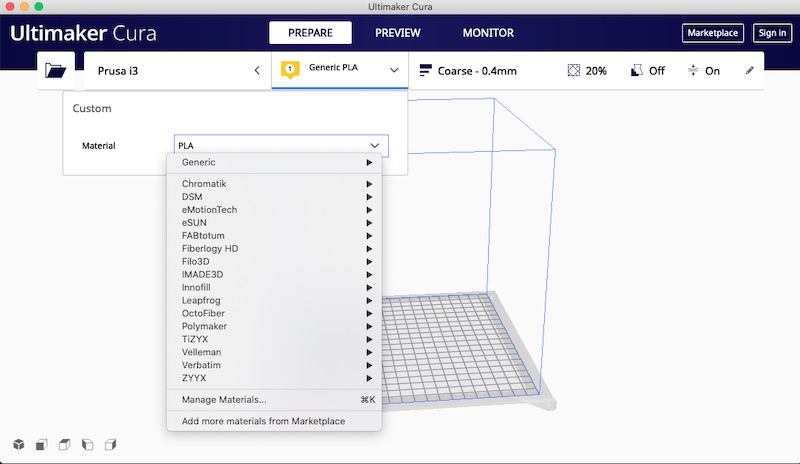
Select the Printing Material
Once you have something you like, then you can set the printing material.
Go to the Material Menu and choose the material you want to print with.
Adjust Print Settings
For most parts, a Draft Profile or Layer Height of (.02mm) works fine. The most common settings to modify are Layer Height, Infill %, and Perimeter Shells.
If it’s a part you’ve designed, I’d use the following settings as a starting point:
- Layer Height (mm) = 0.02 mm
- Infill % = 20%
Leave the remaining settings default.
If you’re printing a file you found online, oftentimes, the author will tell you the print settings in the description. Apply these settings in the slicer.
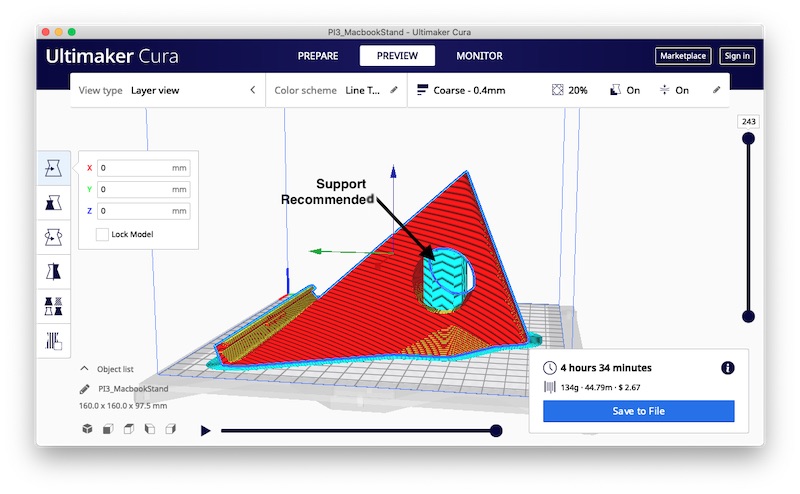
How to decide if the 3D model needs “Supports”
You only need to add supports to your print if some contours or edges hang over the print bed.
A support is a break-away piece that prevents the nozzle from printing in the air (which prevents a hairy glob of filament from forming during your print).
Supports provide a surface to print on that can be removed in post-processing.
Here’s an example of a part that needs supports.
Here’s an example of a part that doesn’t need supports.

A lot of times, if you need supports, and downloaded the file online, the author will tell you to use supports in the description. If it isn’t mentioned, you probably don’t need them.
Again, this is a setting that will take some practice to understand. After you spend enough time 3D printing, you’ll be able to look at a part and be able to list off the appropriate settings.
Do you need bed adhesion?
There are options to add bed adhesion options such as brims, rafts, and skirts in the slicer. You can also apply manual bed adhesion, such as Build Tak, glass, glue, hairspray, and tape.
For 3D printer kits (Anet A8, et al), I recommend a combination of software bed adhesion and manual bed adhesion.
If you’re using a more professional 3D printer, you probably won’t need to add anything but a skirt.
This is a setting you’ll have to adjust over time. I recommend trying different options and seeing what yields the best result for your printer.
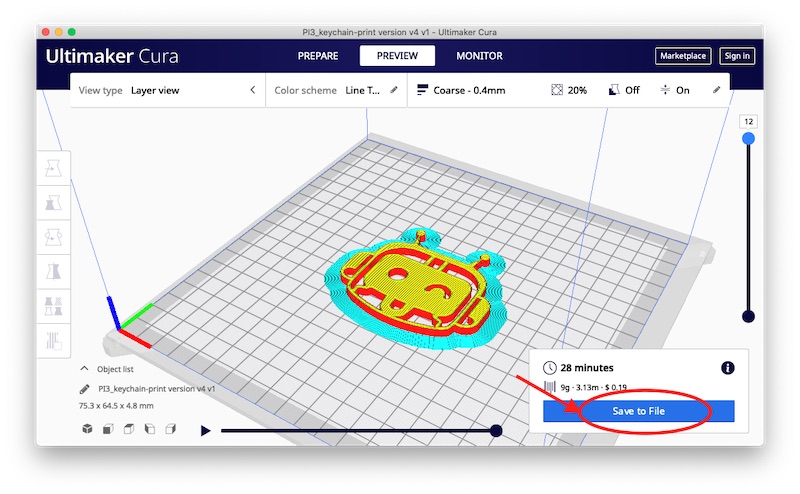
[amazon box=”B00I8NM6JO,B07BR3F9N6″ template=”list”]Step 5. Slice the Part and Get the G-code for Printing
This is the best part! Once you have all the settings configured, click the Slice button. Cura will generate a preview based on the settings you gave it.
You’ll get an estimated print time and weight based on material selection. Optionally, you can have Cura calculate the material cost for the part. We cover this setting in the next section.
If you’re new to 3D printing, I recommend looking at the preview and playing the print in simulation before printing it. That way you can see how the nozzle will move before sending the print over.
There might be some settings you want to adjust. This is a great way to catch anything you missed before it prints.
Once you’re happy with the preview, click the “Save to File” button.
Then you can save the file to an SD card, USB flash drive, or the cloud location for your 3D printer.
Finally, open the file on your 3D printer and start the print.
And that’s the process for getting an STL file running on your 3D printer!
How to Get Cost Estimates for 3D Parts
Additionally, you may want to know how much your parts cost for manufacturing estimates or cost-saving calculations. Here’s how you can add that to Cura.
Open the Preferences menu and choose “Materials.” Next, choose the material and enter the Filament Cost and weight of the spool.
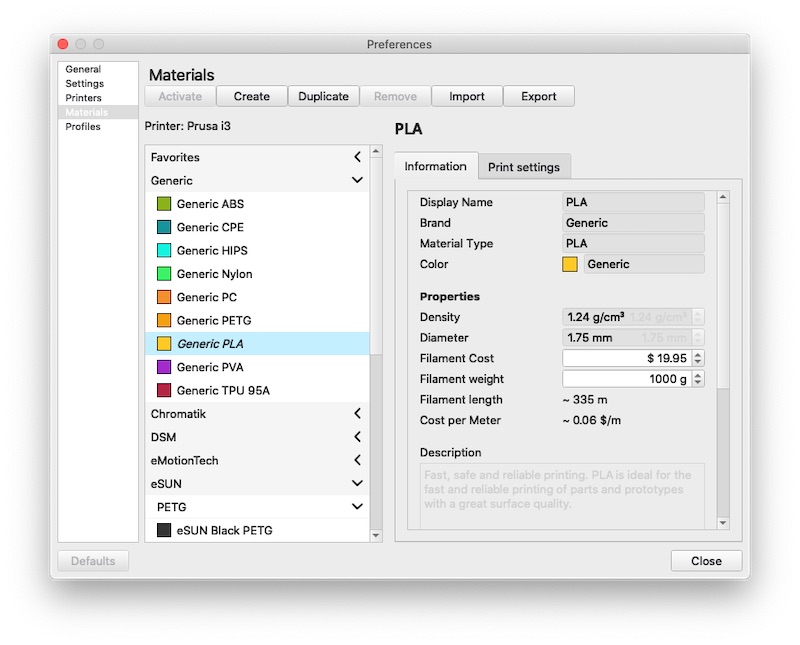
This is the price you paid for the spool of filament. For PLA a typical price is $20-$25 per 1000g. Then hit close.
When you slice your model, you’ll get an approximate cost to print that part. It’s a really handy tool, especially if you’re trying to gauge how cost-effective it is to make a part.
[amazon bestseller=”3D printer filament” items=”3″ template=”list”]Manually Calculate 3D Part Price Based on Weight
Another way to make this calculation is to take the weight (g) of the part and multiply by $0.03-$0.05. That’s a quick way to get a ballpark estimate for most materials without having to configure separate material pricing.
Download our Digital 3D Printing Guide
In this article, we walked through the process of taking a 3D model or STL file and using a Slicer to convert it to a G-code file for 3D printing.
If you found this tutorial useful, you’ll also like our Digital 3D Printing Guide.
This printable guide includes maintenance, start-up, and slicing instructions that you can add to your 3D printing workstation. It’s a great add-on for classrooms, makerspaces, offices, and manufacturing plants.
This guide can be used with most (if not all) 3D printers and is designed to be a “quick start” for the common tasks you need to do to 3D print components.


One Response
Thanks a lot Liz for your explanation and help.
Wish you all the success