

Like a lot of people with an iPhone, when I got my Roomba and went to use it with Siri, I found out that it wasn’t natively supported. Rather than go out and buy an Alexa or a Google Assistant (or use those apps), I decided to find a way to add Siri to control the Roomba. In this tutorial, I will show you how to use Shortcuts in iOS and IFTTT (If This, Then That) to connect Siri to the Roomba for voice-activated cleaning.
This tutorial assumes you already have a WiFi-enabled Roomba (I have a Roomba 675) and an iPhone. For this tutorial, I’ll use my iPhone XR, but it should also work for any Apple device running iOS 12.0 or later.
[amazon bestseller=”irobot roomba” items=”3″]Add Siri Support to Roomba
There are two critical steps and one testing step to add Siri support to the iRobot Roomba. Expect to spend about 20-60 minutes getting all of the components configured and setup. Anyone with basic computer skills should be able to follow along and get this configured. If you have questions, be sure to leave them below, and I’ll help you out!
The way this system works is by using two apps: IFTTT webhooks and iRobot Roomba service and Shortcuts on the iPhone. Here’s a diagram of how this is configured.
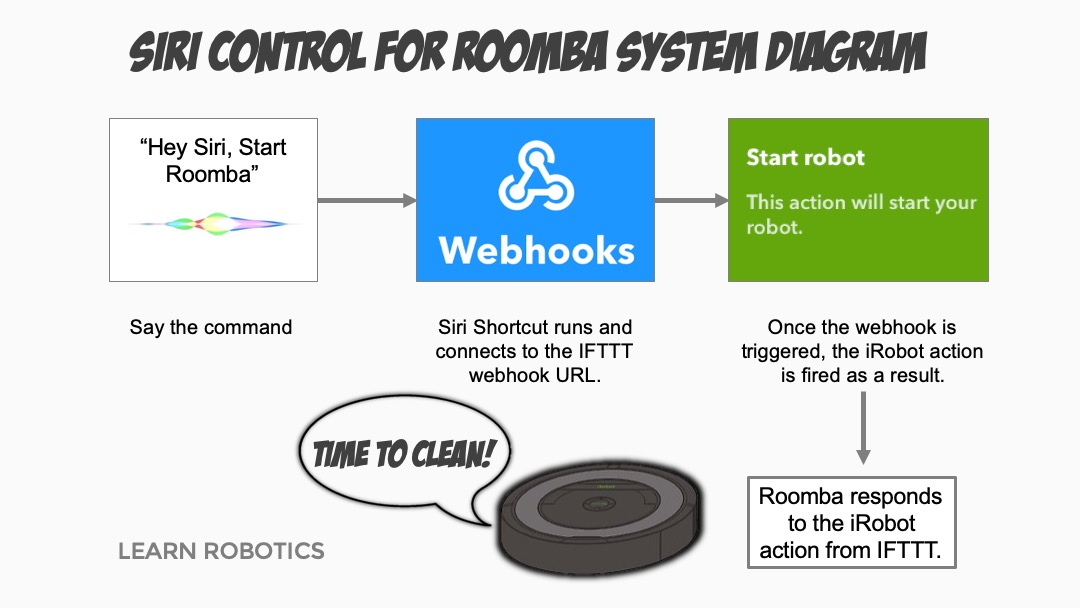
Step 1: Set up IFTTT Webhook with IFTTT iRobot Service
The first part is to create an IFTTT Applet to run the connection between Siri and the iRobot Roomba service. Here’s a walkthrough of the process. I’ve broken down each step below.
Go to ifttt.com and login or sign up for a free IFTTT account. Once you’re logged in, click on your profile image in the top right corner, and select “Create” from the dropdown menu.
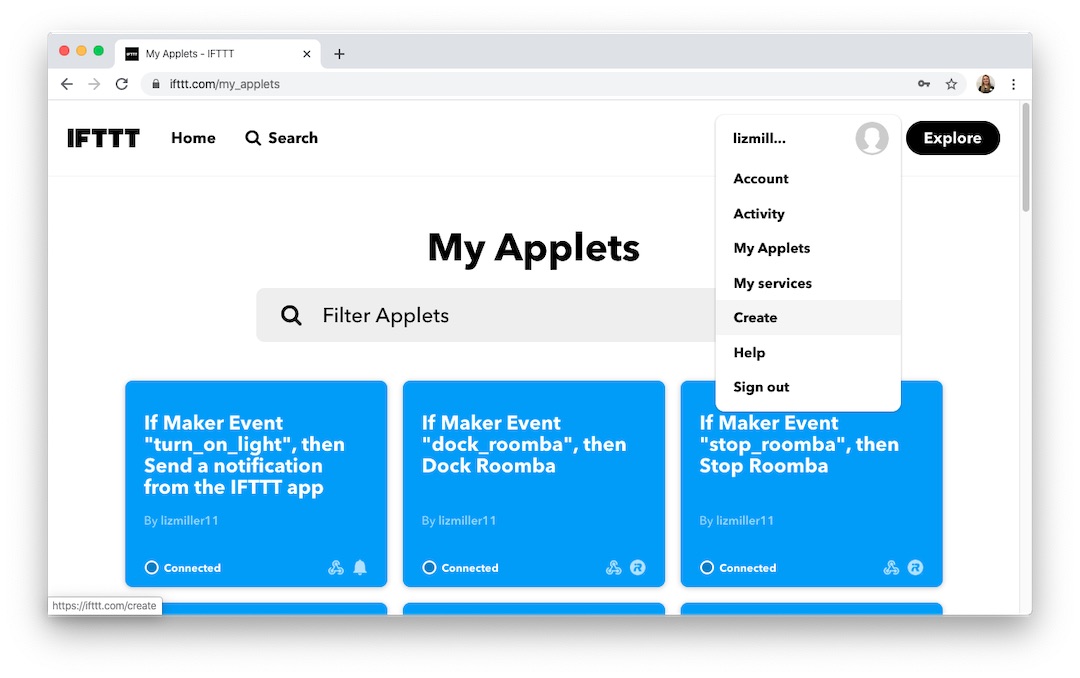 This will bring you to the IFTTT Applet creation page. Click on the black plus button and search for “Webhooks.”
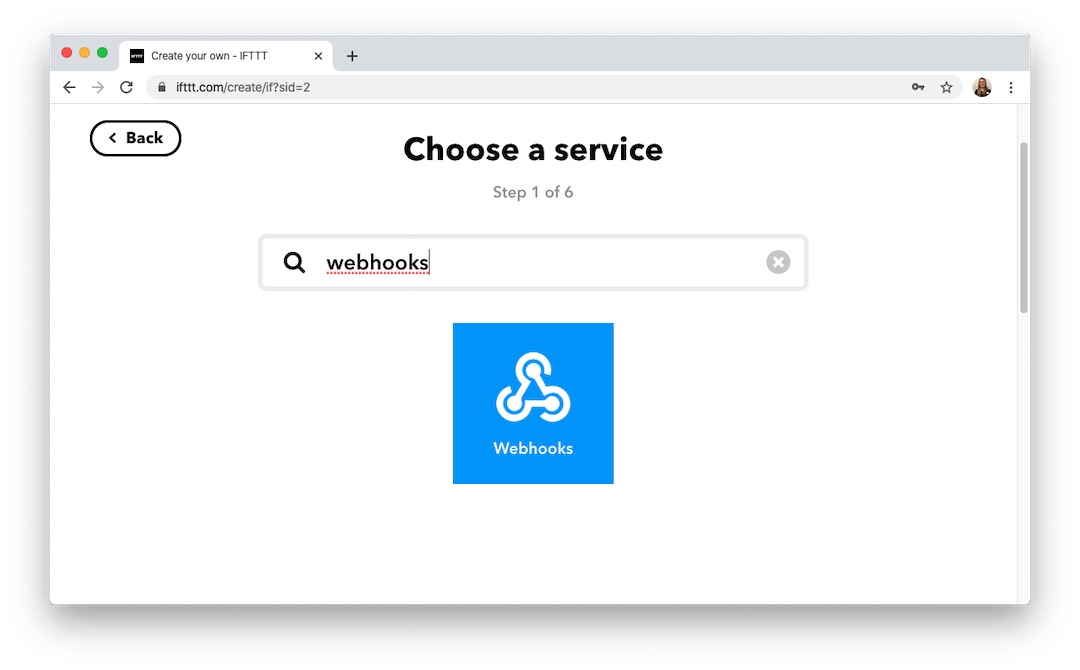 Next, select the blue service that says webhooks. Then, click the box that says “Receive a web request.” Give the event a name. Type in “start_roomba” in the Event name box.
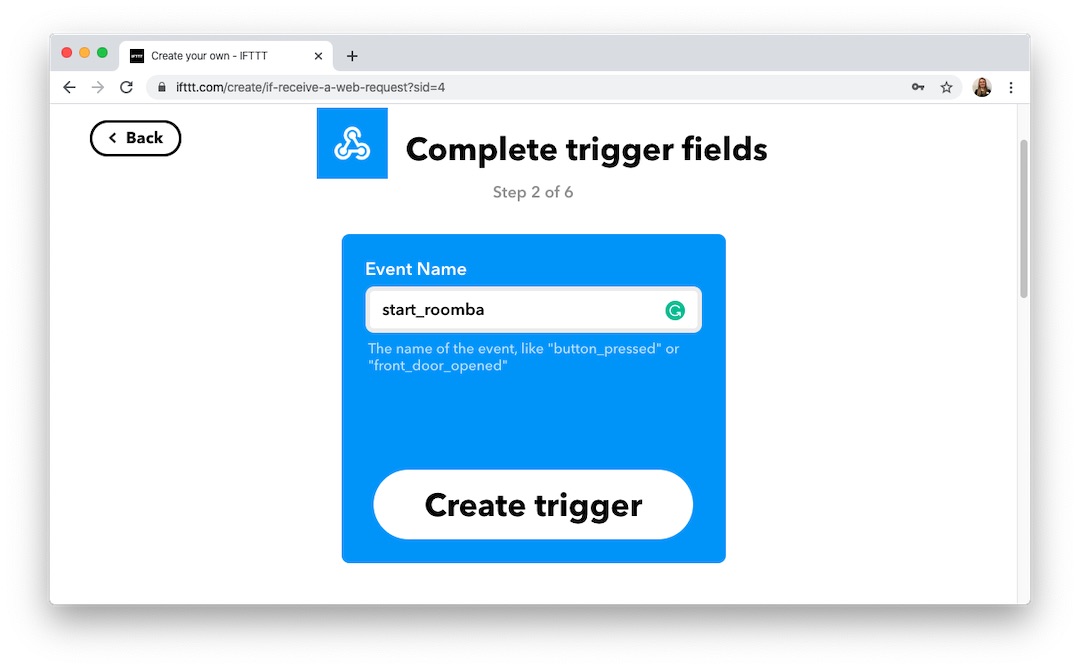 Finally, press the “Create trigger” button. Now we have to define the action for the event. Click the black plus button and search for “iRobot.” Click on the iRobot action service.
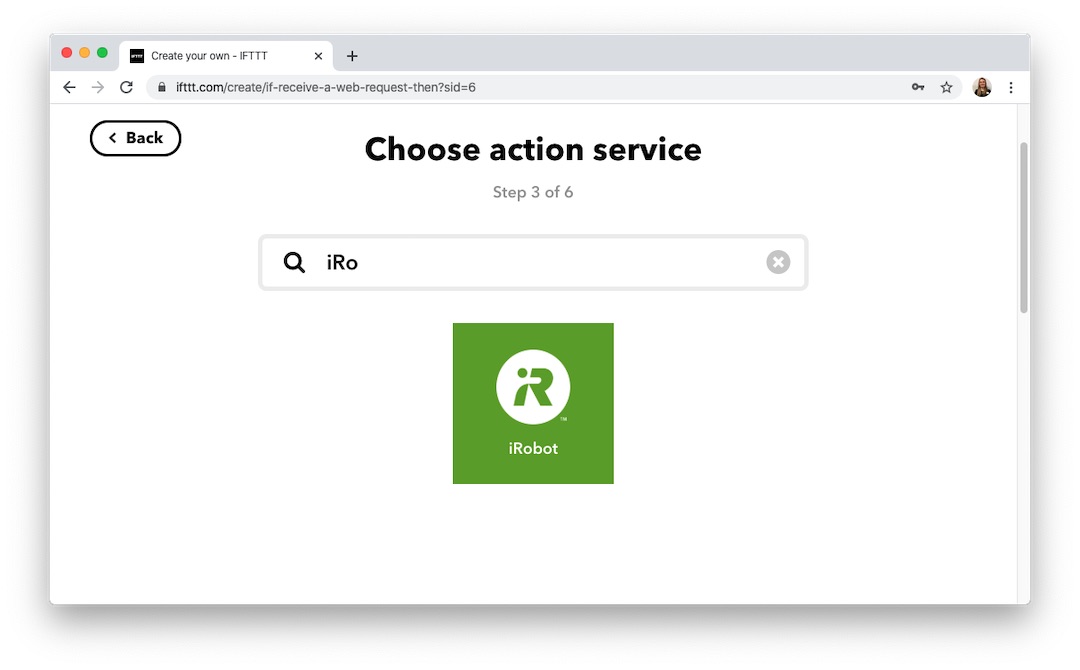 You’ll be brought to a page with many actions to control your Roomba. For this example, select “Start robot.”
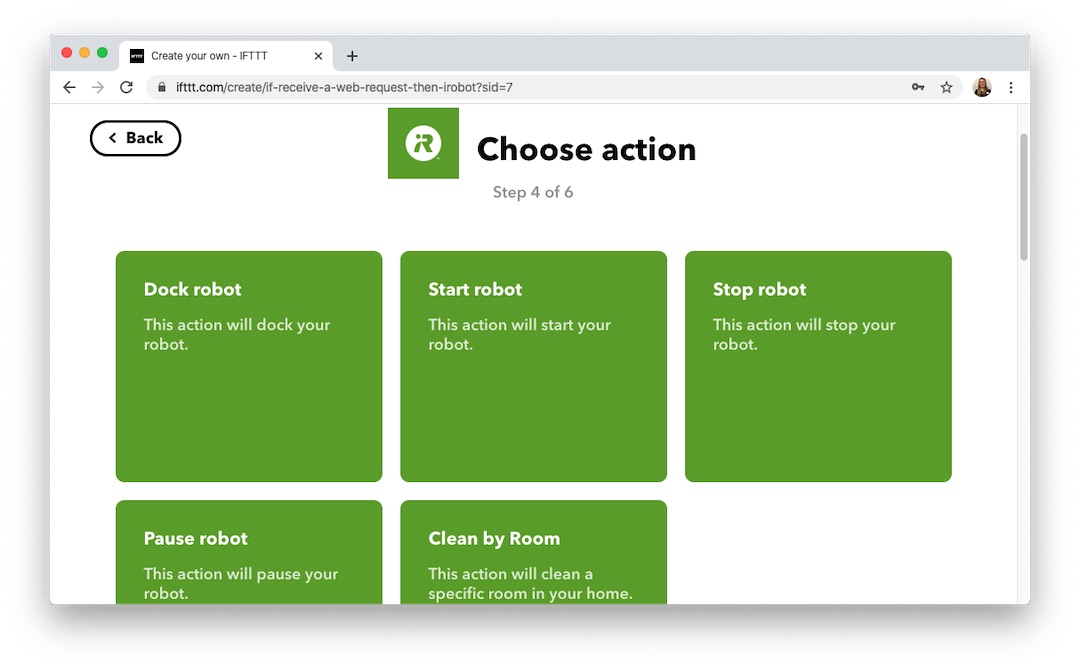
Once you log in, choose the Robot from the dropdown list and press “Create action.”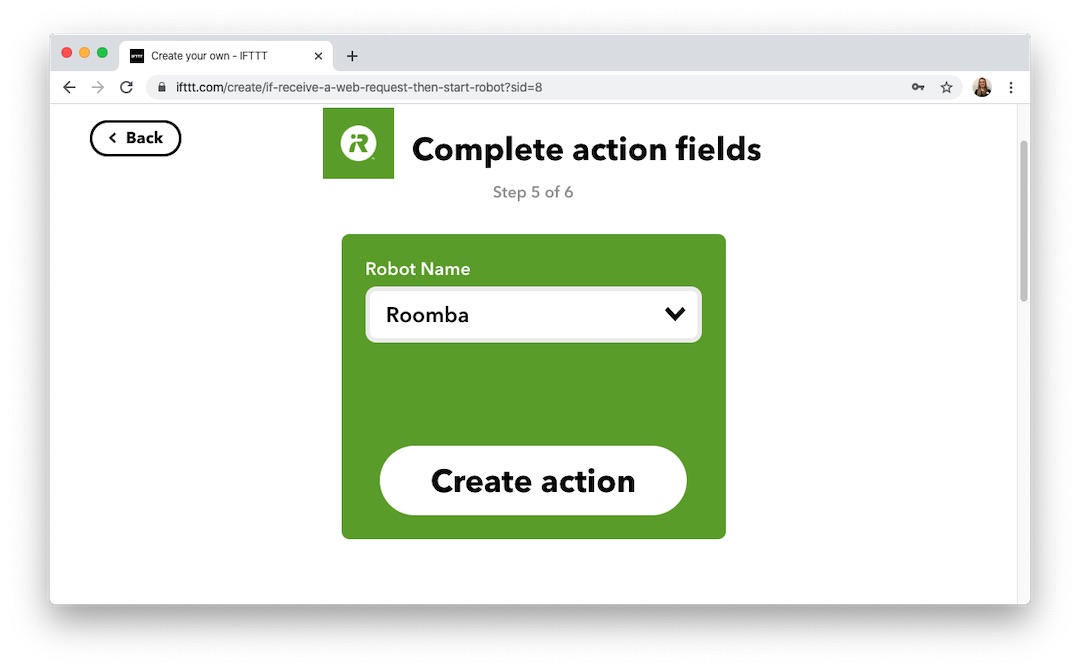 Finally, you can choose to receive notifications from IFTTT when the Applet runs. I’ve disabled this on mine because I’m not using the IFTTT iPhone App. When you’re done, click the “Finish” button.
 And that’s it! Repeat this process for the remaining events (Pause Roomba, Stop Roomba, Dock Roomba, etc.). Once you finish creating all four IFTTT Applets, move on to Step 2.
Step 2: Create iOS Shortcuts on your iPhone
First, make sure your iPhone is running iOS 12.0 or later, then install Shortcuts from the App Store. Next, launch the Shortcuts App and click “Create Shortcut.”
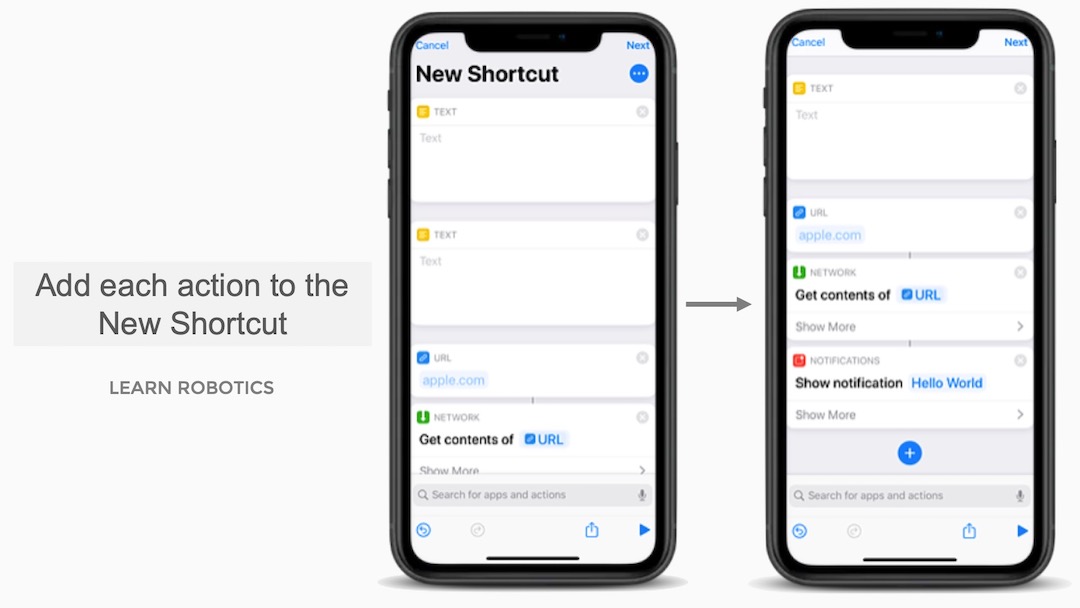
Then, click “Add Action” to bring up the menu of apps and actions. Add five actions to this Shortcut: two text fields, one URL action, and one Network action. I’ve listed them out below to make them easier to find in the app. You can use the search field a the top of the screen to find each one.
Format of the Shortcut to Control Roomba with Siri
- Text
- Text
- URL
- Get Contents of URL
- Show Notification
Here’s a screenshot of what it should look like:
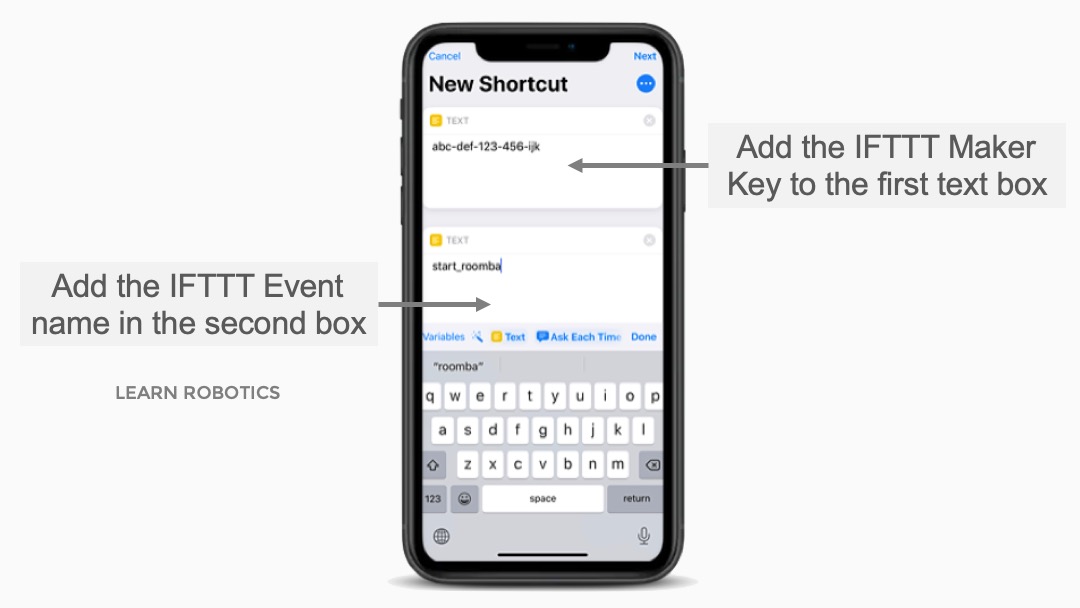
Now, we have to modify the contents of each app. In the first text box, paste your IFTTT webhook key. You can find this on the IFTTT webhooks page and clicking on the “Documentation” button.
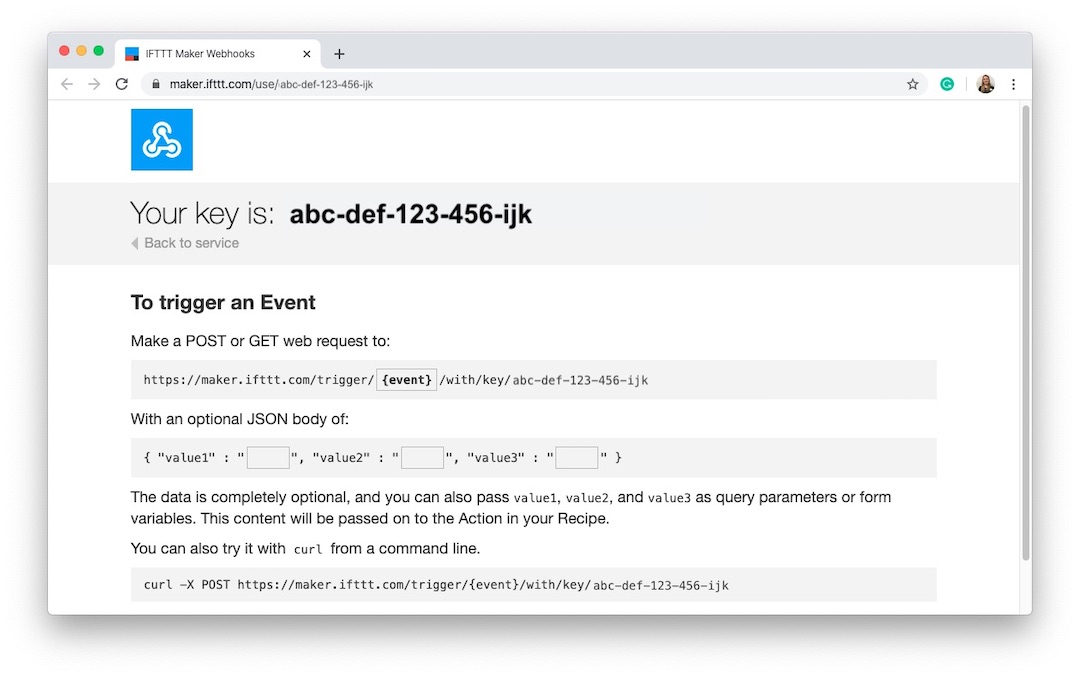
Your key is provided on the top. In this example, I made up a fake key, “abc-def-123-456-ijk.” Be sure to keep your key private because it’s tied to your IFTTT account. Copy and paste the webhook key into the first box in the new Shortcut.
The second text box is for the name of your webhook event (start_roomba) from the IFTTT Applet we created in Step 1.
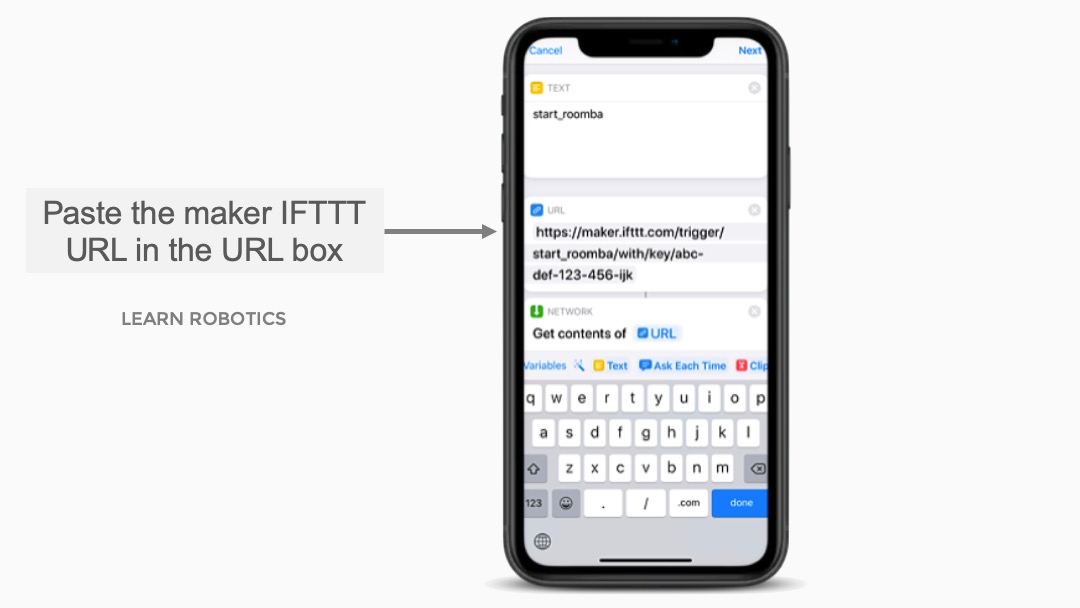
Next is the URL action. I’ve provided a URL template below. Replace the {event} and {key} with your event name and IFTTT webhook key.
Here’s an example. For the start_roomba event with the key abc-def-123-456-ijk the URL will look like this:
Copy and paste this into the URL action box in the new Shortcut.
The fourth step is to make sure the Network Action is set to Get contents of URL and that the Method option is set to GET.
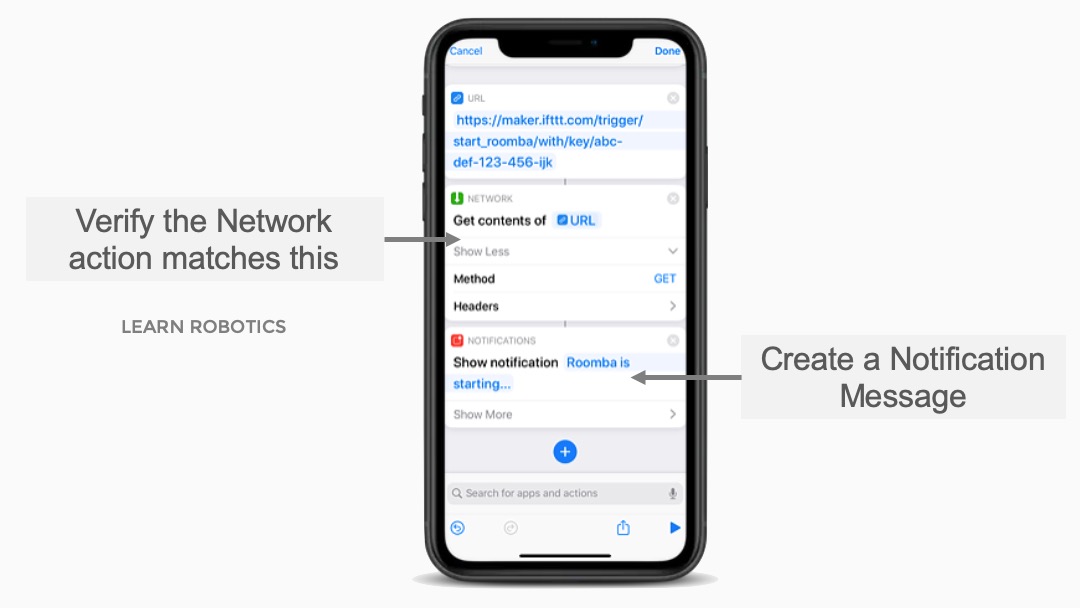
Lastly, you can add a Notification message to describe what is happening. For the start_roomba event, the notification message is “Roomba is starting…” If you’re not a fan of notifications, you can skip this step or choose to have your phone vibrate or make a sound instead.
Once you’ve completed these steps, save your Shortcut. Press the “Done” button in the top right corner. You’ll be prompted to give the Shortcut a name. Make sure that the name is the phrase you want to use with Siri.
For the start_roomba event, I’ve named mine “Start Roomba.” When you use the phrase “Hey Siri, Start Roomba,” Siri will connect to IFTTT and then run the start_roomba event, which triggers the iRobot Roomba recipe.
You can also customize how the Shortcut looks by clicking on the box to the left of the name and changing the Color and Glyph. This can be whatever you want and is entirely optional.
![]()
Lastly, you can add the Shortcut to your Home Screen. Then, when you click on the app, the Shortcut will run automatically. This is useful if you don’t feel like using Siri to control Roomba. After you finish these steps, it’s time to test Siri control with your Roomba.
[aawp box=”B07DL4QY5V” description_items=”3″ description_length=”100″]Step 3: Test the System and Control Roomba with Siri
First, press “Done” in the top right corner to return to the “My Shortcuts” page. Make sure the Roomba is plugged in and charging at its dock. Turn off the screen on your iPhone. Then say “Hey Siri, Start Roomba”. You should hear a beep from the Roomba and it should start to move.
Create the Remaining Voice Commands for Roomba
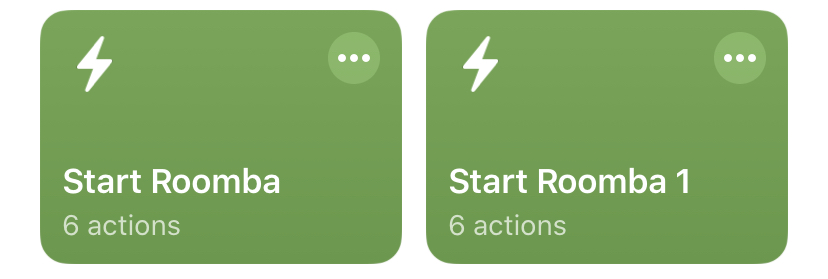
Once it’s working, repeat Step 2 for the remaining commands (Pause Roomba, Stop Roomba, Dock Roomba). You can use the “Duplicate” feature inside the Shortcuts app to make it easier to add new commands to Siri.
To do this, open the Shortcuts app and press and hold the Shortcut you want to duplicate until a modal pops-up. Select the “Duplicate” option from the list. The duplicate will be named the same name as the original but with the number “1” added to the end.
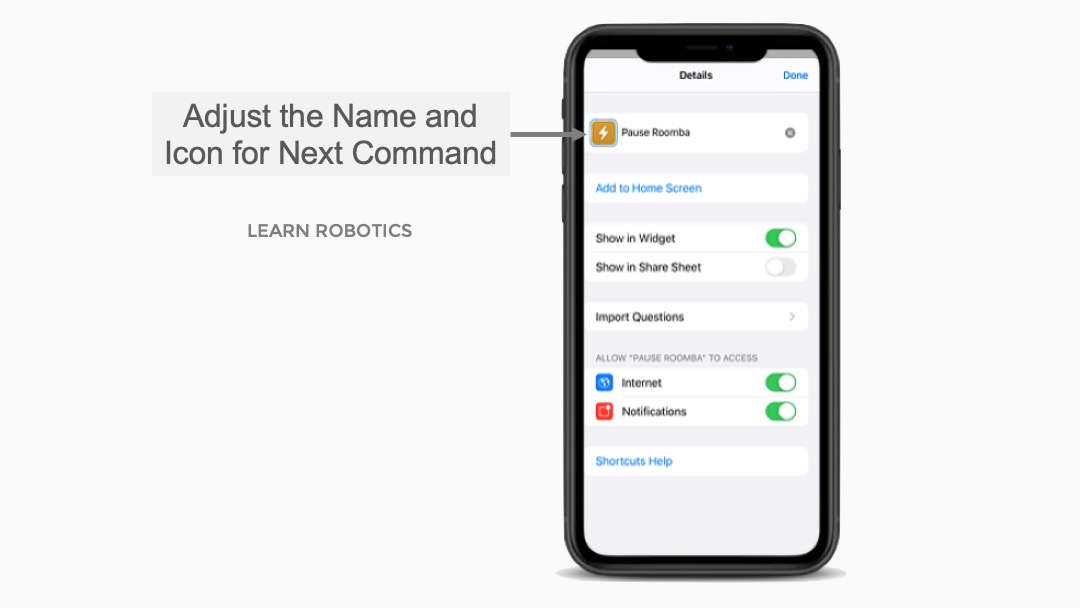
Then open up the duplicate Shortcut by pressing the three dots in the top right corner. Rename it to match the new command.
Then, adjust the second text box with the event name, the URL, and the notification message. Lastly, click “Done” when you’re finished and test it out.
Home Automation Tips
If you’re a die-hard iPhone user and would much rather use Siri than Alexa or Google Assistant with your Roomba, then this tutorial is a must.
It took me roughly 20 minutes to get all of the commands working on my Roomba, and there’s little to no delay between commanding Roomba to it responding to the commands. Rather than having to add another assistant to my home automation system, I can continue using Siri for everything. I hope it helps you too!
What do you think of this tutorial? Did it help you improve your home automation system? Have a question? Let me know in the comments below!
For more great home automation tips, be sure to check out these articles:


13 Responses
Hi Scotty,
How do you use the “clean by room” shortcut. do I just speak the name of the room?
Thanks,
In Shortcuts, the name of the shortcut is usually what you speak! So if you named the shortcut, “Start Robot” then you’d say “Start Robot” out loud to run it. ~Liz from Learn Robotics