

I’ve had a bit of an Internet of Things (IoT) bug the last couple of weeks. For those of you who are new to the blog, welcome! I’m glad you’re following along with my tutorials. Hopefully, you’re making some cool things!
Before we dive right into prototyping and code, and whatnot, I wanted to provide you the backstory for how this project came to be.
The motivation for this Project
I was on a walk the other evening (walks are kind of my thing) and came home to a very dark house. It had me thinking, what if my lights automatically came on when I opened the patio door…
And I know, I could go out and buy something that already works out of the box, but being the brains behind Learn Robotics, I figured, “Hey! let’s create a prototype!”
I got to thinking about all the ways we could do this – dweet.io, Node-RED, Raspberry Pi, Arduino… then it dawned on me that if I used IFTTT and Arduino, I wouldn’t need to have a computer running Node-RED or a Python script all the time, and I could use the IFTTT compatibility to trigger my Philips Hue lights.

So, in this tutorial, I’m going to walk you through how to connect your Arduino to IFTTT. In a later tutorial, I’ll walk you through a tiny (low-power) device that you can use to build your trigger for your lights.
Things you’ll need
For this project, I will be using a Wemos D1 Mini. You could also use a NodeMCU or other WiFi-enabled Arduino controller (ESP8266). If you’re just getting started with IoT, I recommend picking up this NodeMCU kit and supplementing it with a Wemos D1 Mini. This will provide you the maximum sensors and prototyping components for under $40.
Connect Arduino to IFTTT for IoT Projects
Now that we have our components, it’s time to get prototyping. I’m keeping things SUPER simple and wiring up a rotational potentiometer to pin A0 on the Wemos.
Here’s a quick schematic:
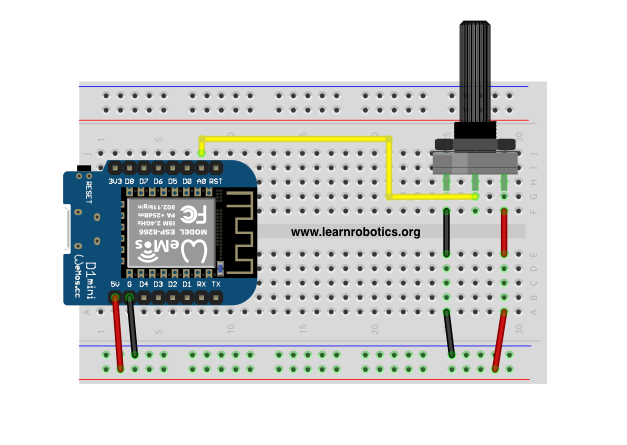
Go ahead and wire up your board before moving on with this tutorial. I also wrote a tutorial on how to wire a breadboard, to help you get started.
Ready to get started? I’ve broken this project into four steps.
- Connect the Wemos D1 Mini to the Internet (the good-ole www)
- Publish readings to an “Event” using the Webhooks channel
- Collect readings from the potentiometer
- Create an Applet in IFTTT to receive notifications from the Wemos
In a future tutorial, I plan to use this methodology to create a “trip” sensor and control my lights at night. (Which I will share with you once I build it!)
Now, let’s grab our Wemos, and get it connected to the Internet.
Step #1: Connect the Wemos D1 Mini to the Internet
Similarly to the Dweet.io Tutorial, you’ll connect your Wemos D1 Mini to the internet. First, we’ll identify the SSID (network name) and Password (network password). Then, we’ll create an account on IFTTT and open the Webhook service. I used the browser version of IFTTT to set all of this up.
#include <Arduino.h>
#include <ESP8266WiFi.h>

// WiFi parameters
const char* ssid = "your-ssid"; //replace with your ssid
const char* password = "your-pw";//replace with your pw
On the Webhook service page, click “Documentation”. You’ll be brought to a page like this:
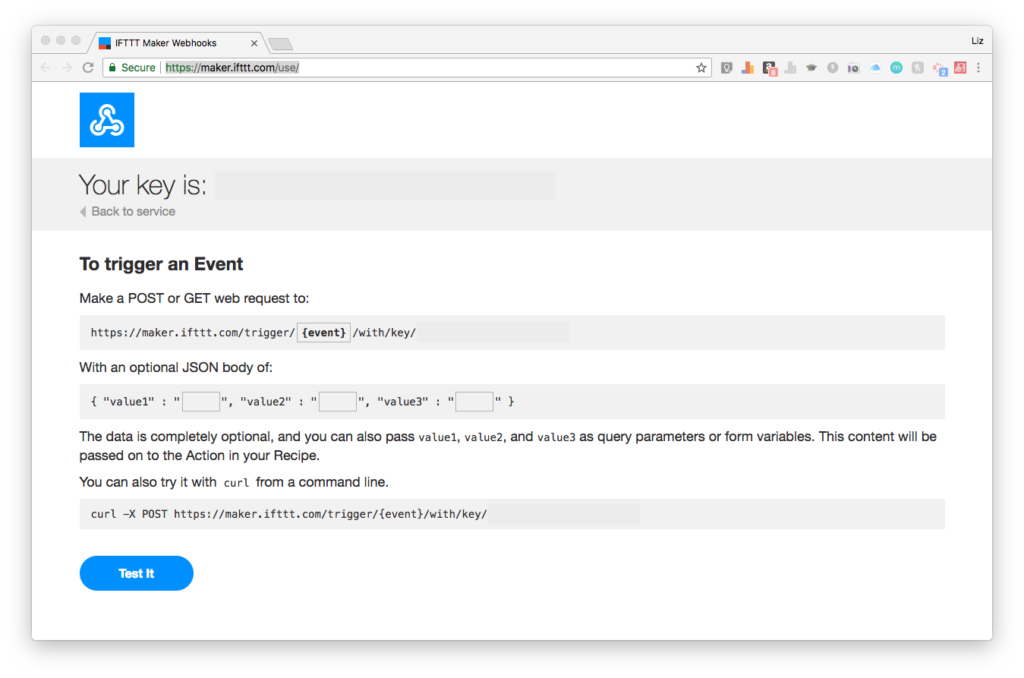
Copy the key information. Now open up your Wemos program and define two IFTTT parameters: MakerIFTTT_Key[] and MakerIFTTT_Event[].
The IFTTT Key is the key you copied from the Documentation page on IFTTT. The {event} is the name of the event you want to track. I’ve named mine “wemos-trigger”.
// IFTTT Maker parameters:
char MakerIFTTT_Key[] = "your-ifttt-key"; // Obtained when setting up/connecting the Maker channel in IFTTT
char MakerIFTTT_Event[] = "wemos-trigger"; // Arbitrary name for the event; used in the IFTTT recipe.
Then, we’ll define a WiFiClient client and our potentiometer pin (pot). When all’s said and done, this is what your code should look like.
WiFiClient client;

#define pot A0      // will be reported as "value1"
Now, we’ll set up the wifi connection. I’ve created a separate method for this, called setupWiFi().
void setupWiFi(){
  Serial.println();
  Serial.println();
  Serial.print("Connecting to ");
  Serial.print(ssid);
  Serial.println("...");

  WiFi.begin(ssid, password);
  int retries = 0;
  while ((WiFi.status() != WL_CONNECTED) && (retries < 15)){ retries++; delay(500); Serial.print("."); } if(retries>14){
    Serial.println(F("WiFi conenction FAILED"));
  }
  if (WiFi.status() == WL_CONNECTED){
    Serial.println(F("WiFi connected!"));
    Serial.println("IP address: ");
    Serial.println(WiFi.localIP());
  }
  Serial.println(F("Setup ready"));
}
This method will use your SSID and Password info to connect to your network. It allows 15 tries before it completely fails. We’ll call setupWiFi() method in our setup() method after initializing the serial monitor Serial.begin(115200). Lastly, we’ll set the pinMode for our potentiometer. Here’s the updated code.
void setup() {
  Serial.begin(115200); //set the baud rate for Wemos D1 mini
  setupWiFi(); //call our WiFi method to connect to the internet
  // the input pin for this example
  pinMode(pot, INPUT);
}
Upload the code to your Wemos, and verify that you can connect to your network. Then, move on to Step #2.
Step #2: Publish readings to an “Event” using the Webhooks channel

This is where the magic happens! We’re going to publish information from the Wemos to IFTTT using a POST Request. I modified this code from a tutorial I found using an Ethernet shield, so full credit for these helper methods goes to Neil Webber.
Essentially, two helper methods help construct the POST data (aka, what we want to send to IFTTT). Then there’s a POST trigger method that fires the data up to IFTTT.
I’ve updated the code with these new methods. Neil did a great job of documenting each line, so it’s fairly easy to figure out what’s going on here.
// *** helper functions for constructing the POST data ***

// append a string or int to a buffer, return the resulting end of string
char *append_str(char *here, char *s) {
    while (*here++ = *s++)
	;
    return here-1;
}
char *append_ul(char *here, unsigned long u) {
    char buf[20];       // we "just know" this is big enough

    return append_str(here, ultoa(u, buf, 10));
}

// Send a POST to trigger the IFTTT/Maker event
void updateEvent() {
    // connect to the Maker event server
    client.connect("maker.ifttt.com", 80);

    // construct the POST request
    char post_rqst[256];    // hand-calculated to be big enough

    char *p = post_rqst;
    p = append_str(p, "POST /trigger/");
    p = append_str(p, MakerIFTTT_Event);
    p = append_str(p, "/with/key/");
    p = append_str(p, MakerIFTTT_Key);
    p = append_str(p, " HTTP/1.1\r\n");
    p = append_str(p, "Host: maker.ifttt.com\r\n");
    p = append_str(p, "Content-Type: application/json\r\n");
    p = append_str(p, "Content-Length: ");

    char *content_length_here = p; // we need to remember where the content length will go, which is:

    p = append_str(p, "NN\r\n"); // it's always two digits, so reserve space for them (the NN)
    p = append_str(p, "\r\n"); // end of headers
    char *json_start = p; // construct the JSON; remember where we started so we will know len

    // As described - this example reports a pin, uptime, and "hello world"
    Serial.println("Sending values to IFTTT");
    p = append_str(p, "{\"value1\":\"");
    p = append_ul(p, analogRead(pot));
    p = append_str(p, "\",\"value2\":\"");
    p = append_ul(p, millis());
    p = append_str(p, "\",\"value3\":\"");
    p = append_str(p, "hello, world!");
    p = append_str(p, "\"}");

    // go back and fill in the JSON length
    // we just know this is at most 2 digits (and need to fill in both)
    int i = strlen(json_start);
    content_length_here[0] = '0' + (i/10);
    content_length_here[1] = '0' + (i%10);

    // finally we are ready to send the POST to the server!
    client.print(post_rqst);
    client.stop();
}
First, we collect a reading from the potentiometer using the analogRead(pot) method. The Webhook service on IFTTT allows you to send 3 values in a POST. I’m not using the other 2 values (other than accumulated time and a string “hello world”). Feel free to modify this for additional information or sensors connected to your Wemos.
Step #3: Collect readings from the potentiometer
So rather than publish every single potentiometer reading, I want to only send a POST when the potentiometer reading is different than the previous reading. I also want to account for a +/- 10% difference in readings. Therefore, we will only send a reading to IFTTT when the potentiometer reading is less than 90% of the current reading or greater than 110% of the current reading. To do this, I’ve created a separate method called checkSensorThenPub().
//*** conditional POST to IFTTT ***

void checkSensorThenPub(){
  Serial.println();
  Serial.println("Calculating Sensor Readings... Please wait...");
  int currPotValue = analogRead(pot);
  int minus10perc = currPotValue*0.90;
  int plus10perc = currPotValue*1.10;
  Serial.print("Current Reading: ");
  Serial.print(currPotValue);
  Serial.print(" | -10 Percent: ");
  Serial.print(minus10perc);
  Serial.print("% ");
  Serial.print(" | +10 Percent: ");
  Serial.print(plus10perc);
  Serial.println("%");
  delay(10000);
  int newReading = analogRead(pot);
  if(newReading > plus10perc || newReading < minus10perc){
    Serial.println("Value change detected!");
    Serial.println("Sending new IFTTT message...");
    updateEvent();
  }
  else{
    Serial.println("No change detected. Standby for 30 seconds ...");
  }
  delay(30000);
}
First, we read the potentiometer reading and store it in a variable, currPotValue. Then we calculate our thresholds (minus10perc and plus10perc). Then we delay for a timeframe (10-30 seconds) and collect a second reading. If the second reading is greater than plus10per or less than, we call the updateEvent() method.
Call this method in your loop() method, and upload it to your Wemos!
void loop(){
  checkSensorThenPub();
}
You can make modifications to this code depending on your application! Download the full Arduino sketch, below.
Here’s your download!
Arduino to IFTTT Sketch (.ino)
Step #4: Create an Applet in IFTTT to receive notifications from the Wemos
Before we can fully test this out, you’ll need to create an Applet in IFTTT to receive notifications. Out of all the steps, this one is the easiest to configure, so congrats for making it this far!
- Open IFTTT (either the smartphone app or the browser version).
- Click on “My Applets”
- Choose the New Applet button in the top right
- On the New Applet Page, click the +this blue button
- It will say “Choose a service”. Type in Webhooks in the Search Services textbox. choose Webhooks when it appears.
- Then, for Step 2 Choose trigger, select “Receive a web request”. Type “wemos-trigger” in the Event Name field. Press “Create Trigger” button
- Next, click the +then button.
- For Choose action service, type in “Notifications”. Select the Notifications option.
- Then, for the Choose action page, pick “Send a notification from the IFTTT app.” This requires the IFTTT app installed on your smartphone (or access to the Activity page in your browser).
- On the Complete action fields page, click “Create Action” button
- Finally, review and finish the Applet. Click the “Finish” button
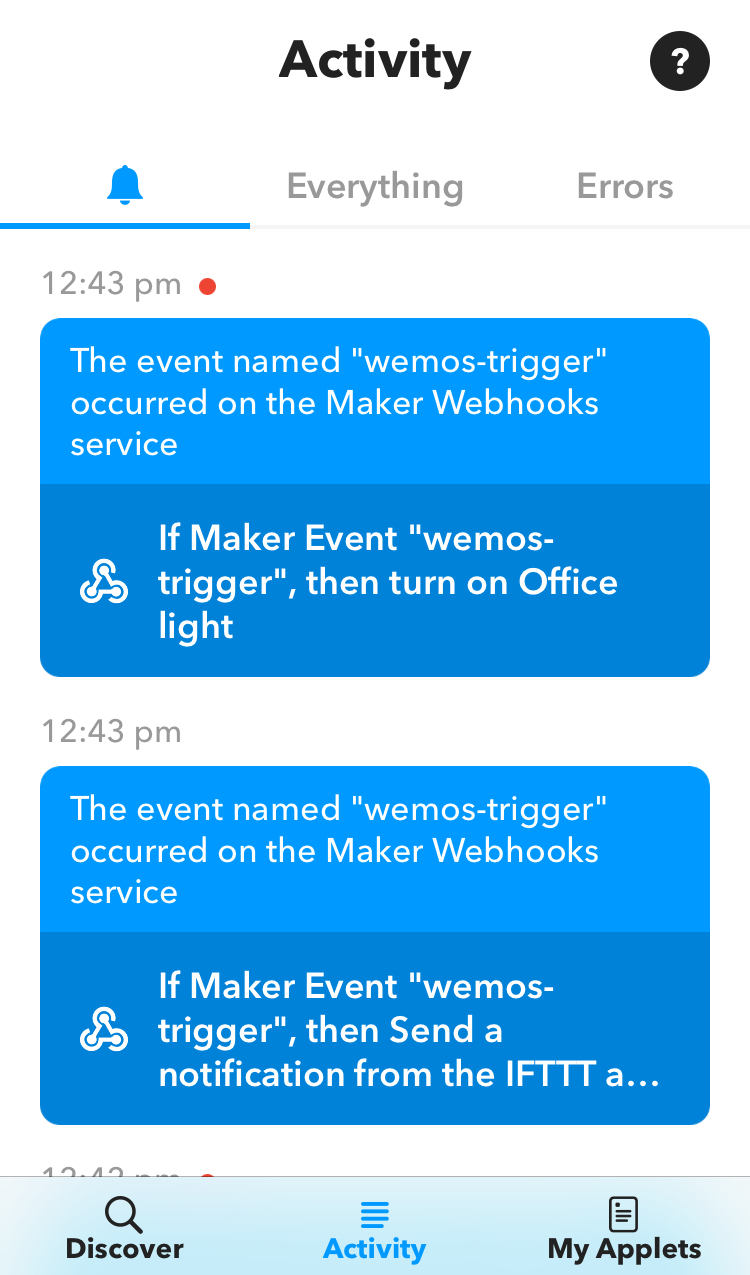
Your Applet should be “ON” and ready to use. If your Wemos is connected to the Internet, and sending data, you should receive a notification in the IFTTT app or on the Activities page!
The default values should be the potentiometer reading, the accrued time, and “hello world”. If you changed this, it’ll be whatever you set values 1-3 in the updateEvent() method.
Here’s what the notification looks like on the IFTTT iPhone App.
Wrapping Up & Next Steps
And that’s it! We have our Arduino controller talking to IFTTT. Like I mentioned at the beginning of the article, the goal is to create a trip sensor to turn on my Philips Hue lights. This should give you a pretty solid start to solving this (and other IoT) projects using Arduino and IFTTT.
Questions, comments, concerns? Drop them below. Happy to help you get your Arduino and IFTTT device up and running!


6 Responses
How to make the update Event function for the ultrasonic Sensor for example, if the threshold of the sensor value crossed than I want to send a notification like if I m measuring the level of water in the tank and it crosses my threshold then the app will show me the notifications of this…? I want to know about how I program the void updateEvent(). I appreciate your time and consideration…
Ghayoor, you can choose when to send information from the Ultrasonic using the
checkSensorThenPub()method. Then in theupdateEvent()method, you can choose what you want to display in the IFTTT message. Good Luck ~Liz from Learn Robotics | Enjoy our content? Please consider sending us a coffee.