

There are many feats of learning robotics online. Besides plugging in your board and downloading the “blink” sketch, it’s important to learn more about digital inputs. The epitome of digital inputs is push buttons. Push buttons are used for a variety of applications to trigger events. In this tutorial, we’re going to explore how to record a push button using Arduino.
It’s a pretty awesome showcase project, so if you’re looking for Arduino projects that “amaze,” this is certainly on the list.
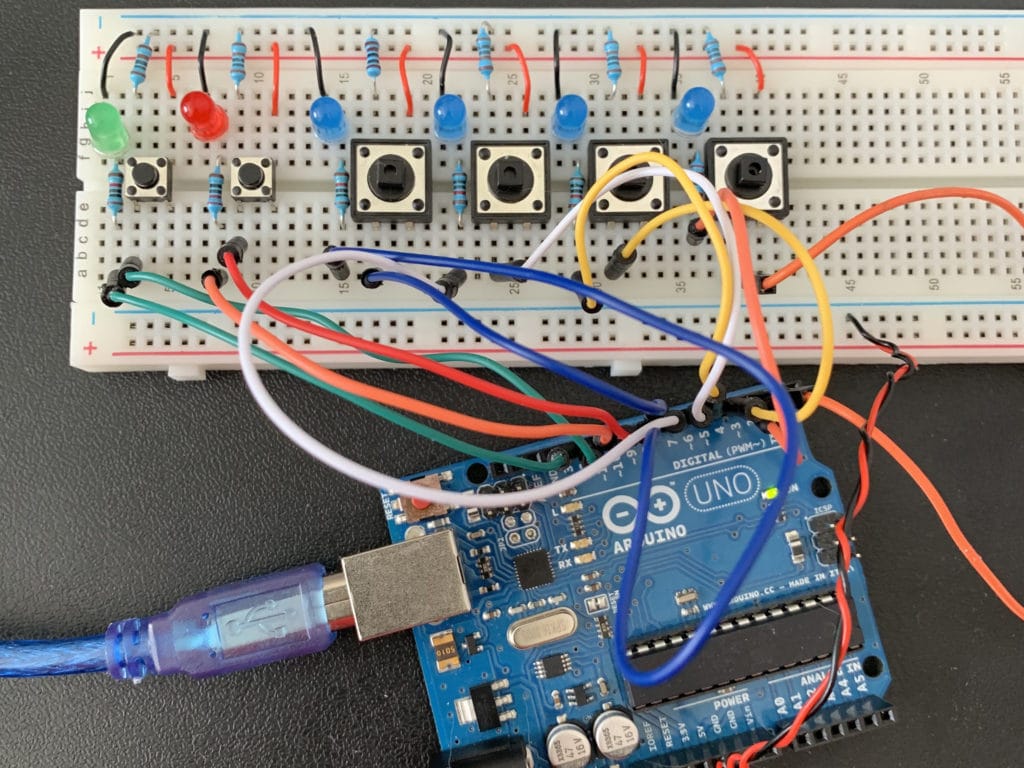
In our prototype, we’ll use four buttons to record the sequence and two buttons to choose our mode (play or record).
Check out the image below to see what this project looks like assembled.
What You’ll Need to Build this Project
You will need the following parts to create this project. This Arduino Kit has all of the parts you’ll need.
- Assorted jumper wires
- Arduino Uno
- Breadboard
- 4x Blue LEDs
- 1x Red LED
- 1x Green LED
- 6x Pushbuttons
- 6x 10KΩ resistors
- 6x 220Ω resistors
You may also make this on a PCB and solder the components together for a cleaner-looking device.
Before we start, I recommend brushing up on the example debouncing sketch. We’ll use debouncing to verify that each button has been triggered. Then, we’ll store the respective button press into an array.
If you’ve never used arrays in Arduino or C/C++, then I recommend checking out this primer.
We’ll review how they work throughout this tutorial, but you might need an additional reference while building this project. Now that we have an overview of the project, gather the materials, and let’s start building the circuit.
Build the Push Button Array for Arduino

I always build the circuit first so that I have it available to test while I’m coding. Here’s a Fritzing wiring diagram. Connect the components according to the drawing. Then, when you’re finished, meet me in the next section to start programming!
The 10KΩ pull-down resistors are connected to the button. They keep the input voltage “pulled down” to ground so that the Arduino reads LOW when not pressed. The 220Ω resistor connects to the positive leg of the LED to prevent burnout.
Remember that LEDs have polarity, so they’ll need to be plugged in correctly.
Two things to know about Arduino Arrays
Now that we have our circuit built, it’s time to talk about Arduino Arrays. More specifically, we’ll be using single-dimension arrays in our code. Arrays allow you to group the same type of data and assign an index. Here’s the syntax for declaring an array in Arduino.
int myArr[5]; //declare an array with a size of 5 called myArr
You can also initialize the array by giving it values in the declaration.
int myArr[5]={1,3,2,7,4}; //myArr has values 1,3,2,7,4
To access these values, you’ll use the array’s index. The index for an array starts with 0 and increments by 1. You’ll use the inner brackets of the array to define the index. For example, you’ll notice that at the 3rd index, the value is equal to 7. At an index of 1, the value equals 3.
myArr[3] == 7
myArr[1] == 3
If you want to change the value of a specific index in an array, you can use the assignment syntax shown below.
myArr[3] = 4; //sets the value of myArr at index 3 to 4
Now when you return the array, you’ll get this set of values:
{1,3,2,4,4}
Arrays are helpful because you can iterate through them and get or set data. We can use for-loops to print out or set the array values. Here’s an example of “initializing” myArr[5] to zeros.
for(int i = 0; i<5; i++){
    myArr[i] = 0;
}
If you’ve seen arrays before, this is nothing new. If not, check out Arduino’s Array page. It’s packed with information and examples of arrays. This will best prepare you for understanding this project.
We’ll be using arrays to keep track of which buttons have been pressed, and which LEDs should be on/off. I also want to point out, that you’ll have to access the array’s index to assign it a value.
You cannot “append” to an array like you can a list in Python. This makes sequencing our button project a little trickier, which we will talk about in a bit.
Write Code using Arduino Push Buttons
First, we’ll create our code by defining any necessary libraries or globals.
Need an Arduino refresher? This tutorial covers the basics.
int play_led = 13; //define pin # for play led
int record_led = 11; //define pin # for record led
Configure an array of buttons and LEDs. Both are of size 4. Use the pin numbers for the array values.
int button[4] = {2,4,6,8}; //store button pins in an array
int leds[4] = {3,5,7,9}; //store led pins in an array
We’ll also need an array to store the sequence. I’m setting the maximum sequence length to 10.
int arr[10]; //store the sequence in an array of size 10
Then, bring over some variables from the debouncing sketch and a couple of helper variables for the project.
boolean previous = LOW;
unsigned long time1 = 0;
int debounce = 200;
int index_state = 0;
int state = HIGH;
boolean empty = false;
int record_count = 0;
We’ll use these to keep track of the button state (HIGH/LOW).
Secondly, configure the setup() method to initialize the LEDs as OUTPUTS and buttons as INPUTS. You’ll also need to initialize the sequence array. I recommend assigning a number we won’t use or see for the project. I’ve picked 7, arbitrarily.
void setup()
{
    for(int i = 0;i<5 ;i++){
        pinMode(button[i],INPUT);
        pinMode(leds[i],OUTPUT);
    }
    for(int n=0;n<10;n++) arr[n] = 7;//initialization
    pinMode(record_led, OUTPUT);
    pinMode(play_led, OUTPUT);
    empty=true;
    Serial.begin(9600);
}
You can see we’ve used a couple of for-loops to initialize the buttons and LEDs and to set up our sequence array. I also initialized the Serial Monitor so that we can see print statements for debugging.
Now, let’s work on “playing” back values from an array. We’ll populate the array with button presses later.
Play Back a Sequence using Hard-coded Array
A lot of programming is solving little problems and then adding features along the way. To eliminate “debouncing” we can hardcode a sequence array with some test values and make sure we can play them back on the LEDs. Let’s develop a quick method called playback().
void playback(){
  digitalWrite(play_led,HIGH); //turn green led ON
  digitalWrite(record_led,LOW); //turn red led OFF
  for(int i = 0; i<10; i++){ //set the appropriate LED HIGH then LOW according to sequence array
    if (arr[i]!=7){
       digitalWrite(leds[arr[i]],HIGH);
       delay(250);
       digitalWrite(leds[arr[i]],LOW);
       delay(250);
    }
  }
  digitalWrite(play_led,LOW);
  for(int n=0;n<10;n++) arr[n] = 7; //clear array for next time
}
Playback will grab data from the sequence array then look through the array and turn on the appropriate LED. Just make sure that you have your LEDs and buttons in the same order index or things will get mixed up! Now that we can playback a sequence, go ahead and assign some values to the sequence array. You can test this method by calling it in loop().
int arr[10] = {1,0,3,2,2,0,2,1,3,0}; //initialize arr[]

void loop(){
    playback();
}
You should see the respective LEDs light up when you run the code.
Now, let’s incorporate our buttons into this program.
Take a few minutes and write up the code yourself, or download our Digital Guide, below:
You’ll notice I’ve already added in the global variables, playback, and play/record methods. Let’s talk about how this works, and what you need to do to make the project work!
Modifying the Example Code for Sequence Buttons
In the play_record() method, you’ll use debouncing to check the previous and current state of the buttons. The mode is determined by the current reading of any of the buttons. When the previous mode is LOW, we’ll go through and collect another mode reading.
Then, we’ll check to see which button was pressed. If it’s any of the sequence buttons, we’ll add the button’s index number to the current index of the sequence array. We’ll also turn on the corresponding LED to show the user the button was pressed.
Lastly, we’ll shut off all the LEDs. This process is repeated for as many buttons that you have in the array.
So, if you have four buttons, you’ll need to write four if-statements to check for each.
Use Play and Record Buttons to Trigger Events
For the Play and Record buttons, you’ll want to trigger the playback() method or write values to the sequence array, respectively.
The main takeaway with this is that you DO NOT want to add values to your sequence array. So, the sequence array index is set to -1.
We have already covered the playback() method, so no need to rework it here. You can just call this method when the play button is pressed. For the record button, you’ll want to turn the record LED on. Then, create a record_count variable to track how many times the record button has been pressed.
If it’s been pressed once, it’s the start of the sequence. Because of this, we’ll need to add a condition to our sequence buttons from above.
In the example code, you’ll notice this condition:
if(digitalRead(button[0]) && record_count==1)
When we press the button, the record_count will increment by 1. We want to make sure the record_count is equal to 1 and the button has been pressed to update our array.
When the record_count is greater than 1, we’ve stopped recording, so we don’t want to override our array values. All we need to do is shut off the record LED and reset our record_counter.
Here’s an example of this conditional.
 //... continued above ...
    else if(digitalRead(10)){ //record
      //erase stored values from array
      digitalWrite(record_led, HIGH); //turn on record led
      digitalWrite(play_led,LOW); //shut off play led
      index_state = -1; //no index
      record_count++; //increase the counter
      //Serial.println(record_count);

      if(record_count <= 1){
        all_off();
      }
      else{
          digitalWrite(record_led,LOW);
          record_count = 0; //reset the counter
      }
    }
     // ... continued below ...
Once you have all the conditional statements written for each sequence button and mode button, you’re ready to do some testing.
Test and Modify the Recorded Sequence
The most fun in this project is getting it to work! (As with anything…) I recommend playing with the prototype and verify that it works the way you expect it to.
As a user, you’ll be looking for visual cues that the prototype can both record a sequence and play it back.
Some specific things you’ll want to verify include:
- Showing which button was pressed when it was pressed;
- Handling double presses: when a user presses the same button twice;
- Re-recording sequences without having trailing or “ghost” values from previous iterations;
- Over-indexing: trying to put more than 10 values into the sequence array.
You may also want to add specific features to this prototype. One idea is to record and store previous sequences so that they can be “replayed” at any time. Rather than erasing the array on playback, you find a way to store that sequence for access later.
The possibilities are endless with this project. You may opt to replace the LEDs with a buzzer and send specific pitches to create a song. You could expand the number of buttons used to accommodate further conditions.
Lastly, you can add duration detection to the buttons. Rather than HIGH/LOW, you can record how long the button was pressed and keep the LED on for that duration.
Have a question about this project? Leave a comment below.
Looking for the code? Here’s the link.
If you thought this tutorial was a bit too advanced, I recommend checking out my Beginner Robotics Certification. It’s the best way to take hobby projects like this and “professionalize” your skills so that you can work in the robotics and tech industries and get paid for your technical talents.


21 Responses
Hi… Can I get the complete coding as my project
Yes, there’s a link to it in the article above
Hello,
You said: “Then change the index of the button you’re checking and LED you’re turning on.”
How do i change the index of the button?
Thanks in advance
The buttons and LEDs are represented by arrays, which tell you where it’s connected to the controller. For example, referencing index 2 for the buttons is
button[2]which means the 2nd position in the button array, which is the button connected to pin 4 (as defined in this example). Hope this helps! ~Liz from Learn RoboticsIt’s not working for me.
Can you give an example final code of all 4 lights and buttons?
We have the full example code on BuyMeACoffee – feel free to check it out and support blog content like this. Thanks ~Liz from Learn Robotics