

The holiday season is in full swing, and what better way to celebrate than with some robotics and prototyping! Regardless of what religion you believe in, these projects are designed to help you build technical and programming skills. We’ll be creating projects for celebrations around the world, so feel free to send us your holiday idea to info at www.learnrobotics.org.
The first holiday we’re going to celebrate is Hanukkah. Hanukkah is eight days long and starts December 2 through December 10th this year. Hanukkah is a Jewish holiday commemorating the rededication of the Second Temple in Jerusalem at the time of the Maccabean Revolt against the Seleucid Empire. You can read more about the religious celebration of Hanukkah here.
Create your own Arduino Hanukkah Menorah

For this project, you don’t have to know anything about Hanukkah except that we’ll be creating a Menorah. A Hanukkah Menorah is a type of candelabra that holds 9 candles. The center candle is called a Shamash. On either side of the Shamash there are four candles. Also, the Shamash is used to light the other candles. Finally, the candles are lit from right to left.
Why does this matter? We will use this information to develop both the hardware, and the software for the Menorah.
Wire Your Menorah on a Breadboard
First, let’s build the circuit for our Arduino Hanukkah Menorah. Here’s a wiring diagram for reference.
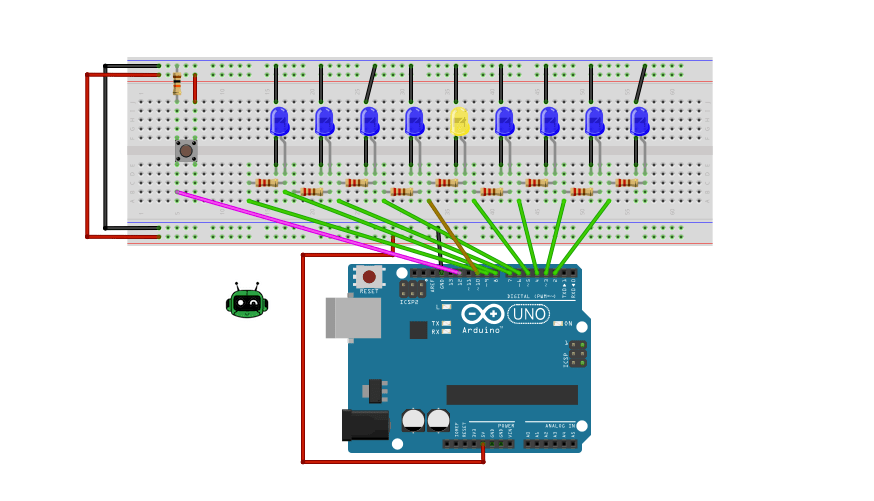
You will need 8 blue LED’s, one white LED, 9 220-ohm resistors, one 10K-ohm resistor, one push button, some jumper wires, a breadboard, and an Arduino. You can pick up an I/O kit and an Arduino Uno, which has everything you need for this project. If you plan on doing additional Arduino projects, I recommend this kit because it includes a lot of modules for the price.
Remember to wire the LED’s with the correct polarity. The curved side will be plugged into a resistor, and the flat side will connect to ground.
If you’ve never wired a breadboard before, I recommend reading this overview first. Also, this tutorial assumes you have some basic experience with Arduino. If not, check out our Four Steps to Writing an Arduino Program before proceeding. We will not be setting up software in this tutorial.
Once your board is wired up, it’s time to write the program.
Write Code for the Arduino Menorah
Ideally, here’s how our Arduino Menorah will work.
When we press the button, the Shamash will light up and the first, right-most LED will turn on. Then as we press the button, subsequent lights will turn on from right to left. Finally, when we’ve reached the very last light (LED #8), and press the button again, the whole menorah will shut off.
We will use pins 2 through 10 to control the LED’s. The Shamash will be on pin 10. The button is connected to pin 12. Define some global variables to represent the pins. Then initialize the LED’s as OUTPUTS and the button as an INPUT. Next, begin the Serial monitor using the following code: Serial.begin(9600);
Now, we’re ready to create functionality for the Menorah. Because we’re using a button to turn on the LED’s, I recommend moving over the debouncing code. Copy the global variables and loop() method from the example Debounce code (File > Examples > Digital > Debounce).
Create a new method called lightMenorah() and paste the contents of loop() inside of it. We’re ready to modify this code. The Debounce code was written to control a single LED when the button is on (HIGH). We’ll change it so that when the button is HIGH, the Shamash is lit and then the first LED turns on. Here’s what the method looks like:
You’ll notice I created a counter so that we can illuminate the correct LED as the button is pressed. The main reason why the LED’s are plugged into consecutive pins, is to take advantage of the digitalWrite(pin, state) method. So, on each button click, we’ll increment the counter and light the “start” pin plus the counter. Then, when the counter hits 8, we’ll reset the counter to zero and shut off all of the LED’s.
We can control all of the LED’s using a digitalWrite(pin, state)inside of a “for” loop. Here’s an example of the allOff() method to shut off all the LED’s.
Lastly, call the lightMenorah() method in loop(), and test it out! Here’s a good reference if you’ve forgotten how to download code to your Arduino. I always recommend trying to write the code yourself, first before taking the answers. But if you’d like to compare your solution to mine, you can download the example code, below.
Download Menorah Code Here (.ino)
If you enjoyed this tutorial, be sure to Share it with a Friend! Tag us in your photos on Facebook & Instagram (@learnrobotics). And, if you’re feeling festive, feel free to Buy us a Coffee for the Holidays!


