

Halloween is near, and I’ve had a lot of requests for another Arduino Halloween Project. If you didn’t get a chance to look at my Animated Skull project, definitely check that one out too!
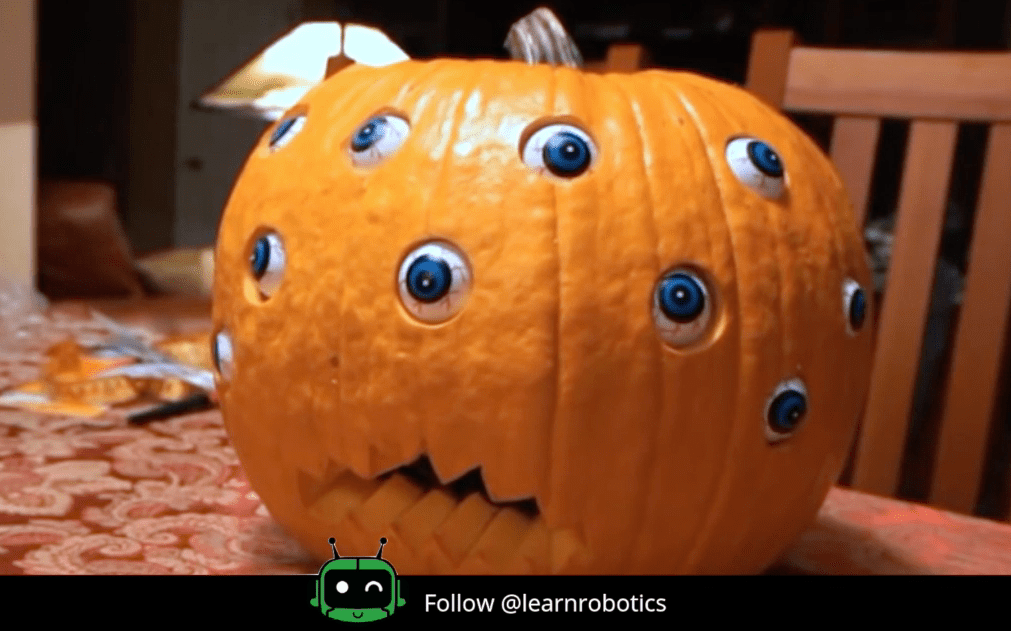
For this activity, we’re going to be making Twitching Eyeball Pumpkins. (Shoutout to 68percentwater for this idea!) The goal is to scare people with this monster-like decor! This project is really fun to do with the family or independently for fun. Set aside a half-day to carve, assemble, wire, and code your very own Twitching Eyeball Pumpkin.
Carve your Pumpkin
I highly recommend using a “funkin” or foam, synthetic pumpkin for this project. Funkins can be carved like regular pumpkins and will avoid all of the “guts” (and glory) that could damage your Arduino and Electronics. If you do decide to get a real pumpkin, you’ll have to place your Arduino and wiring into a plastic bag or case. Again, I highly recommend just opting for the funkin and making your life easier! (Plus, funkin is really FUN to say!)
Once you have your pumpkin picked out, it’s time to carve the pumpkin. Remove the insides as if you were making a jack-o-lantern. Then create some eye slots. Buy a bag of 12 to 20 plastic eyeballs, and cut the holes slightly smaller than the eyeballs. You’ll need one hole per eyeball. If you want the cuts to look cleaner, use a hole saw kit with a drill. Space out the eye slots so that they’re well distributed across the surface of the pumpkin. Next, carve out a mouth. Feel free to make this whatever shape you’d like! For added effects, buy glow-in-the-dark eyeballs!
Now we’re ready to build some eyeball assemblies!
Twitching Eyeball Servo Assemblies
We’ll be using twelve 9g servos (one servo per eyeball), wooden dowels, paper clips, and 1″ PVC pipe couplings to make our twitching eyeball assembly.
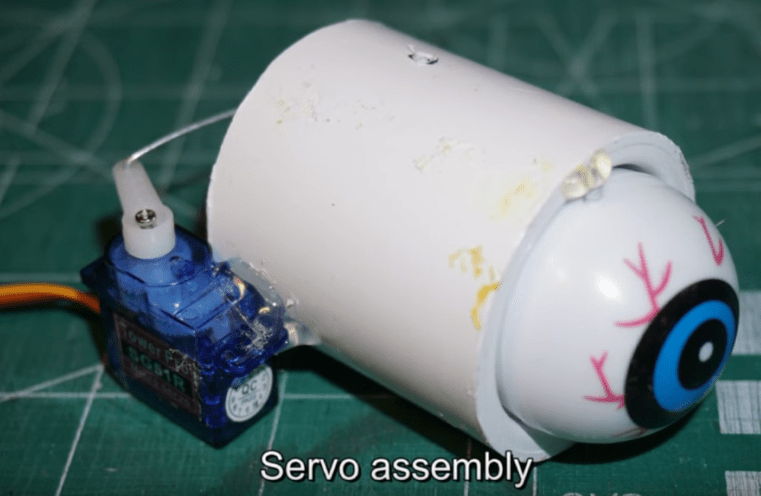
First, drill a nail through the middle of eyeball. Then, place the eyeball on the outside of the PVC pipe coupling. Make sure the eye faces outwards. Use hot glue over the nail (top and bottom) to secure the eyeball to the outside of the PVC pipe coupling.
Then cut 1″ of the wooden dowel. Drill a small hole into the end of the wooden dowel. Secure the dowel to the back of the eyeball with hot glue. Next, connect the wooden dowel to the plastic servo horn with a paper clip.
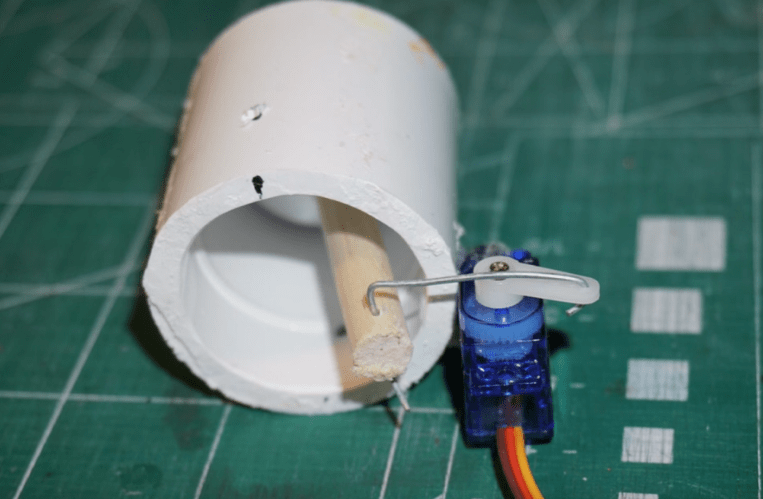
Finally, mount the servo to the outside of the PVC pipe coupling using hot glue. Then secure the servo horn to the servo with a screw.
Repeat this process eleven more times or until you’ve created all of your eyeball assemblies. When you’re finished, move on to wiring up the electronics.
Arduino Halloween Project Electronics
We’ll be using an Arduino Uno for this project. If you’d like to practice your soldering skills, pick up a prototyping shield and solder your wires to it using the diagram below. Otherwise, use a breadboard, and create your connections. If you’re looking for a really clean, easy way to set this project up, just pick up a Sensor Shield V5.0 for Arduino Uno.
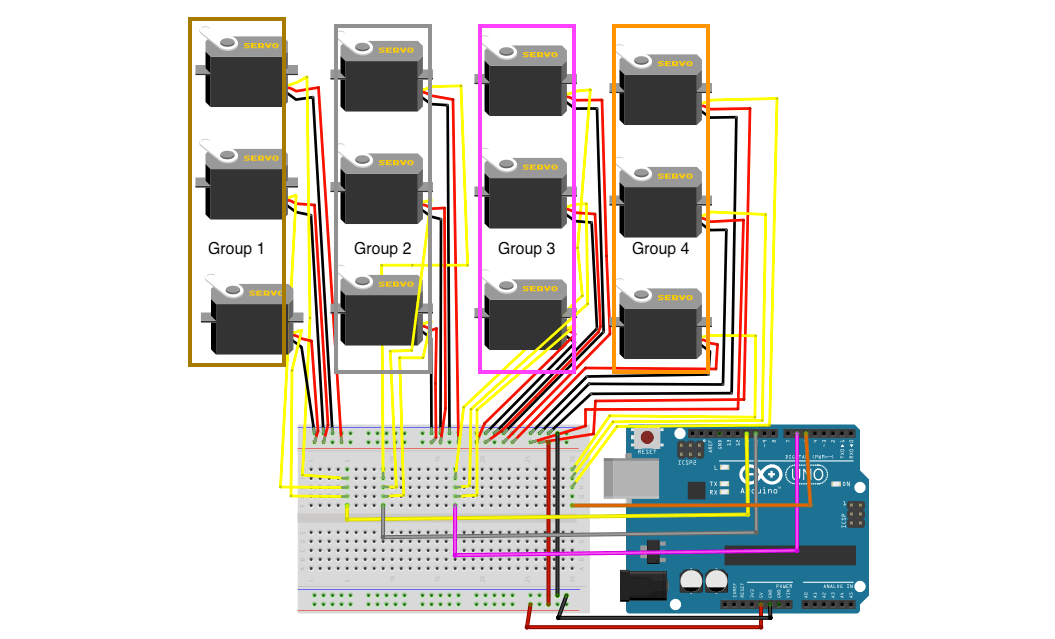
You’ll notice that we’ve created 4 groups of 3 servos/eyeball assemblies. Each group will run off of the same signal pin. (More about this in the software section). I chose to use pins 11, 10, 6, and 5, but feel free to choose any available PWM pins for these groups.
We’ll use 18650 rechargeable batteries and a battery holder with switch to power the electronics. This will connect into the barrel jack on the Arduino. You can also power the system with 4X AA batteries and a AA battery holder.
Once you have your system wired up, it’s time to write the code.
Program Eyeball Twitches
We’ll use the Servo class to help with this project. As I mentioned before, we want to create four groups of three servos. Each group will be driven off of the same signal pin. Therefore, three servos will share the same movement or pattern. This is beneficial because we are limited to six PWM pins. We only need four for this project.
The idea behind the code is to randomly select a position for each group, move the servo into position, delay, then move back to the starting position. If you’ve never worked with Arduino before, I recommend learning the four steps to writing any Arduino program, before proceeding with this project.
Give the code a shot on your own. If you get stuck you can download the example code below. Remember, if your goal is to use this project as a learning experience, it’s not wise to start off with the example code. Try to solve the code on your own, then use the sample code to compare your work.
[pretty-locker id=”339508″]Download the Sample Code Here (.ino)
When you’re finished, you should have something similar to below!
Again, thanks to 68percentwater for the inspiration behind this project. If you have any comments or suggestions to make this pumpkin scarier, comment below! If you enjoy these types of projects, be sure to follow us on Facebook (@learnrobotics). We send special tutorials, discounts, and announcements to our community.


4 Responses
How long would the batteries last in a typical set-up. I’ve seen this project elsewhere and one of the big problems expressed was the amount of current that the servos draw. Is this an issue?
Jason, good point. Yes, the batteries will drain if you’re planning to keep it running. Depending on what battery you use this could be 20 hours to a day. Arduinos are constantly drawing current ~15mA a cycle even if they’re doing nothing. I recommend keeping it plugged into a wall adapter for the time you’re planning on having it on display.
Adding sound would be nice!
Yes, definitely! Pretty easy to do, as well. All you’d need is a speaker & an SD card with whatever song you’d like! Nice idea!