

Halloween is quickly approaching. And, what better way to learn robotics than to make an animated skull using Arduino. In this tutorial, I will walk you through how to make a moving and glowing skull to put on your doorstep and scare trick-or-treaters!
Here’s what it’ll look like when it’s finished! Ready to build yours?

Scare Trick-or-Treaters as They Walk By
The purpose of this device is to move and glow as a person walks by. To do this, we will retrofit a plastic skull with LEDs, a servo motor, and an ultrasonic sensor to develop our scary prototype.
There are three main parts to this project:
- Adding glowing eyes with LEDs
- Rotating skull with a servo motor; and
- Motion detection with an ultrasonic sensor
I recommend following these parts in order. If you’re more advanced, feel free to add in features to customize the look and reaction of your animated skull.
Animated Skull using Arduino: Glowing Eyes
First, let’s put together the LEDs for our glowing eyes. We’re going to start by soldering 22AWG wires to the LEDs. This will make it easier to connect them to our Arduino Uno and breadboard. If you don’t have a soldering iron, I recommend this one from Amazon (aff link).
The goal is to lengthen the LED leads and thread them through the plastic skull. To start, solder a red wire to the anode (+) side of the LED. Then attach the black wire to the cathode (-) flat-side of the LED with solder.
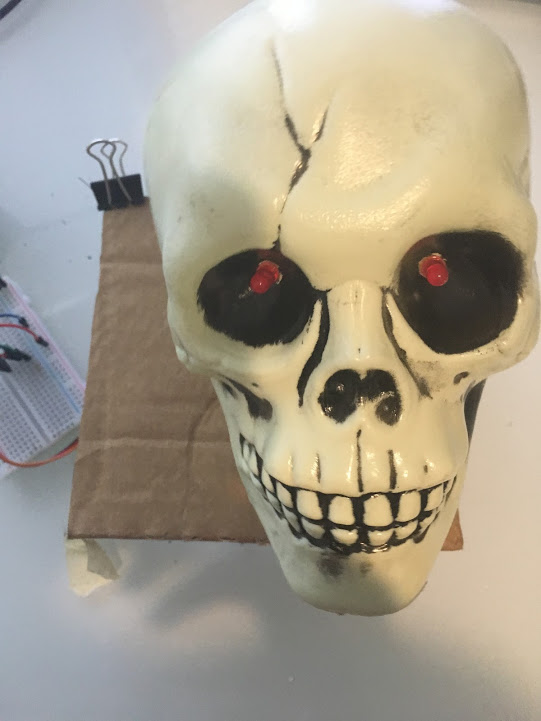
Next, drill a hole in the back of the skull. I used the largest drill bit I had on hand. Cut a hole into the skull’s eye socket using the drill. This is where the LED eye will go. Use a drill bit slightly larger than the LED bulb so that it doesn’t fall through.
Then, feed the wiring through the eye hole to the hole in the back of the skull. Use masking tape to secure the wiring so that it doesn’t fall back through! Repeat the steps above for the second eye. Here’s what it looks like when you’re done!
Attach the Servo Motor to make the Head Rotate
Now, we’re ready to attach the servo motor to the bottom of the skull. Drill a couple of small holes into the base of the skull. Then fasten the servo horn to the skull using the provided screws. Before we fully attach the skull, we need to create a mount for the servo motor. I used a cardboard box, but feel free to design, 3D print, or build a stand for your animated skull.

Carefully Cut a small rectangular hole into the cardboard using a box cutter. Then carve out a channel for the wires. Remember, the skull will be rotating, so we need room for the wires to move freely!
Push the servo into the rectangular hole. It should be snug and secure in the cardboard. Then, press the skull and servo horn onto the servo. We’re now ready to add in the trip sensor – our Ultrasonic Sensor!
Mount the Ultrasonic Sensor (Trip Sensor)
Cut two small holes in the side of the cardboard box. Use the same side that the skull is facing. This is where the Ultrasonic Sensor will go. Then, when someone walks up to it, the sensor will be tripped, and the skull will move! Finally, feed the Ultrasonic sensor through the two holes. Run the wires to the back of the display. Now, for the fun part. We’re ready to wire up the electronics and write some software!
Wiring Diagram for Animated Skull
You’ll need to wire the Arduino and each component using the following diagram.

Connect the LEDs
First, attach the LEDs. The black LED wires (cathode) will connect to GND on the Arduino. The red (anode) wires connect to a 220-ohm resistor, then to Digital Pin 10 on the Arduino. You can also opt to control the LEDs separately by plugging one LED into Digital Pin 10 and the other LED into pin 11.
Attach the Servo
Attach the servo to the Arduino. GND goes to GND on the Arduino. The VCC pin on the servo to +5V on Arduino. Lastly, the SIG pin on the servo goes to Digital Pin 3 on the Arduino.
Plug in the Ultrasonic Sensor
First, connect the GND pin from the Ultrasonic sensor to the GND pin on the Arduino. Second, connect the VCC pin on the Ultrasonic sensor to the +5V pin on the Arduino.


3-pin PING sensor
If you’re using the 3-pin PING sensor, connect SIG pin on the Ultrasonic sensor to the Digital Pin 5 on the Arduino.
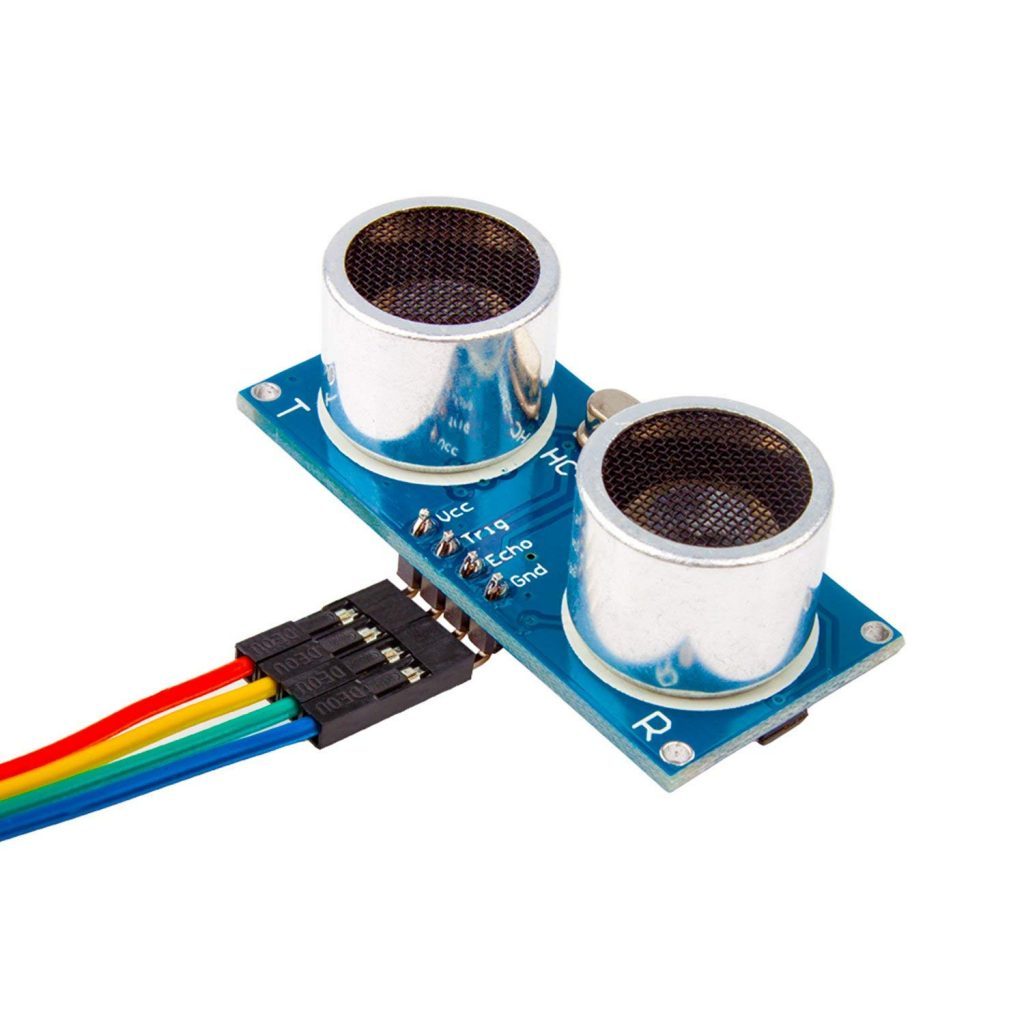
4-pin HC-SR04 Sensor
If you’re using the 4-pin HC-SR04 sensor, connect TRIG from the Ultrasonic sensor to the Digital Pin 5 on the Arduino. Finally, attach the ECHO pin from the Ultrasonic sensor to the Digital Pin 4 on the Arduino.
Now that everything is built and connected, we will move on to programming the device.
Programming Your Animated Skull with Arduino
We want the skeleton head to rotate and the eyes to glow when people or an object is detected in the “red zone”. Refer to the graphic below.
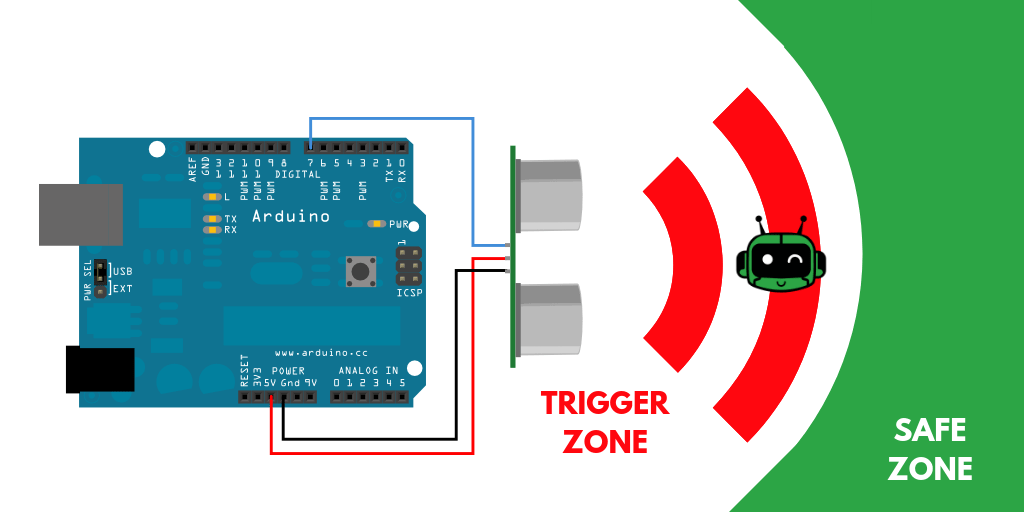
The ultrasonic sensor works similarly to echolocation. An ultrasound wave is sent from the Trig pin until it reaches an object. The ultrasound then bounces off the object is read back in through the Echo pin on the sensor. From this, we can calculate the time between sending the sound wave and receiving it back. This duration is then converted into a distance (in centimeters) using the speed of sound.
Therefore, in order to check for an object in the “red zone”, we will first read the ultrasonic sensor and return our calculated distance.
If the distance is between 20 and 65 cm, we will tell the servo to move and the LEDs to turn on.
If the distance is less than 20 cm or greater than 65 cm, we will tell the servo to maintain its current position and the LEDs to shut off.
Now, let’s translate that into code. Go ahead & give it a shot. When you’ve got your solution (or need inspiration), come back and watch the code walk-through video.
Here’s your download!
Click Here to Download the 3-wire PING code
Click Here to Download the 4-wire HC-SR04 code
I hope you enjoyed this Halloween-themed Animated Skull using Arduino!
If you enjoyed this tutorial, be sure to share a picture of your project on Social Media! Tag me using @learnrobotics on Facebook & Instagram or @learnroboticsx on Twitter!
Then, share this project with your friends!


6 Responses
Hello Liz,
As simple as it is, it didn’t work for me! The servo is turning and go’s back. But the led go’s not on at all. Also the distance sensor did not work. But i noticed there are difference in your wiring diagram and what you write in the text about the wiring. They differ from each other. I have the SRC04. You also talk about pin10 and 11 for the led’s but they are not in your sketch. First problem to solve is that the LED not go’s on at startup, servo is turning. I’m stuck, checked the wiring several times.
Frans, I uploaded the wrong HC-SR04 code! Re-download the files & give that a try! Good catch 🙂
P.S. Once you have it working, be sure to share a quick photo!
Hello Liz,
Can you check the sketch again! It’s looks the same as the Ping Sketch!
Gr Frans
Forget this. I have the correct sketch now. I closed my browser and downloaded the SR04 Sketch and now it’s the good one!
Sorry!
Frans
And it worked! No assembling the skull!
Wonderful! Super happy you got it working! If you have an Instagram tag @learnrobotics in your post! It’d be awesome to see it working!